
怎样通过Blynk服务器在Arduino IDE上DIY气象站
电子说
描述
第1步:了解传感器
BMP180:
说明:
BMP180包括一个压阻传感器,一个模数转换器以及一个带有E2PROM和串行I2C接口的控制单元。 BMP180提供了压力和温度的未补偿值。 E2PROM已存储176位的单个校准数据。用于补偿传感器的偏移,温度依赖性和其他参数。
UP =压力数据(16到19位)
UT =温度数据(16位) )
技术规格:
Vin:3至5VDC
逻辑:3至5V兼容
压力感应范围:300-1100 hPa(海拔9000m至-500m)
高达0.03hPa/0.25m分辨率-40至+ 85°C的工作范围,+ -2°C的温度精度
此板/芯片使用I2C 7位地址0x77。
DHT11:
说明:
DHT11是一款基本的超低成本数字温度和湿度传感器。
它使用电容式湿度传感器和热敏电阻来测量周围的空气,并在数据引脚上发出数字信号(无需模拟输入引脚)。它使用起来相当简单,但是需要谨慎的时间来获取数据。
此传感器的唯一真正缺点是,每2秒只能从其中获取一次新数据,因此,在使用我们的库时,传感器读数可能长达2秒。
技术规格:
3至5V电源和I/O
适用于0-50°C温度读数,±2°C精度
适用于20-80%的湿度读数,精度为5%
转换期间最大电流消耗为2.5 mA(在请求数据时)
步骤2:通过Nodemcu连接
DHT11:
引脚1-3.3V
针脚2-D4
针脚3-NC
针脚4-Gnd
带有Nodemcu的BMP180:
Vin-3.3V
Gnd-Gnd
SCL-D6
SDA-D7
第3步:设置Blynk

Blynk是什么?
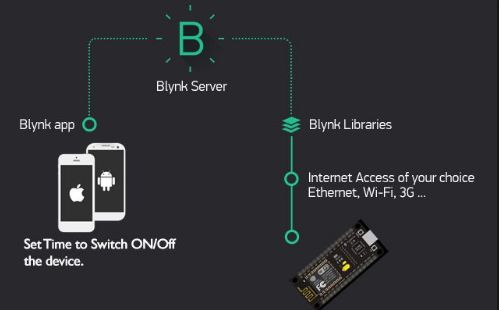
Blynk是一个具有iOS和Android应用程序的平台,用于控制Arduino,Raspberry Pi和
这是一个数字仪表板,您可以通过si为您的项目构建图形界面mply拖放小部件。设置一切非常简单,您将在不到5分钟的时间内开始进行修补。 Blynk并未绑在某些特定的板子或护板上。相反,它是您选择的支持硬件。无论您的Arduino或Raspberry Pi是通过Wi-Fi,以太网还是此新型ESP8266芯片链接到Internet,Blynk都能使您上线并为物联网做好准备。
有关设置的更多信息Blynk:详细的Blynk设置
第4步:代码
//Comments for each line is given in the .ino file below
#include
#define BLYNK_PRINT Serial
#include
#include
#include
#include
#include
Adafruit_BMP085 bmp;
#define I2C_SCL 12
#define I2C_SDA 13
float dst,bt,bp,ba;
char dstmp[20],btmp[20],bprs[20],balt[20];
bool bmp085_present=true;
char auth[]=“Put your Authication key from the Blynk app here”;
char ssid[] = “Your WiFi SSID”;
char pass[] = “Your Password”;
#define DHTPIN 2
#define DHTTYPE DHT11
DHT dht(DHTPIN, DHTTYPE); //Defining the pin and the dhttype
BlynkTimer timer;
void sendSensor()
{
if (!bmp.begin())
{
Serial.println(“Could not find a valid BMP085 sensor, check wiring!”);
while (1) {}
}
float h = dht.readHumidity();
float t = dht.readTemperature();
if (isnan(h) || isnan(t))
{
Serial.println(“Failed to read from DHT sensor!”);
return;
}
double gamma = log(h/100) + ((17.62*t) / (243.5+t));
double dp = 243.5*gamma / (17.62-gamma);
float bp = bmp.readPressure()/100;
float ba = bmp.readAltitude();
float bt = bmp.readTemperature();
float dst = bmp.readSealevelPressure()/100;
Blynk.virtualWrite(V5 , h);
Blynk.virtualWrite(V6 , t);
Blynk.virtualWrite(V10, bp);
Blynk.virtualWrite(V11, ba);
Blynk.virtualWrite(V12, bt);
Blynk.virtualWrite(V13, dst);
Blynk.virtualWrite(V14, dp);
}
void setup()
{
Serial.begin(9600);
Blynk.begin(auth, ssid, pass);
dht.begin();
Wire.begin(I2C_SDA, I2C_SCL);
delay(10);
timer.setInterval(1000L, sendSensor);
}
void loop()
{
Blynk.run();
timer.run();
}
责任编辑:wv
-
如何使用树莓派制作小气象站2020-05-19 0
-
DIY一个基于ESP8266的wifi气象站2022-06-24 0
-
使用ESP8266和ST7735 TFT显示屏设计气象站2022-09-01 0
-
带有BME280的ESP32 Web服务器的高级气象站2021-03-17 1081
-
DIY简单的BME280 Arduino气象站2022-10-27 651
-
使用Arduino和NodeMCU的气象站2022-11-04 511
-
DIY简单气象站2022-11-07 929
-
Arduino气象站项目2022-11-18 470
-
基于Arduino UNO的气象站2022-12-08 538
-
基于Arduino的无线气象站2022-12-19 579
-
Sigfox和Arduino气象站2022-12-22 527
-
Arduino气象站2023-06-20 326
-
Arduino无线气象站2023-06-27 328
-
Arduino在线气象站(NodeMCU)2023-07-04 389
-
使用Blynk应用程序的物联网气象站2023-07-11 261
全部0条评论

快来发表一下你的评论吧 !

