

Adafruit MAX98357 I2S D类单声道放大器的使用教程
电子说
描述
概述
如果您的微控制器或微型计算机具有数字音频功能,则此放大器适合您!它采用标准的I2S数字音频输入,不仅可以将其解码为模拟,还可以将其直接放大为扬声器。完美地添加紧凑的放大声音,需要2个分支(I2S DAC + Amp),并将它们组合为一个。
I2S(不要与I2C混淆)威廉希尔官方网站 板上使用的协议,用于传递音频数据。许多高端芯片和处理器以数字I2S格式管理所有音频。然后,使用三个或四个引脚输入或输出数据(数据输入,数据输出,位时钟和左右通道选择)。通常,对于音频设备,有一个DAC芯片可将I2S引入并转换为可驱动耳机的模拟信号。
这款小型单声道放大器功能强大,令人惊讶。为4欧姆阻抗扬声器提供3.2瓦功率(5V电源@ 10%THD)。微型芯片内部是D类控制器,能够以2.7V-5.5VDC的电压运行。由于该放大器是D类,因此效率极高-非常适合便携式和电池供电项目。它具有过热和过流保护功能,但我们几乎无法判断它发烫了。
音频输入为I2S标准,可以使用3.3V或5V逻辑数据。输出是“桥接”的-这意味着它们直接连接到输出,没有接地。输出是〜300KHz方波PWM,然后由扬声器线圈“平均”出-不会听到高频。以上所有这些都意味着您无法将输出连接到另一个放大器,它应该直接驱动扬声器。
有一个增益引脚,可以操纵该引脚更改增益。默认情况下,该放大器将为您提供 9dB 的增益。通过连接上拉或下拉电阻器或直接布线,可以将增益引脚设置为3dB,6dB,9dB,12dB或15dB。
ShutDown/Mode引脚可用于放置芯片处于关闭状态或设置了哪个I2S音频通道通过管道传输到扬声器。默认情况下,放大器将(L + R)/2立体声混音输出为单声道输出。通过添加电阻器,您可以将其更改为左输出或右输出
与Raspberry Pi,Arduino Zero以及任何其他具有I2S音频输出的微控制器或微型计算机配合使用,效果很好
规格:
输出功率:4Ω时为3.2W,10%THD,8Ω时为1.8W,10%THD,电源为5V
PSRR:在1KHz时,典型值为77 dB(典型值)
I2S采样率从8kHz到96kHz
不需要MCLK
Click + Pop减少
五种引脚可选增益:3dB,6dB,9dB,12dB,15dB
出色的杂音抑制功能
热关断保护
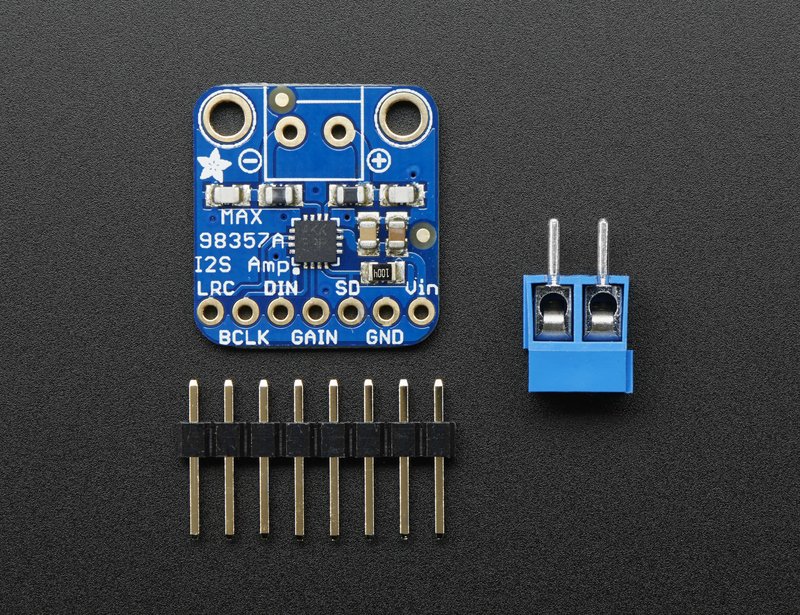
作为经过组装和测试的接线板提供,带有一小块可选的插头和3.5mm接线端子。如果需要的话,需要一些焊接来连接插头和接线盒。
插脚
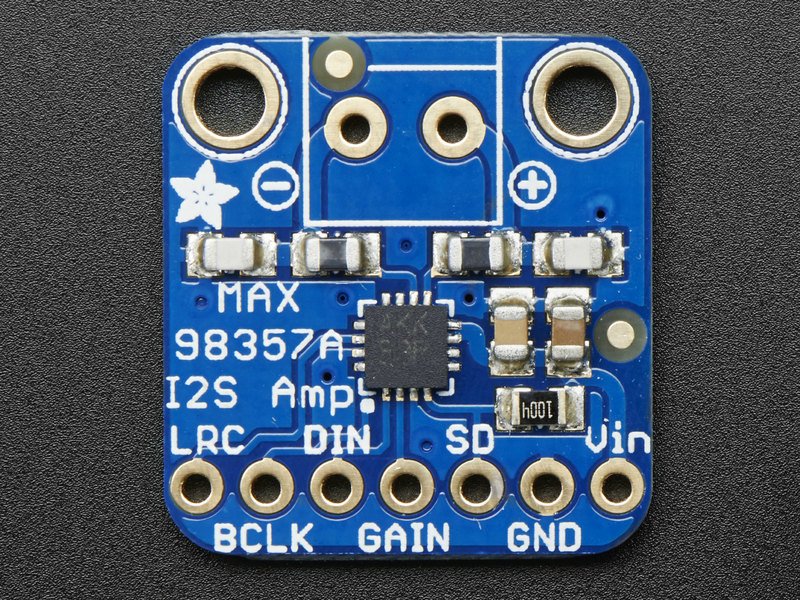
MAX98357A是 I2S 放大器-不使用模拟输入,仅支持数字音频输入!不要将I2S与I2C混淆,I2S是一种声音协议,而I2C是用于少量数据。
扬声器输出
该放大器仅用于驱动动圈式扬声器。扬声器阻抗必须为4Ω或更大。输出信号是330KHz PWM方波,其占空比与音频信号成比例。扬声器线圈的电感用作低通滤波器,以均衡高频分量。请勿尝试将其用作前置放大器。
每个通道的输出均为“桥接”,没有接地。这意味着对于每个通道,+和-交替极性可创建具有两倍可用功率的单通道放大器。
使用3.5mm螺钉接线端子连接扬声器。
5V插入4Ω@ 10%THD-最大3W
5V插入4Ω@ 1%THD-最大2.5W
3.3Vinto4Ω@ 10%THD-最大1.3W
3.3Vinto4Ω@ 1%THD-1.0W最大
5V转换为8Ω@ 10%THD-最大1.8W
5V转换为8Ω@ 1%THD-1.4W最大
3.3Vinto8Ω@ 10%THD的最大-0.8W
3.3Vinto8Ω@ 1%THD-最大0.6W
电源引脚
这是放大器的功率和放大器的逻辑。您可以提供2.5V至5.5V的电压。请注意,在5V电压下,您最终可以在扬声器中输入高达2.8W的功率,因此请确保您的电源可以轻松处理高达650mA的电流,并且我们建议使用至少800mA的电源规格,以便为您提供一些“房间”
如果您有3.3V逻辑设备,仍然可以从5V为放大器供电,建议您获得最大的输出功率!
I2S引脚
三个引脚用于接收音频数据。这些可以是3.3-5V逻辑
LRC (左/右时钟)-这是告诉放大器何时数据用于左声道以及何时用于左声道的引脚。
BCLK (位时钟)-这是告诉放大器何时读取数据引脚上数据的引脚。
DIN (数据输入)-这是输入实际数据的引脚,左右数据都在该引脚上发送,LRC引脚指示何时发送左或右信号
请注意,此放大器不需要 MCLK 引脚,如果您具有MCLK输出,则可以将其断开连接!
其他图钉
其他设置由 GAIN 和 SD
增益
GAI N 是增益设置。您可以具有 3dB,6dB,9dB,12dB 或 15dB 的增益。
15dB 如果 GAIN 直接连接到 GAIN 和 GND
12dB 之间,则100K电阻 GND
9dB ,如果 GAIN 未连接任何东西(这是默认设置)
如果将 GAIN 直接连接到 Vin
3dB ,则 6dB 在 GAIN 和 Vin
之间,这样,默认增益为9dB,但是您可以通过调整与 GAIN 引脚。请注意,您可能需要执行电源重置以调整增益。
SD/MODE
此引脚用于关机模式,但也用于设置输出哪个通道。这有点令人困惑,但本质上是:
如果 SD 直接接地(电压低于0.16V),则放大器关闭 》
如果 SD 上的电压在0.16V至0.77V之间,则输出为(Left + Right)/2,即立体声平均值。
如果 SD 上的电压介于0.77V和1.4V之间,则输出仅是右声道
如果 SD 上的电压更高大于1.4V,则输出为左声道。
这与 SD 上的内部 100K下拉电阻复合在一起,因此您需要在SD上使用上拉电阻来平衡100K内部下拉。
对于分线板,从 SD 到 Vin 有一个1Mohm电阻, ,以5V供电时,将为您提供“立体声平均”输出。如果仅需要左声道或右声道,或者是使用非5V电源供电,则可能需要尝试使用不同的电阻器在 SD
上获得所需的电压
程序集
《表class =“ build-table”》
准备标题栏:
如有必要,将条切成一定长度。如果将其插入面包板,则焊接会更容易-长按针脚
添加分线板:
将分线板放在插针上,以便短插针穿过分线垫
还有焊料!
请务必焊接所有引脚以确保可靠的电接触。
(有关焊接的技巧,请务必查看我们的 优良焊接指南 )。
您已完成!目视检查焊点,然后继续进行下一步
如果要使用接线端子来连接扬声器,请放置3.5mm的接线端子,以使嘴巴指向。
两个引脚上的焊料都带有大量焊料!
Raspberry Pi接线
如果您有Raspberry Pi,并且希望获得比耳机插孔所能提供的更高质量的音频,则I2S是一个不错的选择!您仅需使用3个引脚,并且由于它是纯数字输出,因此可以减少噪声和干扰。当然,您需要确保您拥有一个不错的5V强电源,因此请确保为您的电源要求增加500mA或更多!
此板还与没有具有像Pi Zero这样的音频
该技术将适用于任何带有2x20连接器的Raspberry Pi。带有2x13连接器的较早的Pi 1很难像这样拔出I2S引脚
连接:
Amp Vin 至Raspbery Pi 5V
放大器GND 至Raspbery Pi GND
放大器DIN 至Raspbery Pi #21
放大器BCLK 至Raspbery Pi #18
Amp LRCLK 到Raspbery Pi #19
Raspberry Pi设置
目前,Raspbery Pi linux内核不支持I2S界面中的单声道音频只能播放立体声,因此任何单声道音频文件可能都需要转换为立体声!
2017-11-2 Raspbian PIXEL(“满”)在音量控制方面有问题。 I2S可以运行,但是没有软件卷设置,如果需要,请尝试Raspbian Lite-我们会找出原因:)
快速安装
幸运的是,它非常容易在Raspbian上安装对I2S DAC的支持。
这些说明完全来自Pimoroni那些可爱的人的PhatDAC说明!
从具有Internet连接的Raspberry Pi运行以下内容:
curl -sS https://raw.githubusercontent.com/adafruit/Raspberry-Pi-Installer-Scripts/master/i2samp.sh | bash
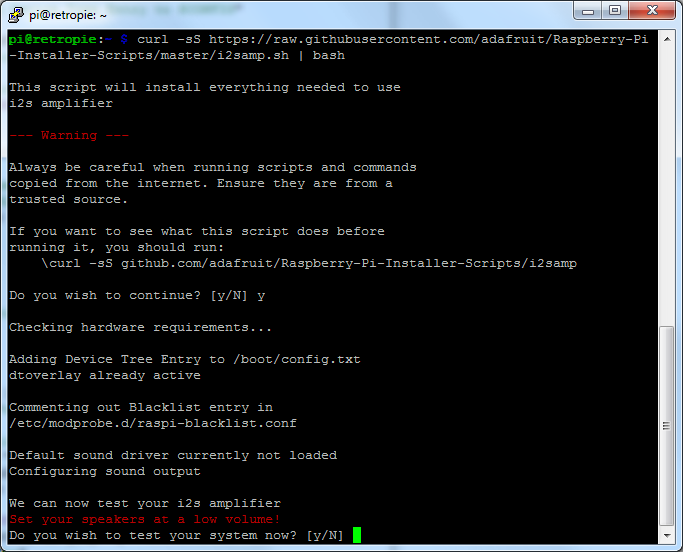
我们添加了一个额外的helper systemd脚本,该脚本将在不使用I2S外设时播放安静的音频。开始播放或停止播放时,这会消除弹出声。它使用很少的CPU时间(在Pi Zero上为5%,在Pi 2或3上可忽略不计)。您无需在RetroPie上使用它,因为它永远不会发布I2S设备,但对Raspbian来说非常有用。

安装后将需要重新启动。

必须重新启动才能启用扬声器硬件!
重新启动后,重新登录并再次运行脚本。。.它将询问您是否您想测试扬声器。说 y es,然后听音频从扬声器中发出。。.
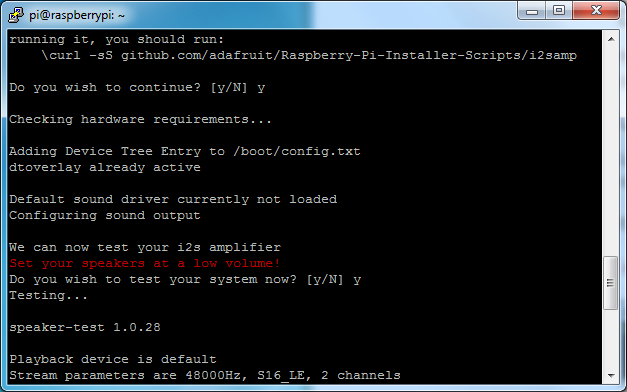
如果听起来真的很失真,则可能是音量太高。但是,为了使音量控制出现在Raspbian桌面或Retropie中,您必须在进行扬声器测试后再次重启,方法是 sudo reboot
您必须重新启动两次*才能启用alsamixer音量(确实如此!)
重新启动后,尝试运行 alsamixer ,然后使用箭头键降低音量,50%是一个不错的开始。
如果您仍然遇到音频问题,请尝试重新运行脚本,并说 N (禁用)/dev/zero playback service。
然后,您可以转到下一页以测试和优化设置。如果脚本适合您,请在详细的 安装上跳过此页面的其余部分!
详细安装
如果由于某种原因,您不能只运行脚本而又想去通过手动安装-这是所有步骤!
更新/etc/modprobe.d(如果存在)
登录到Pi并进入串行控制台(通过控制台电缆,电视控制台,RXVT或您拥有的设备)
使用
sudo nano /etc/modprobe.d/raspi-blacklist.conf

编辑raspi黑名单
如果文件为空,则跳过此步骤
但是,如果看到以下几行:
blacklist i2c-bcm2708
blacklist snd-soc-pcm512x
blacklist snd-soc-wm8804
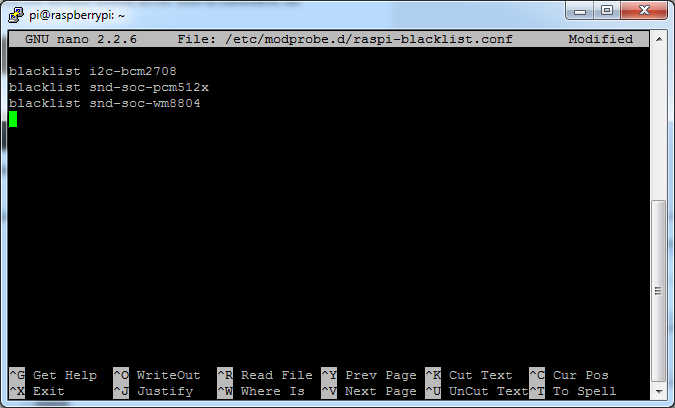
通过在每行之前放置#来更新行
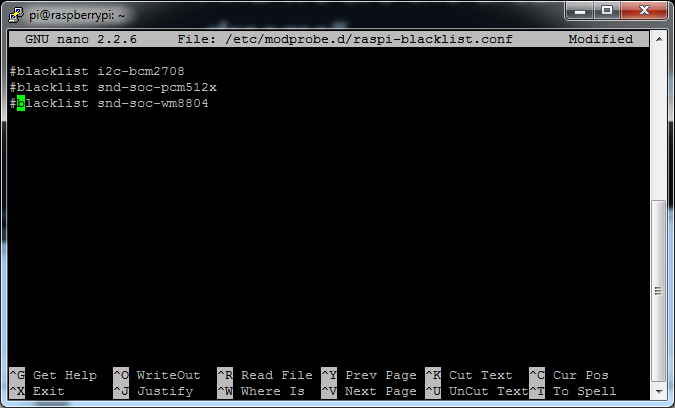
通过键入保存》 Control-X Y 《返回》
禁用耳机音频(如果已设置)
使用
sudo nano /etc/modules
编辑raspi模块列表(如果已设置)为空,只需跳过此步骤
但是,如果看到以下行:
snd_bcm2835
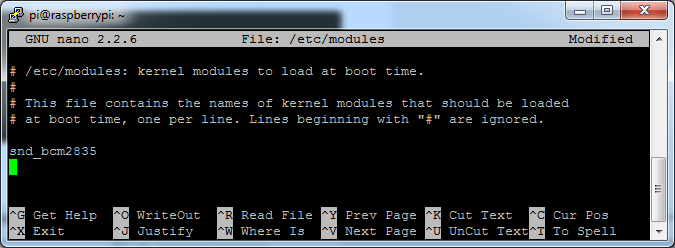
输入#
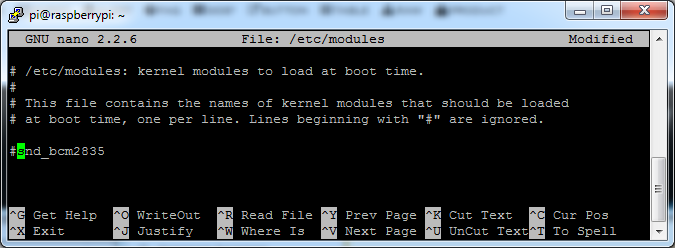
并使用 Control-X Y
创建asound.conf文件
使用
sudo nano /etc/asound.conf
编辑raspi模块列表》
此文件应该为空!
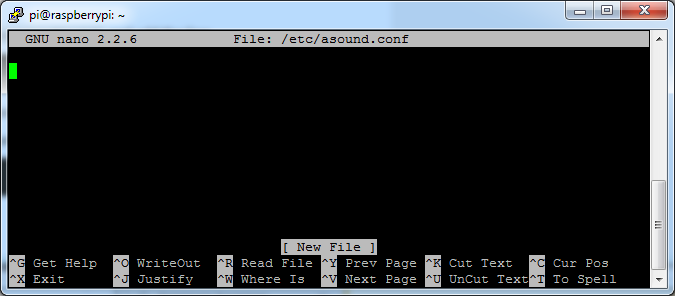
复制并粘贴以下内容xt到文件中
下载:文件
复制代码
pcm.speakerbonnet {
type hw card 0
}
pcm.dmixer {
type dmix
ipc_key 1024
ipc_perm 0666
slave {
pcm “speakerbonnet”
period_time 0
period_size 1024
buffer_size 8192
rate 44100
channels 2
}
}
ctl.dmixer {
type hw card 0
}
pcm.softvol {
type softvol
slave.pcm “dmixer”
control.name “PCM”
control.card 0
}
ctl.softvol {
type hw card 0
}
pcm.!default {
type plug
slave.pcm “softvol”
} pcm.speakerbonnet {
type hw card 0
}
pcm.dmixer {
type dmix
ipc_key 1024
ipc_perm 0666
slave {
pcm “speakerbonnet”
period_time 0
period_size 1024
buffer_size 8192
rate 44100
channels 2
}
}
ctl.dmixer {
type hw card 0
}
pcm.softvol {
type softvol
slave.pcm “dmixer”
control.name “PCM”
control.card 0
}
ctl.softvol {
type hw card 0
}
pcm.!default {
type plug
slave.pcm “softvol”
}
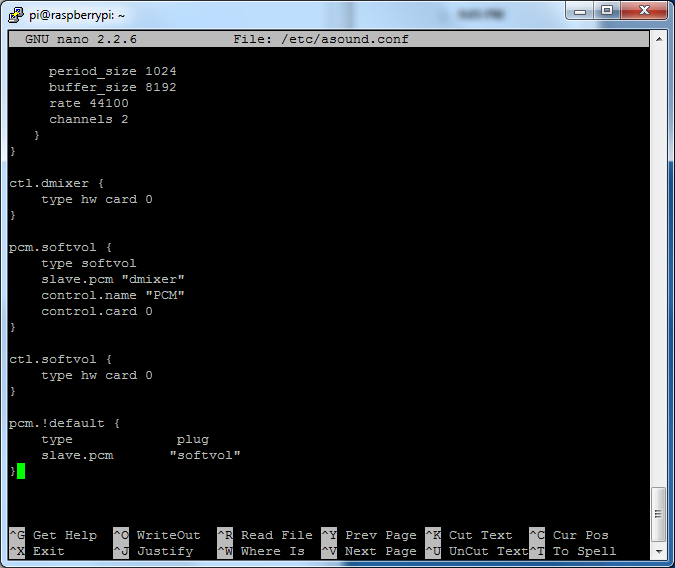
照常保存文件
添加设备树覆盖
使用
sudo nano /boot/config.txt
编辑您的Pi配置文件,然后向下滚动至底部。如果您看到一行显示:dtparam=audio=on
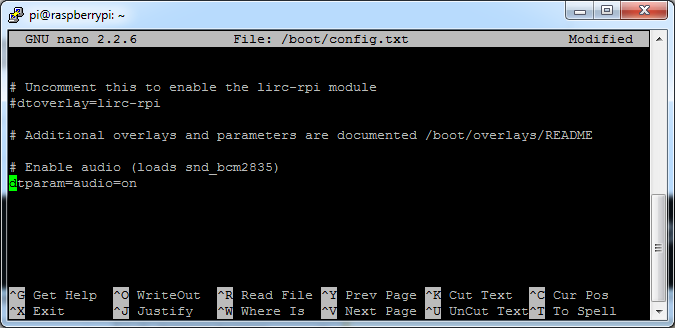
通过在前面放置#禁用它。
然后添加:
dtoverlay=hifiberry-dac
dtoverlay=i2s-mmap
在下一行。保存文件。
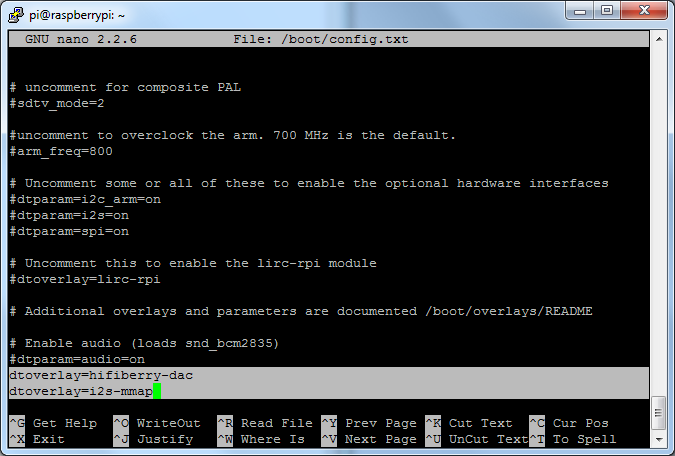
使用 sudo reboot
重启您的Pi Raspberry Pi测试
扬声器测试!
好的,您可以使用任何喜欢的软件播放音频,但是如果您想测试扬声器的输出,可以使用以下一些快速命令来验证放大器和扬声器是否正常工作!
简单的白噪声扬声器测试
运行speaker-test -c2会在扬声器之间产生左右交替的白噪声。
如果您有单声道输出放大器,则I2S放大器会合并左右声道,因此您会听到连续的白噪声
简单的WAV扬声器测试
一旦您有了一些东西出来,尝试使用扬声器测试(对于WAV文件,而不是MP3)播放音频文件
speaker-test -c2 --test=wav -w /usr/share/sounds/alsa/Front_Center.wav
听到来自左右交替扬声器的音频
简单的MP3扬声器测试
如果要播放音乐流,可以尝试
sudo apt-get install -y mpg123
mpg123 http://ice1.somafm.com/u80s-128-mp3
如果您想在命令中播放MP3,请查看本教程,其中涵盖了如何进行设置。
目前,Jessie Raspbery Pi内核不支持单声道音频在I2S界面之外,您只能播放立体声,因此任何单声道音频文件都可能需要转换为立体声!
omxplayer似乎没有将I2S接口用于音频-仅是HDMI-因此您将无法使用它
音量调节
许多程序,例如PyGame和Sonic Pi在应用程序中具有音量控制。对于其他程序,您可以使用名为 alsamixer 的命令行工具来设置音量。只需输入alsamixer,然后使用向上/向下箭头设置音量。设置完后按Escape键
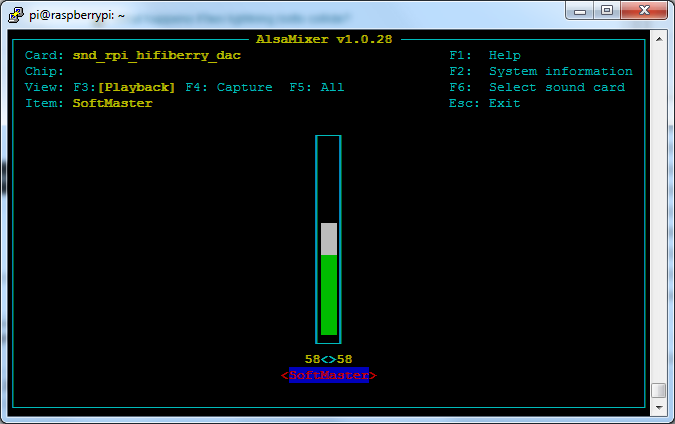
在Raspbian PIXEL中,您可以使用菜单项控件来设置音量。如果它有一个X,请尝试重新启动Pi(安装后必须重新启动两次,以使PIXEL识别音量控制
Pi I2S调整
此页面已弃用,我们的安装程序已执行这些步骤为您服务,但我们会将其保留在此处供存档使用!
减少爆音
对于遵循我们原始安装说明并进行简单alsa配置的用户,他们可能会发现播放新音频时会弹出I2S音频。
解决方法是使用软件混频器向I2S设备输出固定的采样率,以使位时钟不变。我使用ALSA,因此我配置了 dmixer ,并且不再有任何弹出声或点击声。请注意,默认情况下,RaspPi I2S驱动程序不支持 dmixer ,您必须按照提供的这些说明进行添加。继续逐步了解如何启用它!
步骤1
首先通过修改/boot/config.txt 来添加dtoverlay=i2s-mmap
运行 sudo nano/boot/config.txt ,然后将文本添加到底部,如下所示:
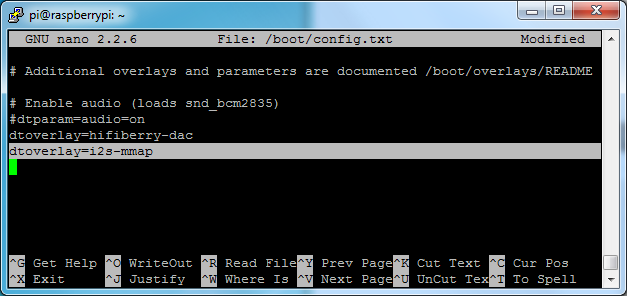
保存并退出。
然后将/etc/asound.conf 更改为:
下载:文件
复制代码
pcm.speakerbonnet {
type hw card 0
}
pcm.!default {
type plug
slave.pcm “dmixer”
}
pcm.dmixer {
type dmix
ipc_key 1024
ipc_perm 0666
slave {
pcm “speakerbonnet”
period_time 0
period_size 1024
buffer_size 8192
rate 44100
channels 2
}
}
ctl.dmixer {
type hw card 0
} pcm.speakerbonnet {
type hw card 0
}
pcm.!default {
type plug
slave.pcm “dmixer”
}
pcm.dmixer {
type dmix
ipc_key 1024
ipc_perm 0666
slave {
pcm “speakerbonnet”
period_time 0
period_size 1024
buffer_size 8192
rate 44100
channels 2
}
}
ctl.dmixer {
type hw card 0
}
通过运行sudo nano /etc/asound.conf
,这将创建一个称为Speakerbonnet的PCM设备,该设备已连接到硬件I2S设备。然后,我们制作一个名为type dmix的新“ dmix”设备(pcm.dmixer)。我们为它提供了唯一的进程间通信密钥(ipc_key 1024)和可在世界范围内读取的(ipc_perm 0666权限)混合器将控制硬件pcm设备Speakerbonnet(pcm“ speakerbonnet”)并具有一个缓冲区设置好它的好又快。设置了通信缓冲区,因此没有延迟(period_time 0,period_size 1024和buffer_size 8192正常工作)。默认的混合速率是44.1khz立体声(rate 44100 channels 2)
最后,我们设置了一个控制接口,但最终效果最好是仅将硬件设备放在此处-ctl.dmixer { type hw card 0 }
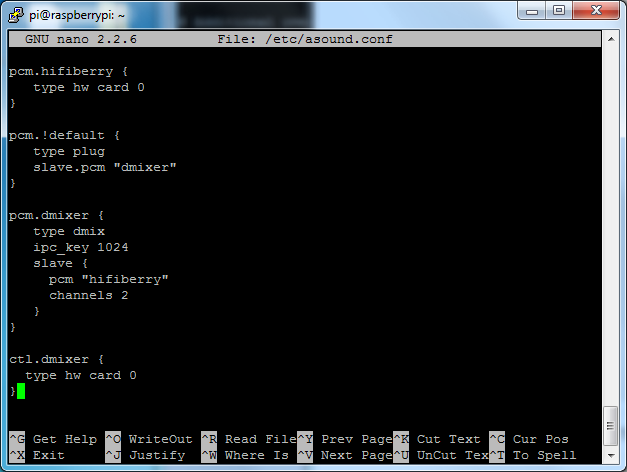
保存并退出。然后重新启动Pi以启用混音器。另外,虽然它会极大地减少弹出声,但有时还是会偶尔碰到一次-特别是在第一次播放音频时!
添加软件音量控制
此处使用的基本I2S芯片组未内置软件控制。因此我们必须“欺骗” Pi来创建软件音量控件。幸运的是,一旦您知道如何做就不难了。
在〜/.asoundrc 中使用nano ~/.asoundrc创建一个新的音频配置文件,并在其中放置以下文本:
下载:文件
复制代码
pcm.speakerbonnet {
type hw card 0
}
pcm.dmixer {
type dmix
ipc_key 1024
ipc_perm 0666
slave {
pcm “speakerbonnet”
period_time 0
period_size 1024
buffer_size 8192
rate 44100
channels 2
}
}
ctl.dmixer {
type hw card 0
}
pcm.softvol {
type softvol
slave.pcm “dmixer”
control.name “PCM”
control.card 0
}
ctl.softvol {
type hw card 0
}
pcm.!default {
type plug
slave.pcm “softvol”
} pcm.speakerbonnet {
type hw card 0
}
pcm.dmixer {
type dmix
ipc_key 1024
ipc_perm 0666
slave {
pcm “speakerbonnet”
period_time 0
period_size 1024
buffer_size 8192
rate 44100
channels 2
}
}
ctl.dmixer {
type hw card 0
}
pcm.softvol {
type softvol
slave.pcm “dmixer”
control.name “PCM”
control.card 0
}
ctl.softvol {
type hw card 0
}
pcm.!default {
type plug
slave.pcm “softvol”
}
这假定您将调音台设置为不弹出!
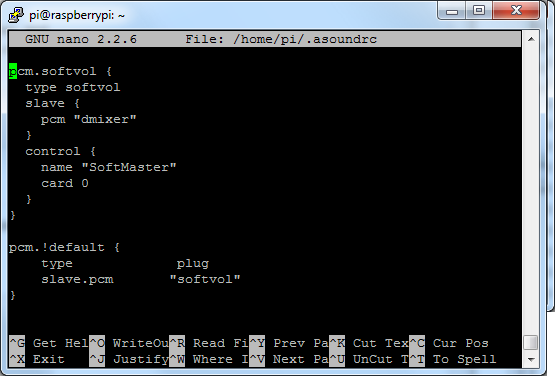
保存并退出
现在,这就是窍门,您必须重新启动,然后通过alsa播放一些音频,然后重新启动以使alsamixer正确同步:
speaker-test -c2 --test=wav -w /usr/share/sounds/alsa/Front_Center.wav
然后然后您可以键入 alsamixer 以使用“经典” alsa控制音量混合界面
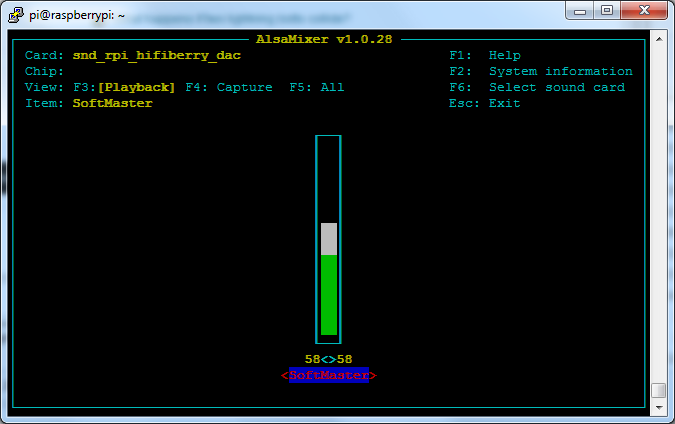
只需按向上和向下箭头设置音量,然后按ESC退出
使用PyGame播放音频
您可以使用 mpg123 进行基本测试,但要动态更改音量或有一个互动程序。为了获得更强大的音频播放,我们建议使用PyGame播放各种音频格式(包括MP3!)
安装PyGame
首先安装pygame支持,您需要在具有网络访问权限的Pi上打开控制台并运行:
下载:文件
复制代码
sudo apt-get install python-pygame sudo apt-get install python-pygame
下一步,将该pygame示例zip下载到您的Pi
点击下载PyGame示例代码和示例mp3
在命令行上运行
wget https://cdn-learn.adafruit.com/assets/assets/000/041/506/original/pygame_example.zip
unzip pygame_example.zip
运行演示
在zip内的示例是 pygameMP3.py
此示例将播放脚本文件夹中的所有MP3。为了演示您也可以在pygame中调整音量,第二个参数是要播放的音量。使用介于0.0和1.0之间的命令行参数指定要播放的音量
例如,以下是如何以75%的音量播放:
下载:文件
复制代码
python pygameMP3.py 0.75 python pygameMP3.py 0.75
如果您有自己的mp3,请使用以下代码!
下载:文件
复制代码
‘’‘ pg_midi_sound101.py
play midi music files (also mp3 files) using pygame
tested with Python273/331 and pygame192 by vegaseat
’‘’
#code modified by James DeVito from here: https://www.daniweb.com/programming/software-development/code/454835/let-pygame-play-your-midi-or-mp3-files
#!/usr/bin/python
import sys
import pygame as pg
import os
import time
def play_music(music_file):
‘’‘
stream music with mixer.music module in blocking manner
this will stream the sound from disk while playing
’‘’
clock = pg.time.Clock()
try:
pg.mixer.music.load(music_file)
print(“Music file {} loaded!”.format(music_file))
except pygame.error:
print(“File {} not found! {}”.format(music_file, pg.get_error()))
return
pg.mixer.music.play()
# If you want to fade in the audio.。。
# for x in range(0,100):
# pg.mixer.music.set_volume(float(x)/100.0)
# time.sleep(.0075)
# # check if playback has finished
while pg.mixer.music.get_busy():
clock.tick(30)
freq = 44100 # audio CD quality
bitsize = -16 # unsigned 16 bit
channels = 2 # 1 is mono, 2 is stereo
buffer = 2048 # number of samples (experiment to get right sound)
pg.mixer.init(freq, bitsize, channels, buffer)
if len(sys.argv) 》 1:
try:
user_volume = float(sys.argv[1])
except ValueError:
print “Volume argument invalid. Please use a float (0.0 - 1.0)”
pg.mixer.music.fadeout(1000)
pg.mixer.music.stop()
raise SystemExit
print(“Playing at volume: ” + str(user_volume)+ “ ”)
pg.mixer.music.set_volume(user_volume)
mp3s = []
for file in os.listdir(“。”):
if file.endswith(“.mp3”):
mp3s.append(file)
print mp3s
for x in mp3s:
try:
play_music(x)
time.sleep(.25)
except KeyboardInterrupt:
# if user hits Ctrl/C then exit
# (works only in console mode)
pg.mixer.music.fadeout(1000)
pg.mixer.music.stop()
raise SystemExit
else:
print(“Please specify volume as a float! (0.0 - 1.0)”) ‘’‘ pg_midi_sound101.py
play midi music files (also mp3 files) using pygame
tested with Python273/331 and pygame192 by vegaseat
’‘’
#code modified by James DeVito from here: https://www.daniweb.com/programming/software-development/code/454835/let-pygame-play-your-midi-or-mp3-files
#!/usr/bin/python
import sys
import pygame as pg
import os
import time
def play_music(music_file):
‘’‘
stream music with mixer.music module in blocking manner
this will stream the sound from disk while playing
’‘’
clock = pg.time.Clock()
try:
pg.mixer.music.load(music_file)
print(“Music file {} loaded!”.format(music_file))
except pygame.error:
print(“File {} not found! {}”.format(music_file, pg.get_error()))
return
pg.mixer.music.play()
# If you want to fade in the audio.。。
# for x in range(0,100):
# pg.mixer.music.set_volume(float(x)/100.0)
# time.sleep(.0075)
# # check if playback has finished
while pg.mixer.music.get_busy():
clock.tick(30)
freq = 44100 # audio CD quality
bitsize = -16 # unsigned 16 bit
channels = 2 # 1 is mono, 2 is stereo
buffer = 2048 # number of samples (experiment to get right sound)
pg.mixer.init(freq, bitsize, channels, buffer)
if len(sys.argv) 》 1:
try:
user_volume = float(sys.argv[1])
except ValueError:
print “Volume argument invalid. Please use a float (0.0 - 1.0)”
pg.mixer.music.fadeout(1000)
pg.mixer.music.stop()
raise SystemExit
print(“Playing at volume: ” + str(user_volume)+ “ ”)
pg.mixer.music.set_volume(user_volume)
mp3s = []
for file in os.listdir(“。”):
if file.endswith(“.mp3”):
mp3s.append(file)
print mp3s
for x in mp3s:
try:
play_music(x)
time.sleep(.25)
except KeyboardInterrupt:
# if user hits Ctrl/C then exit
# (works only in console mode)
pg.mixer.music.fadeout(1000)
pg.mixer.music.stop()
raise SystemExit
else:
print(“Please specify volume as a float! (0.0 - 1.0)”)
Arduino接线和测试
基于ATmega328P的经典Arduino(如UNO和Metro 328)没有I2S接口,因此不能 》与他们一起使用此突破
但是基于零速,Metro M0和Feather M0的新型基于ATSAMD21的板可以! (注意,Gemma M0和Trinket M0没有可用的I2S引脚)。甚至新的基于ATSAMD51的板卡(例如Metro M4和Feather M4)也可以。
要在M0或M4板上使用I2S,您需要安装Adafruit Zero I2S库。可通过库管理器使用。您可以搜索(见下文),然后单击安装按钮。
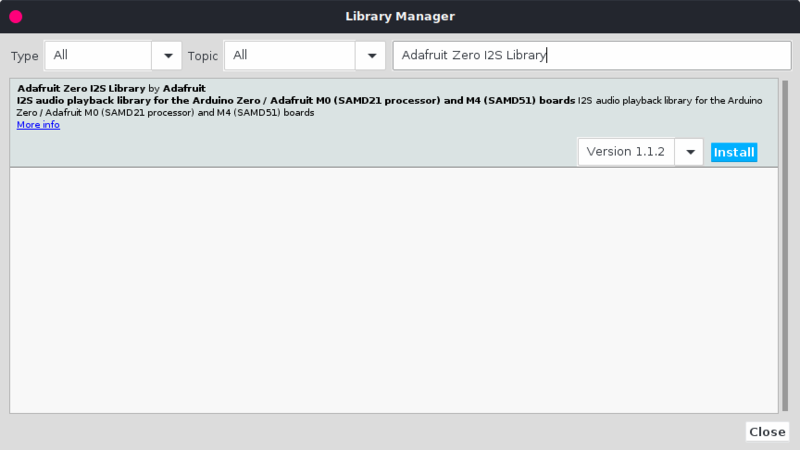
接线
接线连接与CircuitPython所用的相同。因此,请转到 CircuitPython接线和测试页面,了解如何为您的特定威廉希尔官方网站 板接线。
基本测试
要进行测试,请尝试运行下面的演示。它随库安装一起提供,因此您可以通过以下方式找到它:
文件-》示例-》 Adafruit零I2S库-》基本
请确保更改此行:
下载:文件
复制代码
Adafruit_ZeroI2S i2s(0, 1, 9, 2); Adafruit_ZeroI2S i2s(0, 1, 9, 2);
,以匹配用于设置的引脚。如果已按照本指南中的说明进行接线,则可以通过将默认线路更改为以下方式来尝试使用默认引脚:
下载:文件
复制代码
Adafruit_ZeroI2S i2s; Adafruit_ZeroI2S i2s;
下载:Project Zip 或 basic.ino | 查看Github
复制代码
Temporarily unable to load content:
Temporarily unable to load content:
DMA测试
上面的基本测试是通过循环使用i2s.write()函数直接创建输出的。另一种方法是使用DMA生成输出。使用这种方法,您可以进行一些初始设置来配置DMA引擎以进行回放。然后,它可以在后台生成输出,从而允许您在代码中执行其他操作。
要采用这种方法,您将需要安装Zero DMA库。您可以通过库管理器来做到这一点:
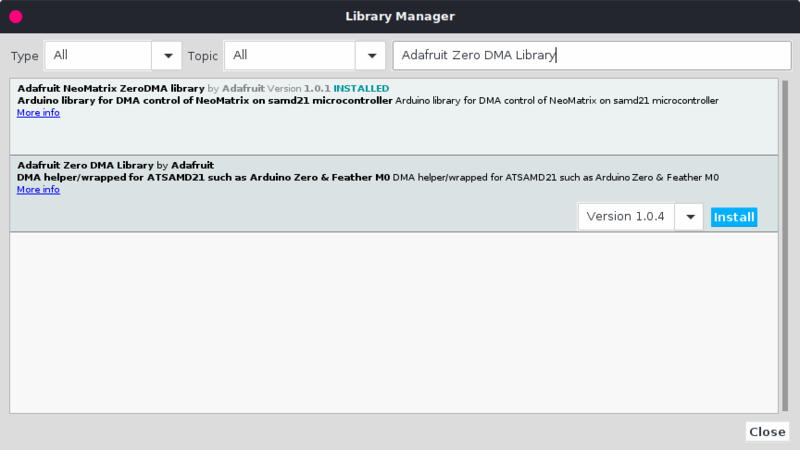
然后您可以使用在零I2S库中找到的DMA示例:
文件-》示例-》 Adafruit零I2S库-》 dma
下载:Project Zip 或 dma.ino | 在Github上查看
复制代码
#include
#include
#include “utility/dma.h”
#include
/* max volume for 32 bit data */
#define VOLUME ( (1UL 《《 31) - 1)
/* create a buffer for both the left and right channel data */
#define BUFSIZE 256
int data[BUFSIZE];
Adafruit_ZeroDMA myDMA;
ZeroDMAstatus stat; // DMA status codes returned by some functions
Adafruit_ZeroI2S i2s;
void dma_callback(Adafruit_ZeroDMA *dma) {
/* we don‘t need to do anything here */
}
void setup()
{
Serial.begin(115200);
//while(!Serial); // Wait for Serial monitor before continuing
Serial.println(“I2S output via DMA”);
int *ptr = data;
/*the I2S module will be expecting data interleaved LRLR*/
for(int i=0; i /* create a sine wave on the left channel */
*ptr++ = sin( (2*PI / (BUFSIZE/2) ) * i) * VOLUME;
/* create a cosine wave on the right channel */
*ptr++ = cos( (2*PI / (BUFSIZE/2) ) * i) * VOLUME;
}
Serial.println(“Configuring DMA trigger”);
myDMA.setTrigger(I2S_DMAC_ID_TX_0);
myDMA.setAction(DMA_TRIGGER_ACTON_BEAT);
Serial.print(“Allocating DMA channel.。。”);
stat = myDMA.allocate();
myDMA.printStatus(stat);
Serial.println(“Setting up transfer”);
myDMA.addDescriptor(
data, // move data from here
#if defined(__SAMD51__)
(void *)(&I2S-》TXDATA.reg), // to here (M4)
#else
(void *)(&I2S-》DATA[0].reg), // to here (M0+)
#endif
BUFSIZE, // this many.。。
DMA_BEAT_SIZE_WORD, // bytes/hword/words
true, // increment source addr?
false);
myDMA.loop(true);
Serial.println(“Adding callback”);
myDMA.setCallback(dma_callback);
/* begin I2S on the default pins. 24 bit depth at
* 44100 samples per second
*/
i2s.begin(I2S_32_BIT, 44100);
i2s.enableTx();
stat = myDMA.startJob();
}
void loop()
{
Serial.println(“do other things here while your DMA runs in the background.”);
delay(2000);
}
#include
#include
#include “utility/dma.h”
#include
/* max volume for 32 bit data */
#define VOLUME ( (1UL 《《 31) - 1)
/* create a buffer for both the left and right channel data */
#define BUFSIZE 256
int data[BUFSIZE];
Adafruit_ZeroDMA myDMA;
ZeroDMAstatus stat; // DMA status codes returned by some functions
Adafruit_ZeroI2S i2s;
void dma_callback(Adafruit_ZeroDMA *dma) {
/* we don’t need to do anything here */
}
void setup()
{
Serial.begin(115200);
//while(!Serial); // Wait for Serial monitor before continuing
Serial.println(“I2S output via DMA”);
int *ptr = data;
/*the I2S module will be expecting data interleaved LRLR*/
for(int i=0; i /* create a sine wave on the left channel */
*ptr++ = sin( (2*PI / (BUFSIZE/2) ) * i) * VOLUME;
/* create a cosine wave on the right channel */
*ptr++ = cos( (2*PI / (BUFSIZE/2) ) * i) * VOLUME;
}
Serial.println(“Configuring DMA trigger”);
myDMA.setTrigger(I2S_DMAC_ID_TX_0);
myDMA.setAction(DMA_TRIGGER_ACTON_BEAT);
Serial.print(“Allocating DMA channel.。。”);
stat = myDMA.allocate();
myDMA.printStatus(stat);
Serial.println(“Setting up transfer”);
myDMA.addDescriptor(
data, // move data from here
#if defined(__SAMD51__)
(void *)(&I2S-》TXDATA.reg), // to here (M4)
#else
(void *)(&I2S-》DATA[0].reg), // to here (M0+)
#endif
BUFSIZE, // this many.。。
DMA_BEAT_SIZE_WORD, // bytes/hword/words
true, // increment source addr?
false);
myDMA.loop(true);
Serial.println(“Adding callback”);
myDMA.setCallback(dma_callback);
/* begin I2S on the default pins. 24 bit depth at
* 44100 samples per second
*/
i2s.begin(I2S_32_BIT, 44100);
i2s.enableTx();
stat = myDMA.startJob();
}
void loop()
{
Serial.println(“do other things here while your DMA runs in the background.”);
delay(2000);
}
CircuitPython接线和测试
CircuitPython 3.0及更高版本内置了I2S,这意味着您可以在支持的M0和M4 Express CircuitPython板上轻松使用此突破口!支持的板是Feather M0 Express,Feather M4 Express,Metro M0 Express,Metro M4 Express和ItsyBitsy M0 Express。
请注意,饰品M0,Gemma M0和ItsyBitsy M4不支持I2S(最后一个不是错字!)
M0板具有多个可用的I2S引脚组合。我们将为每块板演示单个引脚组合。
接线
以下接线图显示了如何将MAX98357分支连接到CircuitPython板上。您将使用电压输入,接地,位时钟,左/右时钟和数据引脚。
VIN 是 red 线。
GND 是黑色导线。
BCLK 是蓝色导线。
LRC 是黄色导线。
DIN 是《绿色电线。
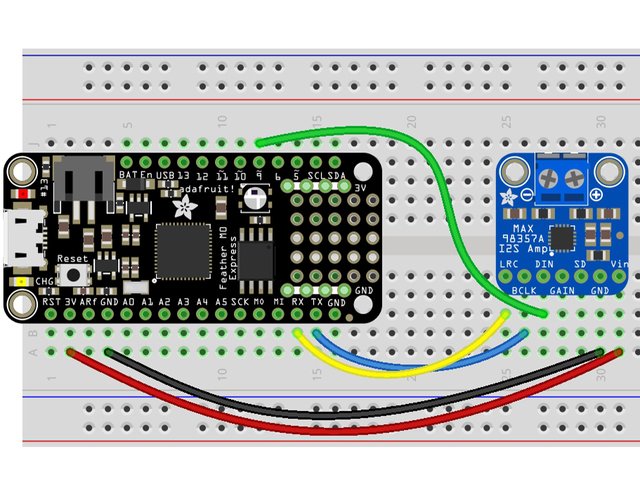
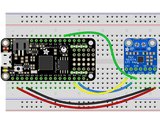
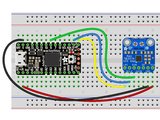
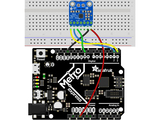
对于Feather M0 Express,ItyBitsy M0 Express和Metro M0 Express:
在突破口上连接 VIN 到板上的 3V/3.3 。
将 分支上的 GND连接到主板上的 G/GND。板。
在分支上连接 BCLK 连接到板上的 D1/TX 。
将分支中的 LRC 连接到板上的 D0/RX strong》。
将分组中的 DIN 连接到板上的 D9 。
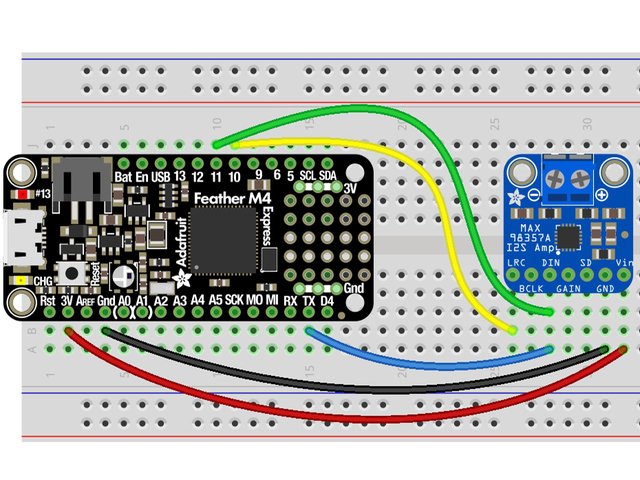
对于Feather M4 Express:
将分支上的 VIN 连接到板上的 3V 。
连接 分支上的GND到板上的 Gind 。
将分支上的 BCLK连接到《。
将分组中的 LRC 连接到板上的 D10 。
将分组中的 DIN 连接到板上的 D11 。
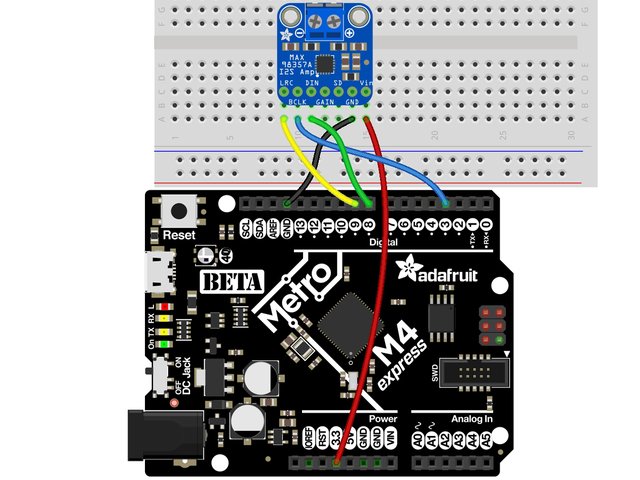
对于Metro M4 Express:
在分支上连接 VIN 》连接到板上的 3.3 。
将分支中的 GND 连接到板上的 GND strong》。
在分支上将 BCLK 连接到板上的 D3 。
在分支上将 LRC连接连接到板上的 D9 。
将分支中的 DIN 连接到板上的 D8 。
代码示例
我们有两个CircuitPython代码示例。前者在分组讨论中通过扬声器播放生成的音调。第二个播放波形文件。让我们看一下!
音调生成
第一个示例生成一个正弦波的一个周期,然后循环生成一个音调。您可以通过更改关联的变量来更改音量和音调的Hz。在循环内,我们播放音调一秒钟,然后将其停一秒钟。
下载:Project Zip 或 CircuitPython_I2S_Tone.py | 在Github上查看
复制代码
import time
import array
import math
import audioio
import board
import audiobusio
sample_rate = 8000
tone_volume = .1 # Increase or decrease this to adjust the volume of the tone.
frequency = 440 # Set this to the Hz of the tone you want to generate.
length = sample_rate // frequency # One freqency period
sine_wave = array.array(“H”, [0] * length)
for i in range(length):
sine_wave[i] = int((math.sin(math.pi * 2 * frequency * i / sample_rate) *
tone_volume + 1) * (2 ** 15 - 1))
# For Feather M0 Express, ItsyBitsy M0 Express, Metro M0 Express
audio = audiobusio.I2SOut(board.D1, board.D0, board.D9)
# For Feather M4 Express
# audio = audiobusio.I2SOut(board.D1, board.D10, board.D11)
# For Metro M4 Express
# audio = audiobusio.I2SOut(board.D3, board.D9, board.D8)
sine_wave_sample = audioio.RawSample(sine_wave, sample_rate=sample_rate)
while True:
audio.play(sine_wave_sample, loop=True)
time.sleep(1)
audio.stop()
time.sleep(1)
对于羽毛M0 Express,ItsyBitsy M0 Express 和 Metro M0 Express ,
对于羽毛M4 Express ,注释掉audio = audiobusio.I2SOut(board.D1, board.D0, board.D9)并取消注释# audio = audiobusio.I2SOut(board.D1, board.D10, board.D11)。
对于 Metro M4 Express ,注释掉audio = audiobusio.I2SOut(board.D1, board.D0, board.D9)并取消注释# audio = audiobusio.I2SOut(board.D3, board.D3, board.D8)。
现在您将听到440Hz音调的一秒钟和一秒钟的声音。沉默
您可以尝试更改音调的Hz以产生不同的音调。尝试更改time.sleep()中的秒数以产生更长或更短的音调。
波形文件
第二个示例播放波形文件。我们以可读格式打开文件。然后在循环中,我们播放文件,并告诉代码继续播放文件,直到完成为止。您可以使用任何受支持的wave文件。我们已经在代码中包含了wave文件。
StreetChicken.wav
下载:Project Zip 或 CircuitPython_I2S_Wave.py | 在Github上查看
复制代码
import audioio
import board
import audiobusio
wave_file = open(“StreetChicken.wav”, “rb”)
wave = audioio.WaveFile(wave_file)
# For Feather M0 Express, ItsyBitsy M0 Express, Metro M0 Express
audio = audiobusio.I2SOut(board.D1, board.D0, board.D9)
# For Feather M4 Express
# audio = audiobusio.I2SOut(board.D1, board.D10, board.D11)
# For Metro M4 Express
# audio = audiobusio.I2SOut(board.D3, board.D9, board.D8)
while True:
audio.play(wave)
while audio.playing:
pass
代码中的对象设置与上面相同。
对于 Feather M0 Express,ItsyBitsy M0 Express 和 Metro M0 Express ,无需更改即可运行代码。
对于 Feather M4 Express ,注释掉audio = audiobusio.I2SOut(board.D1, board.D0, board.D9)并取消注释# audio = audiobusio.I2SOut(board.D1, board.D10, board.D11)。
对于 Metro M4 Express ,注释掉audio = audiobusio.I2SOut(board.D1, board.D0, board.D9)并取消注释# audio = audiobusio.I2SOut(board.D3, board.D3, board.D8)
现在,您将听到wave文件播放并循环播放。
此示例可以做很多事情。尝试播放其他波形文件,或者包括while audio.playing: pass而不是包含time.sleep(),以使其播放指定的秒数。查阅CircuitPython Essentials指南中的pause和resume功能的“音频输出”页面。
我的I2S在哪里?
我们之前提到过,支持的M0板具有多个I2S引脚组合供您使用。 M4板有一种选择。无论哪种方式,如果您想知道可用的选项,请将以下代码复制到 code.py ,连接到串行控制台和检查输出。
这些是ItsyBitsy M0 Express的结果。
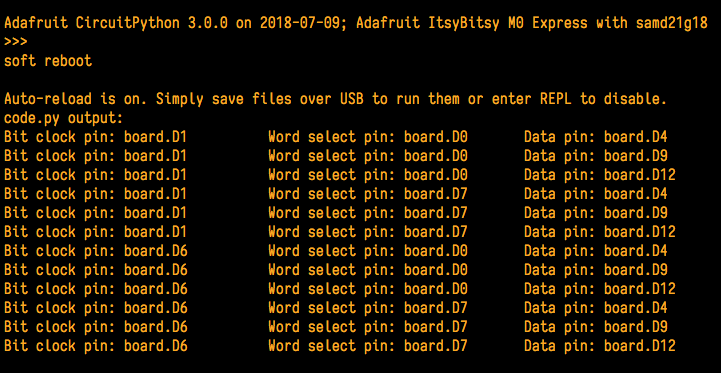
下载:Project Zip 或 I2S_Test_Script.py | 在Github上查看
复制代码
import board
import audiobusio
from microcontroller import Pin
def is_hardware_i2s(bit_clock, word_select, data):
try:
p = audiobusio.I2SOut(bit_clock, word_select, data)
p.deinit()
return True
except ValueError:
return False
def get_unique_pins():
exclude = [‘NEOPIXEL’, ‘APA102_MOSI’, ‘APA102_SCK’]
pins = [pin for pin in [
getattr(board, p) for p in dir(board) if p not in exclude]
if isinstance(pin, Pin)]
unique = []
for p in pins:
if p not in unique:
unique.append(p)
return unique
for bit_clock_pin in get_unique_pins():
for word_select_pin in get_unique_pins():
for data_pin in get_unique_pins():
if bit_clock_pin is word_select_pin or bit_clock_pin is data_pin or word_select_pin
is data_pin:
continue
else:
if is_hardware_i2s(bit_clock_pin, word_select_pin, data_pin):
print(“Bit clock pin:”, bit_clock_pin, “ Word select pin:”, word_select_pin,
“ Data pin:”, data_pin)
else:
pass
I2S音频常见问题解答
嘿,在Raspbian Pixel桌面中,扬声器图标已X化!
播放一些音频后,尝试重新启动一次。另外,请确保您具有我们最新的alsa配置(请检查Raspberry Pi安装页面上的详细安装页面中的/etc/asound.conf!
。如果它仍然不起作用,您仍然可以更改音量,只需在终端命令提示符下使用 alsamixer 。
即使启用了dmixer,当Pi首次启动或当它第一次开始播放音频时
是的,这是Raspbian Linux的已知东西是的Linux!我们没有修复程序,如果可以让您感觉更好,我的高档Windows开发计算机会对台式机扬声器执行相同的操作。
i2s设置脚本中的“/dev/zero play”选项(我们于2018年10月添加了该选项),但您仍然可能会得到一个初始弹出音
我的DAC上的音频听起来真的很差/失真
请确保降低了音量。默认值为100%,太高了!使用 alsamixer 将音量降低到50%左右
可以与我最喜欢的软件一起使用吗?
它将与任何支持alsa音频的一起使用。有成千上万个linux程序,所以我们不能保证它们都能正常工作,但这是我们确定能做到的!
PyGame -请参阅播放音频的页面以PyGame为例的代码。可以在pygame
mpg123 -命令行mp3音频播放中控制音量。使用alsamixer控制音量
播放-用于在命令行上播放wav文件
Sonic Pi -已在像素桌面。使用Sonic Pi设置面板更改音量-似乎并不在乎您设置的全局音量!
Scratch 2 -已在Pixel桌面上进行了测试。效果很好,但可能会有所延迟,并且在您第一次播放音频时会发出爆裂的声音。您可以使用alsamixer设置音量,也可以通过应用程序使用将音量设置为nn%块
从头开始1 设置音量-无效,有些
RetroPie/Emulation Station 不能在Scratch 1上设置?-音频在游戏中有效(我们测试了NES和MAME libretro),但在“主屏幕”中不起作用‘(选择要玩的游戏界面)
下载
MAX98357数据表
带有EagleCAD PCB文件的GitHub
Adafruit Fritzing库中的Fritzing对象
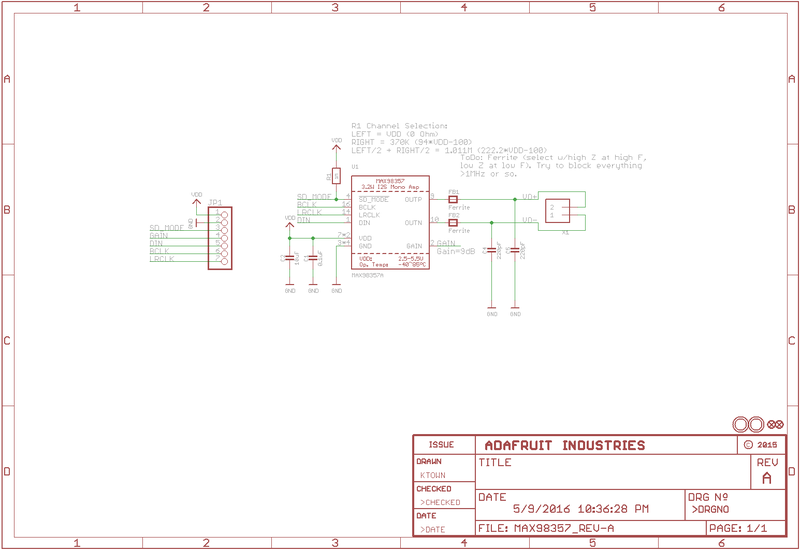
示意图
单击以进行签名
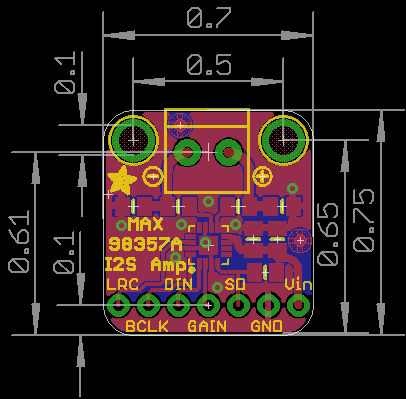
制造打印
英寸尺寸
责任编辑:wv
- 相关推荐
- 单声道放大器
-
高效D类音频放大器MAX9700/MAX9712怎么样?2021-04-14 0
-
单声道2WD类音频功率放大器MAX9830相关资料分享2021-05-18 0
-
自制TFA9894D I2S 5.6W放大器分线器2022-08-22 0
-
MAX9830中文资料,单声道2W D类放大器2010-03-01 785
-
3W单声道D类单芯片音频放大器2008-01-13 1819
-
MAX9768 单声道、10W、D类扬声器放大器,带有音量控2008-11-24 1582
-
MAX9709 单声道/立体声、D类放大器2008-11-24 1469
-
MAX9830 单声道2W D类放大器2009-08-21 673
-
MAX9736 单声道/立体声大功率D类放大器2009-10-15 1211
-
MAX97000 具有单声道D类扬声器放大器和H类耳机放大器2009-11-26 1122
-
MAX97001 带有单声道D类扬声器和H类耳机放大器的音频2010-08-21 1067
-
MAX9830单声道、2W、D类放大器2010-10-13 3314
-
MAX98314单声道、3.2W D类放大器2012-05-09 1280
-
Maxim宣布推出MAX98357和MAX98358数字输入D类音频功率放大器2018-05-19 8009
-
NS4168 2.5W -I2S 数字输入单声道 D 类音频功率放大器2024-11-07 254
全部0条评论

快来发表一下你的评论吧 !

