

鸿蒙分布式相机“踩坑”分享
描述
接上一篇 OpenHarmony 分布式相机(上),今天我们来说下如何实现分布式相机。
实现分布式相机其实很简单,正如官方介绍的一样,当被控端相机被连接成功后,可以像使用本地设备一样使用远程相机。
我们先看下效果:
上一篇已经完整的介绍了如何开发一个本地相机,对于分布式相机我们需要完成以下几个步骤。
前置条件:
两台带摄像头的设备
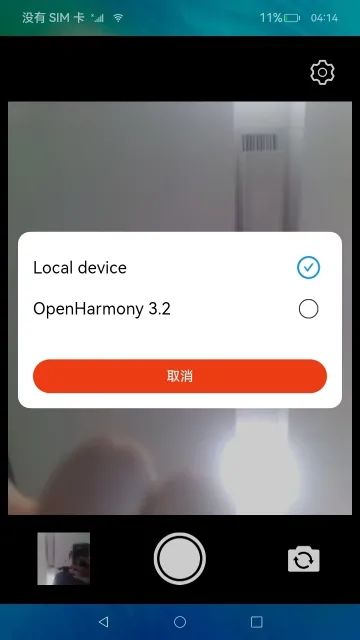
建议使用相同版本的 OH 系统,本案例使用 OpenHarmony 3.2 beta5
连接在同一个网络
开发步骤:
引入设备管理(@ohos.distributedHardware.deviceManager)
通过 deviceManager 发现周边设备
通过 pin 码完成设备认证
获取和展示可信设备
在可信设备直接选择切换不同设备的摄像头
在主控端查看被控端的摄像头图像
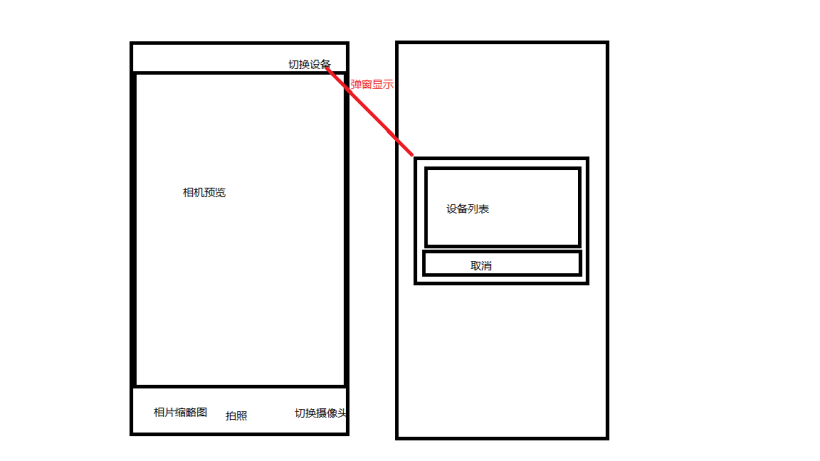
以上描述的功能在应用开发时可以使用一张草图来表示,草图中切换设备->弹窗显示设备列表的过程,草图如下:
代码
①RemoteDeviceModel.ts
说明: 远程设备业务处理类,包括获取可信设备列表、获取周边设备列表、监听设备状态(上线、下线、状态变化)、监听设备连接失败、设备授信认证、卸载设备状态监听等。
代码如下:
import deviceManager from '@ohos.distributedHardware.deviceManager'
import Logger from './util/Logger'
const TAG: string = 'RemoteDeviceModel'
let subscribeId: number = -1
export class RemoteDeviceModel {
    private deviceList: Array = []
    private discoverList: Array = []
    private callback: () => void
    private authCallback: () => void
    private deviceManager: deviceManager.DeviceManager
    constructor() {
    }
    public registerDeviceListCallback(bundleName : string, callback) {
        if (typeof (this.deviceManager) !== 'undefined') {
            this.registerDeviceListCallbackImplement(callback)
            return
        }
        Logger.info(TAG, `deviceManager.createDeviceManager begin`)
        try {
            deviceManager.createDeviceManager(bundleName, (error, value) => {
                if (error) {
                    Logger.info(TAG, `createDeviceManager failed.`)
                    return
                }
                this.deviceManager = value
                this.registerDeviceListCallbackImplement(callback)
                Logger.info(TAG, `createDeviceManager callback returned, error= ${error},value= ${value}`)
            })
        } catch (err) {
            Logger.error(TAG, `createDeviceManager failed, code is ${err.code}, message is ${err.message}`)
        }
        Logger.info(TAG, `deviceManager.createDeviceManager end`)
    }
    private deviceStateChangeActionOffline(device) {
        if (this.deviceList.length <= 0) {
            this.callback()
            return
        }
        for (let j = 0; j < this.deviceList.length; j++) {
            if (this.deviceList[j ].deviceId === device.deviceId) {
                this.deviceList[j] = device
                break
            }
        }
        Logger.info(TAG, `offline, device list= ${JSON.stringify(this.deviceList)}`)
        this.callback()
    }
    private registerDeviceListCallbackImplement(callback) {
        Logger.info(TAG, `registerDeviceListCallback`)
        this.callback = callback
        if (this.deviceManager === undefined) {
            Logger.info(TAG, `deviceManager has not initialized`)
            this.callback()
            return
        }
        Logger.info(TAG, `getTrustedDeviceListSync begin`)
        try {
            let list = this.deviceManager.getTrustedDeviceListSync()
            Logger.info(TAG, `getTrustedDeviceListSync end, deviceList= ${JSON.stringify(list)}`)
            if (typeof (list) !== 'undefined' && typeof (list.length) !== 'undefined') {
                this.deviceList = list
            }
        } catch (err) {
            Logger.error(`getTrustedDeviceListSync failed, code is ${err.code}, message is ${err.message}`)
        }
        this.callback()
        Logger.info(TAG, `callback finished`)
        this.deviceManager.on('deviceStateChange', (data) => {
            if (data === null) {
                return
            }
            Logger.info(TAG, `deviceStateChange data= ${JSON.stringify(data)}`)
            switch (data.action) {
                case deviceManager.DeviceStateChangeAction.READY:
                    this.discoverList = []
                    this.deviceList.push(data.device)
                    try {
                        let list = this.deviceManager.getTrustedDeviceListSync()
                        if (typeof (list) !== 'undefined' && typeof (list.length) !== 'undefined') {
                            this.deviceList = list
                        }
                        this.callback()
                    } catch (err) {
                        Logger.error(TAG, `getTrustedDeviceListSync failed, code is ${err.code}, message is ${err.message}`)
                    }
                    break
                case deviceManager.DeviceStateChangeAction.OFFLINE:
                case deviceManager.DeviceStateChangeAction.CHANGE:
                    this.deviceStateChangeActionOffline(data.device)
                    break
                default:
                    break
            }
        })
        this.deviceManager.on('deviceFound', (data) => {
            if (data === null) {
                return
            }
            Logger.info(TAG, `deviceFound data= ${JSON.stringify(data)}`)
            this.deviceFound(data)
        })
        this.deviceManager.on('discoverFail', (data) => {
            Logger.info(TAG, `discoverFail data= ${JSON.stringify(data)}`)
        })
        this.deviceManager.on('serviceDie', () => {
            Logger.info(TAG, `serviceDie`)
        })
        this.startDeviceDiscovery()
    }
    private deviceFound(data) {
        for (var i = 0;i < this.discoverList.length; i++) {
            if (this.discoverList[i].deviceId === data.device.deviceId) {
                Logger.info(TAG, `device founded ignored`)
                return
            }
        }
        this.discoverList[this.discoverList.length] = data.device
        Logger.info(TAG, `deviceFound self.discoverList= ${this.discoverList}`)
        this.callback()
    }
    private startDeviceDiscovery() {
        if (subscribeId >= 0) {
            Logger.info(TAG, `started DeviceDiscovery`)
            return
        }
        subscribeId = Math.floor(65536 * Math.random())
        let info = {
            subscribeId: subscribeId,
            mode: deviceManager.DiscoverMode.DISCOVER_MODE_ACTIVE,
            medium: deviceManager.ExchangeMedium.COAP,
            freq: deviceManager.ExchangeFreq.HIGH,
            isSameAccount: false,
            isWakeRemote: true,
            capability: deviceManager.SubscribeCap.SUBSCRIBE_CAPABILITY_DDMP
        }
        Logger.info(TAG, `startDeviceDiscovery ${subscribeId}`)
        try {
            // todo 多次启动发现周边设备有什么影响吗?
            this.deviceManager.startDeviceDiscovery(info)
        } catch (err) {
            Logger.error(TAG, `startDeviceDiscovery failed, code is ${err.code}, message is ${err.message}`)
        }
    }
    public unregisterDeviceListCallback() {
        Logger.info(TAG, `stopDeviceDiscovery $subscribeId}`)
        this.deviceList = []
        this.discoverList = []
        try {
            this.deviceManager.stopDeviceDiscovery(subscribeId)
        } catch (err) {
            Logger.error(TAG, `stopDeviceDiscovery failed, code is ${err.code}, message is ${err.message}`)
        }
        this.deviceManager.off('deviceStateChange')
        this.deviceManager.off('deviceFound')
        this.deviceManager.off('discoverFail')
        this.deviceManager.off('serviceDie')
    }
    public authenticateDevice(device, extraInfo, callBack) {
        Logger.info(TAG, `authenticateDevice ${JSON.stringify(device)}`)
        for (let i = 0; i < this.discoverList.length; i++) {
            if (this.discoverList[i].deviceId !== device.deviceId) {
                continue
            }
            let authParam = {
                'authType': 1,
                'appIcon': '',
                'appThumbnail': '',
                'extraInfo': extraInfo
            }
            try {
                this.deviceManager.authenticateDevice(device, authParam, (err, data) => {
                    if (err) {
                        Logger.error(TAG, `authenticateDevice error: ${JSON.stringify(err)}`)
                        this.authCallback = null
                        return
                    }
                    Logger.info(TAG, `authenticateDevice succeed: ${JSON.stringify(data)}`)
                    this.authCallback = callBack
                })
            } catch (err) {
                Logger.error(TAG, `authenticateDevice failed, code is ${err.code}, message is ${err.message}`)
            }
        }
    }
    /**
     * 已认证设备列表
     */
    public getDeviceList(): Array {
        return this.deviceList
    }
    /**
     * 发现设备列表
     */
    public getDiscoverList(): Array {
        return this.discoverList
    }
}
getDeviceList() :获取已认证的设备列表;getDiscoverList:发现周边设备的列表。
②DeviceDialog.ets
说明:通过 RemoteDeviceModel.getDiscoverList() 和通过 RemoteDeviceModel.getDeviceList() 获取到所有周边设备列表,用户通过点击"切换设备"按钮弹窗显示所有设备列表信息。
import deviceManager from '@ohos.distributedHardware.deviceManager';
const TAG = 'DeviceDialog'
// 分布式设备选择弹窗
@CustomDialog
export struct DeviceDialog {
  private controller?: CustomDialogController // 弹窗控制器
  @Link deviceList: Array // 设备列表
  @Link selectIndex: number // 选中的标签
  build() {
    Column() {
      List() {
        ForEach(this.deviceList, (item: deviceManager.DeviceInfo, index) => {
          ListItem() {
            Row() {
              Text(item.deviceName)
                .fontSize(22)
                .width(350)
                .fontColor(Color.Black)
              Image(index === this.selectIndex ? $r('app.media.checked') : $r('app.media.uncheck'))
                .width(35)
                .objectFit(ImageFit.Contain)
            }
            .height(55)
            .onClick(() => {
              console.info(`${TAG} select device ${item.deviceId}`)
              if (index === this.selectIndex) {
                console.info(`${TAG} device not change`)
              } else {
                this.selectIndex = index
              }
              this.controller.close()
            })
          }
        }, item => item.deviceName)
      }
      .width('100%')
      .height(150)
      Button() {
        Text($r('app.string.cancel'))
          .width('100%')
          .height(45)
          .fontSize(18)
          .fontColor(Color.White)
          .textAlign(TextAlign.Center)
      }.onClick(() => {
        this.controller.close()
      })
      .backgroundColor('#ed3c13')
    }
    .width('100%')
    .padding(20)
    .backgroundColor(Color.White)
    .border({
      color: Color.White,
      radius: 20
    })
  }
}
③打开设备列表弹窗
说明:在 index.ets 页面中,点击“切换设备”按钮即可以开启设备列表弹窗,通过 @Watch(‘selectedIndexChange’) 监听用户选择的设备标签,在 devices 中获取到具体的 DeviceInfo 对象。
代码如下:
  @State @Watch('selectedIndexChange') selectIndex: number = 0
  // 设备列表
  @State devices: Array = []
  // 设备选择弹窗
  private dialogController: CustomDialogController = new CustomDialogController({
    builder: DeviceDialog({
      deviceList: $devices,
      selectIndex: $selectIndex,
    }),
    autoCancel: true,
    alignment: DialogAlignment.Center
  })


 showDialog() {
    console.info(`${TAG} RegisterDeviceListCallback begin`)
    distributed.registerDeviceListCallback(BUNDLE_NAME, () => {
      console.info(`${TAG} RegisterDeviceListCallback callback entered`)
      this.devices = []
      // 添加本地设备
      this.devices.push({
        deviceId: Constant.LOCAL_DEVICE_ID,
        deviceName: Constant.LOCAL_DEVICE_NAME,
        deviceType: 0,
        networkId: '',
        range: 1 // 发现设备的距离
      })
      let discoverList = distributed.getDiscoverList()
      let deviceList = distributed.getDeviceList()
      let discoveredDeviceSize = discoverList.length
      let deviceSize = deviceList.length
      console.info(`${TAG} discoveredDeviceSize:${discoveredDeviceSize} deviceSize:${deviceSize}`)
      let deviceTemp = discoveredDeviceSize > 0 ? discoverList : deviceList
      for (let index = 0; index < deviceTemp.length; index++) {
        this.devices.push(deviceTemp[index])
      }
    })
    this.dialogController.open()
    console.info(`${TAG} RegisterDeviceListCallback end`)
  }


async selectedIndexChange() {
    console.info(`${TAG} select device index ${this.selectIndex}`)
    let discoverList: Array = distributed.getDiscoverList()
    if (discoverList.length <= 0) {
      this.mCurDeviceID = this.devices[this.selectIndex].deviceId
      await this.switchDevice()
      this.devices = []
      return
    }
    let selectDeviceName = this.devices[this.selectIndex].deviceName
    let extraInfo = {
      'targetPkgName': BUNDLE_NAME,
      'appName': APP_NAME,
      'appDescription': APP_NAME,
      'business': '0'
    }
    distributed.authenticateDevice(this.devices[this.selectIndex], extraInfo, async () => {
      // 获取到相关的设备ID,启动远程应用
      for (var index = 0; index < distributed.getDeviceList().length; index++) {
        let deviceName = distributed.getDeviceList()[index].deviceName
        if (deviceName === selectDeviceName) {
          this.mCurDeviceID = distributed.getDeviceList()[index].deviceId
          await this.switchDevice()
        }
      }
    })
    this.devices = []
  }
④重新加载相机
说明:根据用户选择的设备标签获取到当前用户需要切换的相机设备对象,重新加载相机,重新加载需要释放原有的相机资源,然后重新构建 createCameraInput、createPreviewOutput、createSession。 可能你注意到这里好像没有执行 createPhotoOutput,这是因为在实践过程中发现,添加了一个当前设备所支持的拍照配置到会话管理(CaptureSession.addOutput())时,系统会返回当前拍照配置流不支持,并关闭相机,导致相机预览黑屏,所以这里没有添加。
issues:远程相机拍照失败 not found in supported streams。
https://gitee.com/openharmony/distributedhardware_distributed_camera/issues/I6E5ZXmCameraService:这个是相机管理类,代码可以查看上一篇:OpenHarmony 分布式相机(上)中查看。
代码如下:
  /**
   * 切换摄像头
   * 同一台设备上切换不同摄像头
   */
  async switchCamera() {
    console.info(`${TAG} switchCamera`)
    let cameraList = this.mCameraService.getDeviceCameras(this.mCurDeviceID)
    if (cameraList && cameraList.length > 1) {
      let cameraCount: number = cameraList.length
      console.info(`${TAG} camera list ${cameraCount}}`)
      if (this.mCurCameraIndex < cameraCount - 1) {
        this.mCurCameraIndex += 1
      } else {
        this.mCurCameraIndex = 0
      }
      await this.reloadCamera()
    } else {
      this.showToast($r('app.string.only_one_camera_hint'))
    }
  }

  /**
   * 重新加载摄像头
   */
  async reloadCamera() {
    // 显示切换loading
    this.isSwitchDeviceing = true
    // 先关闭当前摄像机,再切换新的摄像机
    await this.mCameraService.releaseCamera()
    await this.startPreview()
  }


private async startPreview() {
    console.info(`${TAG} startPreview`)
    await this.mCameraService.createCameraInput(this.mCurCameraIndex, this.mCurDeviceID)
    await this.mCameraService.createPreviewOutput(this.surfaceId, this.previewImpl)
    if (this.mCurDeviceID === Constant.LOCAL_DEVICE_ID) {
      // fixme xjs 如果是远程相机,则不支持拍照,添加拍照输出流会导致相机黑屏
      await this.mCameraService.createPhotoOutput(this.functionBackImpl)
    }
    await this.mCameraService.createSession(this.surfaceId)
  }
⑤加载过度动画
说明:在相机切换中会需要释放原相机的资源,在重启新相机,在通过软总线通道同步远程相机的预览数据。 这里需要一些时间,根据目前测试,在网络稳定状态下,切换时间 3~5s,网络不稳定状态下,切换最长需要 13s,当然有时候会出现无法切换成功,这种情况可能是远程设备已经下线,无法再获取到数据。
代码如下:
  @State isSwitchDeviceing: boolean = false // 是否正在切换相机

 if (this.isSwitchDeviceing) {
        Column() {
          Image($r('app.media.load_switch_camera'))
            .width(400)
            .height(306)
            .objectFit(ImageFit.Fill)
          Text($r('app.string.switch_camera'))
            .width('100%')
            .height(50)
            .fontSize(16)
            .fontColor(Color.White)
            .align(Alignment.Center)
        }
        .width('100%')
        .height('100%')
        .backgroundColor(Color.Black)
        .justifyContent(FlexAlign.Center)
        .alignItems(HorizontalAlign.Center)
        .onClick(() => {
        })
      }
至此,分布式相机的整体流程就已实现完成。下面我们介绍下分布式相机开发中所遇到的问题。
分布式相机问题一览
对于开发过程中所遇到的一些坑,前面多少有简单的提到一些,这里做一次规整,也算是一次回顾。
①首次授权成功无法显示相机预览
解析:我们正常会在 MainAbility.ts 的 onCreate() 函数加载的时候执行申请授权,在 index.ets 页面中,当 XComponent 组件 onLoad() 回调后执行初始化相机操作,代码如下:
MainAbility.ts:
const TAG: string = '[DistributedCamera]' let permissionList: Arrayindex.ets:= [ "ohos.permission.MEDIA_LOCATION", "ohos.permission.READ_MEDIA", "ohos.permission.WRITE_MEDIA", "ohos.permission.CAMERA", "ohos.permission.MICROPHONE", "ohos.permission.DISTRIBUTED_DATASYNC" ] export default class MainAbility extends Ability { async onCreate(want, launchParam) { console.info(`${TAG} onCreate`) globalThis.cameraAbilityContext = this.context await globalThis.cameraAbilityContext.requestPermissionsFromUser(permissionList) } }
// ...
// 截取部分主要代码

Column() {
          XComponent({
            id: 'componentId',
            type: 'surface',
            controller: this.XComponentController
          }).onLoad(async () => {
            console.info(`${TAG} XComponent onLoad is called`)
            this.XComponentController.setXComponentSurfaceSize({
              surfaceWidth: Resolution.DEFAULT_WIDTH,
              surfaceHeight: Resolution.DEFAULT_HEIGHT
            })
            this.surfaceId = this.XComponentController.getXComponentSurfaceId()
            console.info(`${TAG} surfaceId: ${this.surfaceId}`)
            await this.initCamera()
          }).height('100%')
            .width('100%')
        }
        .width('100%')
        .height('75%')
        .margin({
          bottom: 20
        })

// ...
应用启动后,调用了 requestPermissionsFromUser() 请求权限后,但未手动授权时,查看相关日志:
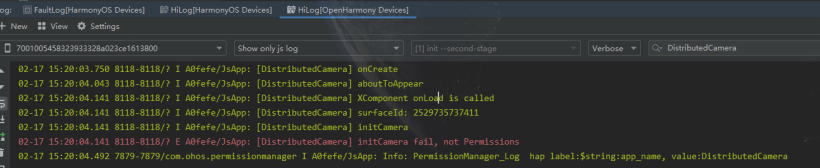
日志告诉我们,page 的生命周期已启动到 onShow,并且页面布局也完成了加载,XComponent 组件回调 onLoad()。 但是由于还未授权,导致无法初始化相机,此时即便授权成功,也不会再进行初始化,导致相机无法启动,无预览视图。 知道原因后,我们可以有多种方式解决,重点就是在授权完成后,需要再次触发初始化相机,让相机启动才可以正常预览。
我的处理方式:
在 index.ets 页面中处理授权
定义是否已授权的标识,用于判断是否可以初始化相机
定义是否已经初始化相机标识,防止对此初始化
在 page 页面初始化函数 aboutToAppear() 中请求权限,并在权限申请结果中添加初始化相机操作
XComponent 组件回调 onLoad() 初始化相机操作不变
index.ets:
  private isInitCamera: boolean = false // 是否已初始化相机
  private isPermissions: boolean = false // 是否完成授权

  async aboutToAppear() {
    console.info(`${TAG} aboutToAppear`)
    globalThis.cameraAbilityContext.requestPermissionsFromUser(permissionList).then(async (data) => {
      console.info(`${TAG} data permissions: ${JSON.stringify(data.permissions)}`)
      console.info(`${TAG} data authResult: ${JSON.stringify(data.authResults)}`)
      // 判断授权是否完成
      let resultCount: number = 0
      for (let result of data.authResults) {
        if (result === 0) {
          resultCount += 1
        }
      }
      if (resultCount === permissionList.length) {
        this.isPermissions = true
      }
      await this.initCamera()
      // 获取缩略图
      this.mCameraService.getThumbnail(this.functionBackImpl)
    })
  }
②相机应用未关闭,系统息屏后重新点亮,重新返回相机应用,无预览输出流返回
解析:从现象看,预览画面卡在息屏前的状态,需要退出应用后,重启应用才能正常预览。从日志上看没有查看到具体的原因,只是 camera_host 的数据量日志消失。
猜想:相机在系统息屏后强制关闭,需要重新加载相机才能正常预览,实现方式如下:
在 page 的 onPageShow() 回调函数中重新初始化相机。
在 page 的 onPageHide() 函数中释放相机资源,减少系统资源不必要的消耗。
index.ets:
  async onPageShow() {
    console.info(`${TAG} onPageShow`)
    await this.initCamera()
  }
  onPageHide() {
    console.info(`${TAG} onPageHide`)
    this.isSwitchDeviceing = false
    this.isInitCamera = false
    this.mCameraService.releaseCamera()
  }
结论: 实践验证此方法有效解决息屏后点亮返回相机无法预览的问题。
③加载远程相机,在会话管理中添加拍照输出流,无法拍照,预览黑屏
解析:两台设备 pin 码认证通过,连接成功,在主控端选择一台被控端设备时,加载相机,流程与加载本地相机相同。
流程如下:
createCameraInput()
createPreviewOutput()
createPhotoOutput()
createSession()

* createSession.beginConfig()
* createSession.addInput(CameraInput)
* createSession.addOutput(PreviewOutput)
* createSession.addOutput(PhotoOutput)
* createSession.commitConfig()
* createSession.start()
经过排查,发现日志中返回异常 not found in supported streams,详情可以查看关联 issues。
https://gitee.com/openharmony/distributedhardware_distributed_camera/issues/I6E5ZX原因:在创建 PhotoOutput 时需要传递支持的拍照配置信息 Profile,这里的 Profile 可以通过 CmeraManager.getSupportedOutputCapability() 返回的相机输出能力 CameraOutputCapability 对象获取,但远程相机设备拍照输出能力列表返回空。
但通过查看本地相机拍照输出能力可知 DAYU200 设备支持的 Profile 信息:
photoProfile {"format":2000,"size":{"width":1280,"height":960}}
通过此将 photoProfile 作为远程相机设备构建拍照输出流的入参场景拍照输出流,并把此添加到拍照会话管理中,但是界面出现不支持此相机配置,最终关闭了相机,导致黑屏。 解决方案:根据此问题,目前只能根据场景判断是否需要添加拍照输出流到会话管理,对于本地相机则可以添加拍照输出流,执行拍照业务,远程相机则不添加拍照输出流,这也就不能执行拍照业务,希望社区有解决方案。
④切换不同设备上的相机,相机预览输出流出现异常,无法显示远程相机的画面
解析: 此问题存在的原因可能有多种,这里我说下我遇到的情况。 (1)分布式连接被断开,但是因为底层机制,设备之间下线需要在一段时间内才能上报(预计 5 分钟),所以在应用层看到可以连接的远端设备,其实已经下线了,这时当然不能切换到远程相机。 (2)与问题 3 中描述的相同,因为添加了一个无法支持的拍照配置信息导致相机被关闭。
解决方案:
等待线下通知,再重新连接设备,或者等待设备自动完成重连,简单粗暴就是重启设备。
待社区反馈。
⑤相机业务在主线程执行,需要将业务移动到子线程,防止 UI 线程堵塞
解析:如题描述,目前可能存在堵塞 UI 线程的可能,需要将一些耗时的操作移动到子线程,比如预览、拍照保存图片等。 目前正在修改优化,关于 ets 的异步线程 worker 可以查看之前写的一篇关于:OpenHarmony stage worker 多线程。
⑥远程相机预览数据传输存在 500ms 的延迟
解析:在 wifi 环境下,被控端相机将预览数据通过软总线传输到主控端显示,有 500ms 左右的延迟,此问题待排查,具体是那个环境出现的延迟。
⑦no permission for function call
解析:用户动态授予:允许不同设备间的数据(ohos.permission.DISTRIBUTED_DATASYNC) 交换权限后,DeviceManager.startDeviceDiscovery() 启动发现周边设备总会出现异常。
日志中提示:
discoverFail data= {"subscribeId":26386,"reason":-20007,"errInfo":"no permission for function call."}
原因: 非系统应用无法使用 DeviceManager,详细可查看:issues。
https://gitee.com/openharmony/distributedhardware_device_manager/issues/I6BYK4解决方案:系统应用和普通应用是通过签名来区分,那只要通过修改签名 UnsgnedReleasedProfileTemplate.json 文件中的 app-feature 值为 ohos_system_app,即为系统应用。
- 相关推荐
- 摄像头
- 相机
- 设备
- 鸿蒙
- OpenHarmony
-
HarmonyOS鸿蒙操作系统之什么是“基于微内核的全场景分布式操作系统”?2020-09-23 0
-
鸿蒙分布式任务调度2021-06-12 0
-
鸿蒙分布式任务调度——数据传递2021-06-12 0
-
HarmonyOS教程一分布式语音照相机2021-09-10 0
-
分布式系统硬件资源池原理和接入实践2023-12-06 0
-
什么是鸿蒙分布式游戏?为什么要做分布式游戏?2021-01-30 4622
-
华为鸿蒙系统之分布式游戏详解2021-01-30 7188
-
鸿蒙分布式怎么理解2021-07-08 4502
-
鸿蒙系统底层架构 鸿蒙系统分布式架构2021-07-08 12782
-
分享一个有趣的鸿蒙分布式小游戏2021-11-01 2552
-
鸿蒙版JS如何实现分布式仿抖音应用2021-11-15 2367
-
OpenHarmony技术william hill官网 :分布式相机和分布式图库功能2022-04-25 1824
-
鸿蒙OS 分布式任务调度2024-01-29 493
全部0条评论

快来发表一下你的评论吧 !
