
多CPU下的Ring Buffer处理
描述
1. 网卡处理数据包流程
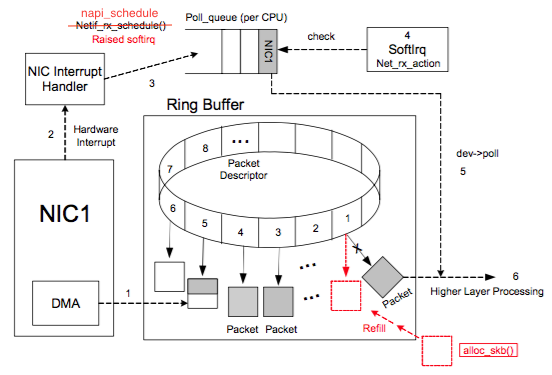
一图胜千言,先来看看网卡处理网络数据流程图:

图片来自参考链接1
上图中虚线步骤的解释:
1 DMA 将 NIC 接收的数据包逐个写入 sk_buff ,一个数据包可能占用多个 sk_buff , sk_buff 读写顺序遵循FIFO(先入先出)原则。
2 DMA 读完数据之后,NIC 会通过 NIC Interrupt Handler 触发 IRQ (中断请求)。
3 NIC driver 注册 poll 函数。
4 poll 函数对数据进行检查,例如将几个 sk_buff 合并,因为可能同一个数据可能被分散放在多个 sk_buff 中。
5 poll 函数将 sk_buff 交付上层网络栈处理。
完整流程:
1 系统启动时 NIC (network interface card) 进行初始化,系统分配内存空间给 Ring Buffer 。
2 初始状态下,Ring Buffer 队列每个槽中存放的 Packet Descriptor 指向 sk_buff ,状态均为 ready。
3 DMA 将 NIC 接收的数据包逐个写入 sk_buff ,一个数据包可能占用多个 sk_buff ,sk_buff 读写顺序遵循FIFO(先入先出)原则。
4 被写入数据的 sk_buff 变为 used 状态。
5 DMA 读完数据之后,NIC 会通过 NIC Interrupt Handler 触发 IRQ (中断请求)。
6 NIC driver 注册 poll 函数。
7 poll 函数对数据进行检查,例如将几个 sk_buff 合并,因为可能同一个数据可能被分散放在多个 sk_buff 中。
8 poll 函数将 sk_buff 交付上层网络栈处理。
9 poll 函数清理 sk_buff,清理 Ring Buffer 上的 Descriptor 将其指向新分配的 sk_buff 并将状态设置为 ready。
2. 多 CPU 下的 Ring Buffer 处理
因为分配给 Ring Buffer 的空间是有限的,当收到的数据包速率大于单个 CPU 处理速度的时候 Ring Buffer 可能被占满,占满之后再来的新数据包会被自动丢弃。
如果在多核 CPU 的服务器上,网卡内部会有多个 Ring Buffer,NIC 负责将传进来的数据分配给不同的 Ring Buffer,同时触发的 IRQ 也可以分配到多个 CPU 上,这样存在多个 Ring Buffer 的情况下, Ring Buffer 缓存的数据也同时被多个 CPU 处理,就能提高数据的并行处理能力。
当然,要实现“NIC 负责将传进来的数据分配给不同的 Ring Buffer”,NIC 网卡必须支持 Receive Side Scaling(RSS) 或者叫做 multiqueue 的功能。RSS 除了会影响到 NIC 将 IRQ 发到哪个 CPU 之外,不会影响别的逻辑了。数据处理过程跟之前描述的是一样的。
3. Ring Buffer 相关命令
在生产实践中,因 Ring Buffer 写满导致丢包的情况很多。当环境中的业务流量过大且出现网卡丢包的时候,考虑到 Ring Buffer 写满是一个很好的思路。
总结下 Ring Buffer 相关的命令:
3.1 网卡收到的数据包统计
[root@test ]$ ethtool -S em1 | more
NIC statistics:
     rx_packets: 35874336743
     tx_packets: 35163830212
     rx_bytes: 6337524253985
     tx_bytes: 3686383656436
     rx_broadcast: 15392577
     tx_broadcast: 873436
     rx_multicast: 45849160
     tx_multicast: 1784024
RX 就是收到数据,TX 是发出数据。
3.2 带有 drop 字样的统计和 fifo_errors 的统计
[root@test ]$ethtool -S em1 | grep -iE "error|drop"
rx_crc_errors: 0
rx_missed_errors: 0
tx_aborted_errors: 0
tx_carrier_errors: 0
tx_window_errors: 0
rx_long_length_errors: 0
rx_short_length_errors: 0
rx_align_errors: 0
dropped_smbus: 0
rx_errors: 0
tx_errors: 0
tx_dropped: 0
rx_length_errors: 0
rx_over_errors: 0
rx_frame_errors: 0
rx_fifo_errors: 79270
tx_fifo_errors: 0
tx_heartbeat_errors: 0
rx_queue_0_drops: 16669
rx_queue_1_drops: 21522
rx_queue_2_drops: 0
rx_queue_3_drops: 5678
rx_queue_4_drops: 5730
rx_queue_5_drops: 14011
rx_queue_6_drops: 15240
rx_queue_7_drops: 420
发送队列和接收队列 drop 的数据包数量显示在这里。并且所有 queue_drops 加起来等于 rx_fifo_errors。
所以总体上能通过 rx_fifo_errors 看到 Ring Buffer 上是否有丢包。如果有的话一方面是看是否需要调整一下每个队列数据的分配,或者是否要加大 Ring Buffer 的大小。
3.3 查询 Ring Buffer 大小
[root@test]$ ethtool -g em1
Ring parameters for em1:
Pre-set maximums:
RX: 4096
RX Mini: 0
RX Jumbo: 0
TX: 4096
Current hardware settings:
RX: 256
RX Mini: 0
RX Jumbo: 0
TX: 256
RX 和 TX 最大是 4096,当前值为 256 。队列越大丢包的可能越小,但数据延迟会增加。
3.4 调整 Ring Buffer 队列数量
[root@test]$ ethtool -l em1
Channel parameters for em1:
Pre-set maximums:
RX:        0
TX:        0
Other:        1
Combined:    8
Current hardware settings:
RX:        0
TX:        0
Other:        1
Combined:    8
Combined = 8,说明当前 NIC 网卡会使用 8 个进程处理网络数据。
更改 eth0 网卡 Combined 的值:
ethtool -L eth0 combined 8
需要注意的是,ethtool 的设置操作可能都要重启一下才能生效。
3.4 调整 Ring Buffer 队列大小 查看当前 Ring Buffer 大小:
[root@test]$ ethtool -g em1
Ring parameters for em1:
Pre-set maximums:
RX:        4096
RX Mini:    0
RX Jumbo:    0
TX:        4096
Current hardware settings:
RX:        256
RX Mini:    0
RX Jumbo:    0
TX:        256
看到 RX 和 TX 最大是 4096,当前值为 256。队列越大丢包的可能越小,但数据延迟会增加。
设置 RX 和 TX 队列大小:
ethtool -G em1 rx 4096
ethtool -G em1 tx 4096
3.5 调整 Ring Buffer 队列的权重
NIC 如果支持 mutiqueue 的话 NIC 会根据一个 Hash 函数对收到的数据包进行分发。能调整不同队列的权重,用于分配数据。
[root@test]$ ethtool -x em1
RX flow hash indirection table for em1 with 8 RX ring(s):
    0:      0     0     0     0     0     0     0     0
    8:      0     0     0     0     0     0     0     0
   16:      1     1     1     1     1     1     1     1
   24:      1     1     1     1     1     1     1     1
   32:      2     2     2     2     2     2     2     2
   40:      2     2     2     2     2     2     2     2
   48:      3     3     3     3     3     3     3     3
   56:      3     3     3     3     3     3     3     3
   64:      4     4     4     4     4     4     4     4
   72:      4     4     4     4     4     4     4     4
   80:      5     5     5     5     5     5     5     5
   88:      5     5     5     5     5     5     5     5