

OpenCV FFT模糊检测方法
描述
在本教程中,您将学习如何使用OpenCV和快速傅里叶变换(FFT)在图像和实时视流中执行模糊检测。 今天的教程是我上一篇关于OpenCV模糊检测的博客文章的扩展
原始模糊检测方法:
依赖于计算图像Laplacian算子的方差
可以仅用一行代码实现
使用起来非常简单
缺点是,Laplacian方法需要大量手动调整用于定义图像是否模糊的”阈值“。如果你能控制你的光线条件,环境和图像捕捉过程,这个方法工作得很好,但如果不是,那你很可能得到杂乱不堪的效果。 我们今天要讲的方法依赖于计算图像的快速傅里叶变换。它仍然需要一些手动调整,但正如我们将发现的,FFT模糊检测器比Laplacian方差更加可靠与稳定。 在本教程结束时,你将拥有一个可以应用于图像和视频流,且功能齐全的FFT模糊检测器。 OpenCV快速傅里叶变换(FFT)模糊检测 在本教程的第一部分,我们将简要讨论:
什么是模糊检测
为什么我们想检测图像/视频流中的模糊
快速傅里叶变换如何让我们检测模糊
什么是模糊检测,什么时候我们需要检测模糊?
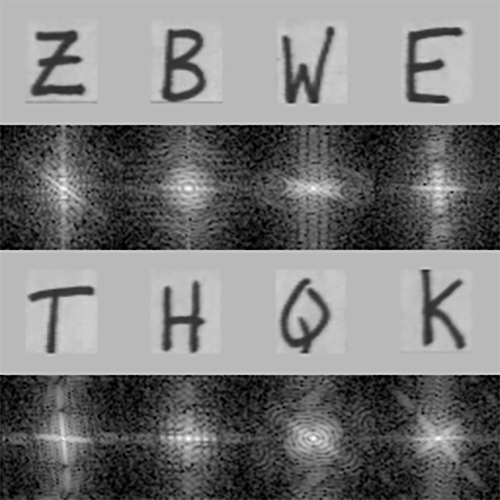
图1:如何使用OpenCV和快速傅里叶变换(FFT)算法自动检测照片是否模糊?(图片来源:https://www.cs.unm.edu/~brayer/vision/fourier.html)
模糊检测,顾名思义,是检测图像是否模糊的算法。
模糊检测可能的应用包括:
图像质量的自动分级
帮助专业摄影师在100到1000张的照片拍摄过程中自动丢弃模糊/低质量的照片
将OCR应用于实时视频流,但仅对非模糊帧应用昂贵的OCR计算
这里的关键要点是,为在理想条件下捕获的图像编写计算机视觉代码总是比较容易的。
与其尝试处理质量非常差的图像的边缘情况,不如检测并丢弃质量差的图像(比如有明显模糊的图像)。
这种模糊检测程序既可以自动丢弃质量差的图像,也可以简单地告诉终端用户:”嘿,老兄,再试一次,让我们在这里捕捉一个更好的画面”。
请记住,计算机视觉应用程序应该是智能的,因此有了“人工智能”这个术语——有时候,“智能”可以只是检测输入数据的质量是否太差,而不是试图弄懂它。
什么是快速傅立叶变换(FFT)?
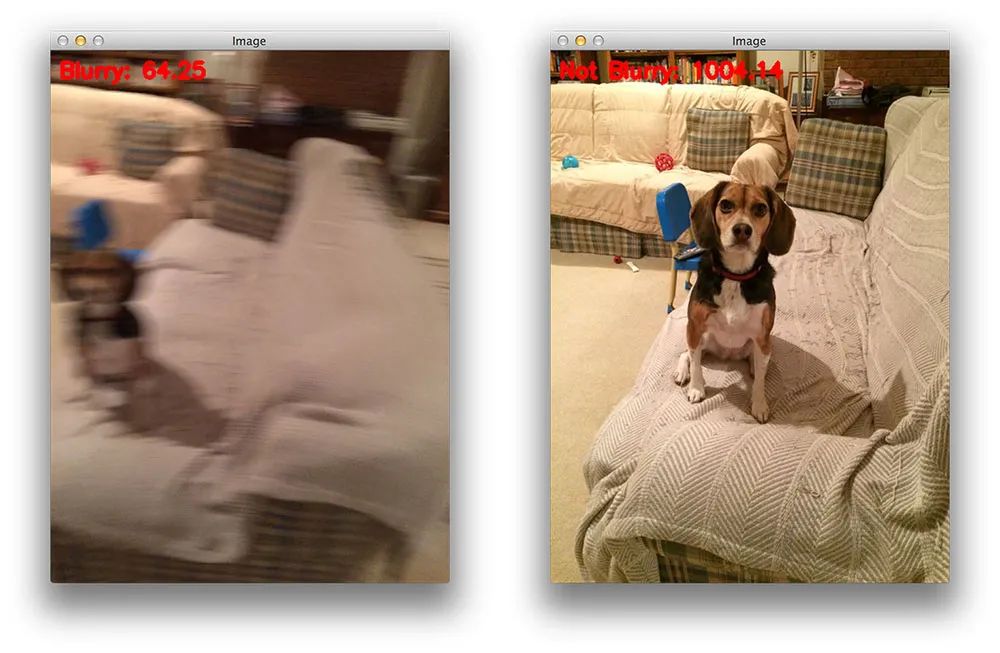
图2:在本教程中,我们将使用OpenCV和NumPy的组合在图像和视流中进行基于快速傅立叶变换(FFT)的模糊检测。
快速傅里叶变换是计算离散傅里叶变换的一种方便的数学算法。它用于将信号从一个域转换为另一个域。
FFT在许多学科中都很有用,包括音乐、数学、科学和工程。例如,电气工程师,特别是那些与无线、电源和音频信号打交道的工程师,需要FFT计算来将时间序列信号转换到频域,因为有些计算在频域更容易进行。相反,使用FFT可以将频域信号转换回时域。 在计算机视觉方面,我们通常认为FFT是一种图像处理工具,它可以将图片在两个图像域内转换:
傅里叶(即频率)域
空间域
此外,FFT同时用实分量和虚分量来表示图像。 通过分析这些值,我们可以执行图像处理程序,如模糊,边缘检测,阈值,纹理分析,以及模糊检测。 回顾快速傅里叶变换的数学细节超出了这篇博客文章的范围,所以如果你有兴趣学习更多关于它的知识,我建议你阅读这篇关于FFT及其与图像处理的关系的文章。
https://homepages.inf.ed.ac.uk/rbf/HIPR2/fourier.htm
对于有学术倾向的读者,可以看看Aaron Bobick在佐治亚理工学院计算机视觉课程上的精彩幻灯片。
https://www.cc.gatech.edu/~afb/classes/CS4495-Fall2014/slides/CS4495-Frequency.pdf
最后,维基百科关于傅里叶变换的页面更详细地介绍了数学,包括它在非图像处理任务中的应用。 项目结构
首先使用本教程的“下载”部分下载源代码和示例图像。一旦你解压缩文件,你将有一个目录组织如下:
$ tree --dirsfirst
.
├── images
│   ├── adrian_01.png
│   ├── adrian_02.png
│   ├── jemma.png
│   └── resume.png
├── pyimagesearch
│   ├── __init__.py
│   └── blur_detector.py
├── blur_detector_image.py
└── blur_detector_video.py
2 directories, 8 files
我们基于FFT的模糊检测算法位于blur_detector.py文件中的pyimagesearch模块中。内部实现了一个函数detect_blur_fft。 我们在两个Python驱动程序脚本中使用detect_blur_fft方法:
blur_detector_image:对静态图像进行模糊检测。我在images/目录中为我们提供了一些测试图像,您也应该在自己的图像(模糊的和不模糊的)上尝试这种算法。
blur_detector_video。在视频流中实现实时模糊检测。
使用OpenCV实现我们的FFT模糊检测器 现在我们准备用OpenCV实现我们的快速傅里叶变换模糊检测器。 我们将要介绍的方法是基于Liu等人在2008年CVPR出版物《图像部分模糊检测和分类》中实现的。
http://www.cse.cuhk.edu.hk/leojia/all_final_papers/blur_detect_cvpr08.pdf
在我们的目录结构中打开blur_detector.py文件,插入以下代码:
# import the necessary packages
import matplotlib.pyplot as plt
import numpy as np
def detect_blur_fft(image, size=60, thresh=10, vis=False):
  # grab the dimensions of the image and use the dimensions to
  # derive the center (x, y)-coordinates
  (h, w) = image.shape
  (cX, cY) = (int(w / 2.0), int(h / 2.0))
我们的模糊检测器实现需要matplotlib和NumPy。我们将使用内建在NumPy中的快速傅里叶变换算法作为我们方法的基础;
第4行定义detect_blur_fft函数,接受四个参数:
图片image:我们对模糊检测输入图像
大小size:以图像中心点为中心的半径的大小,我们将使FFT偏移为零
阈值thresh:用于确定图像是否被认为是模糊的,将与震级的平均值(稍后详细说明)进行比较的一个值
标识符vis:一个布尔值,指示是否使用matplotlib可视化/绘制原始输入图像和大小图像
给定输入图像,首先获取它的尺寸(第7行)并计算中心(x, y)坐标(第8行)。
接下来,我们将使用NumPy的快速傅里叶变换(FFT)算法实现来计算离散傅里叶变换(DFT):
  # compute the FFT to find the frequency transform, then shift
  # the zero frequency component (i.e., DC component located at
  # the top-left corner) to the center where it will be more
  # easy to analyze
  fft = np.fft.fft2(image)
  fftShift = np.fft.fftshift(fft)
在这里,我们使用NumPy的内置算法计算FFT(第5行)。 然后我们将结果的零频率分量(直流分量)移到中心以便于分析(第6行)。 现在我们已经有了图像的FFT,如果设置了vis标志,让我们可视化一下结果:
  # check to see if we are visualizing our output
  if vis:
    # compute the magnitude spectrum of the transform
    magnitude = 20 * np.log(np.abs(fftShift))
    # display the original input image
    (fig, ax) = plt.subplots(1, 2, )
    ax[0].imshow(image, cmap="gray")
    ax[0].set_title("Input")
    ax[0].set_xticks([])
    ax[0].set_yticks([])
    # display the magnitude image
    ax[1].imshow(magnitude, cmap="gray")
    ax[1].set_title("Magnitude Spectrum")
    ax[1].set_xticks([])
    ax[1].set_yticks([])
    # show our plots
    plt.show()
出于调试和好奇的目的,您可能希望通过设置vis=True来绘制输入图像的FFT幅度谱。 如果你选择这样做,首先我们计算变换的振幅谱(第4行)。 然后,我们将原始输入图像绘制在幅度谱图像旁边(第6-16行),并显示结果(第19行)。 现在我们有了可视化振幅谱的方法,让我们来确定输入图像是否模糊:
  # zero-out the center of the FFT shift (i.e., remove low
  # frequencies), apply the inverse shift such that the DC
  # component once again becomes the top-left, and then apply
  # the inverse FFT
  fftShift[cY - size:cY + size, cX - size:cX + size] = 0
  fftShift = np.fft.ifftshift(fftShift)
  recon = np.fft.ifft2(fftShift)
在这里,我们:
设置我们的FFT移动为0(即,去除低频率)第5行
应用反向位移将DC组件放回左上角(第6行)
应用逆FFT(第7行)
到此,我们还有三个步骤来确定我们的图像是否模糊:
  # compute the magnitude spectrum of the reconstructed image,
  # then compute the mean of the magnitude values
  magnitude = 20 * np.log(np.abs(recon))
  mean = np.mean(magnitude)
  # the image will be considered "blurry" if the mean value of the
  # magnitudes is less than the threshold value
  return (mean, mean <= thresh
其余步骤包括:
在我们已经将中心DC值归零之后,再次计算重建图像的幅度值(第3行)。
计算幅度值的平均值(第4行)。
返回一个2元组的平均值以及一个指示输入图像是否模糊的布尔值(第8行)。查看代码,我们可以看到,通过比较平均值和阈值,我们已经确定了模糊布尔值(判断图像是否模糊)。
我们实现了一个基于fft的模糊检测算法。但还没有完成。在下一节中,我们将对静态图像应用我们的算法,以确保它按照我们的期望执行。
用FFT检测图像中的模糊
现在我们的detect_blur_fft 辅助函数已经实现,让我们通过创建一个Python驱动程序脚本来使用它,该脚本从磁盘加载一个输入图像,然后对其应用FFT模糊检测。
打开一个新文件,命名为detect_blur_image.py,并插入以下代码:
# import the necessary packages
from pyimagesearch.blur_detector import detect_blur_fft
import numpy as np
import argparse
import imutils
import cv2
# construct the argument parser and parse the arguments
ap = argparse.ArgumentParser()
ap.add_argument("-i", "--image", type=str, required=True,
  help="path input image that we'll detect blur in")
ap.add_argument("-t", "--thresh", type=int, default=20,
  help="threshold for our blur detector to fire")
ap.add_argument("-v", "--vis", type=int, default=-1,
  help="whether or not we are visualizing intermediary steps")
ap.add_argument("-d", "--test", type=int, default=-1,
  help="whether or not we should progressively blur the image")
args = vars(ap.parse_args())
第2-6行进行导入,特别的是,我们需要导入我们在上一节中实现的detect_blur_fft函数。
从这里,我们解析四个命令行参数:
--image:用于模糊检测的输入图像的路径。
--thresh:我们的模糊检测器计算阈值。
--vis:我们的标志符,指示是否将输入图像的幅度值图像可视化。
--test:为了测试,我们可以逐步模糊输入图像,并对每个示例进行基于fft的模糊检测;此标志指示我们是否将执行此测试。
--image、--thresh和--vis参数分别对应于我们在上一节实现的detect_blur_fft函数的image、thresh和vis参数。
让我们继续,加载我们的输入图像,执行快速傅里叶变换模糊检测:
# load the input image from disk, resize it, and convert it to
# grayscale
orig = cv2.imread(args["image"])
orig = imutils.resize(orig, width=500)
gray = cv2.cvtColor(orig, cv2.COLOR_BGR2GRAY)
# apply our blur detector using the FFT
(mean, blurry) = detect_blur_fft(gray, size=60,
  thresh=args["thresh"], vis=args["vis"] > 0)
进行FFT模糊检测,我们:
加载输入图像--image,并将其转换为灰度(第3-5行)
使用detect_blur_fft函数应用我们的FFT模糊检测器(第7和8行)
接下来,我们将注释并显示我们的图像:
# draw on the image, indicating whether or not it is blurry
image = np.dstack([gray] * 3)
color = (0, 0, 255) if blurry else (0, 255, 0)
text = "Blurry ({:.4f})" if blurry else "Not Blurry ({:.4f})"
text = text.format(mean)
cv2.putText(image, text, (10, 25), cv2.FONT_HERSHEY_SIMPLEX, 0.7,
  color, 2)
print("[INFO] {}".format(text))
# show the output image
cv2.imshow("Output", image)
cv2.waitKey(0)
在这里,我们:
向我们的单通道灰度图像添加两个通道,将结果存储在图像中(第2行)
通过第32行将颜色设置为红色(如果模糊)和绿色(如果不模糊)
在图像的左上角绘制模糊的文本指示和平均值(第4-7行),并在终端中打印相同的信息(第37行)
显示输出图像,直到按下一个键为止(第11和12行)
至此,我们已经完成了确定输入图像是否模糊的目标。 我们可以就此打住。但是为了更严格地测试我们的算法,让我们实现一个健壮的方法来测试我们的图像在不同层次上的模糊:
# check to see if are going to test our FFT blurriness detector using
# various sizes of a Gaussian kernel
if args["test"] > 0:
  # loop over various blur radii
  for radius in range(1, 30, 2):
    # clone the original grayscale image
    image = gray.copy()
    # check to see if the kernel radius is greater than zero
    if radius > 0:
      # blur the input image by the supplied radius using a
      # Gaussian kernel
      image = cv2.GaussianBlur(image, (radius, radius), 0)
      # apply our blur detector using the FFT
      (mean, blurry) = detect_blur_fft(image, size=60,
        thresh=args["thresh"], vis=args["vis"] > 0)
      # draw on the image, indicating whether or not it is
      # blurry
      image = np.dstack([image] * 3)
      color = (0, 0, 255) if blurry else (0, 255, 0)
      text = "Blurry ({:.4f})" if blurry else "Not Blurry ({:.4f})"
      text = text.format(mean)
      cv2.putText(image, text, (10, 25), cv2.FONT_HERSHEY_SIMPLEX,
        0.7, color, 2)
      print("[INFO] Kernel: {}, Result: {}".format(radius, text))
    # show the image
    cv2.imshow("Test Image", image)
    cv2.waitKey(0)
当设置了--test标志时,我们将进入从第3行开始的条件块。第3-31行代码完成了以下工作:
在逐渐增加的半径范围内对我们的灰度图像应用高斯模糊
对每个人为模糊的图像进行快速的基于傅里叶变换的模糊检测
注释并显示结果
为了完成我们的测试特性,第5行开始在[0,30]范围内的所有奇数半径上进行循环。从这里开始,第13行应用OpenCV的GaussianBlur方法有意地在我们的图像中引入模糊。 其他的都是一样的,包括模糊检测算法和注释步骤。您可以通过在屏幕上按一个键来循环测试结果图像,直到模糊半径在该范围内耗尽。 当然,我们测试例程的目的是让我们能够有效地感受和调整模糊阈值参数(—thresh)。
FFT模糊检测在图像结果 现在我们准备使用OpenCV和快速傅里叶变换来检测图像中的模糊。 首先,请确保使用本教程的“下载”部分下载源代码和示例图像。 然后打开终端,执行以下命令:
$ python blur_detector_image.py --image images/adrian_01.png
[INFO] Not Blurry (42.4630)
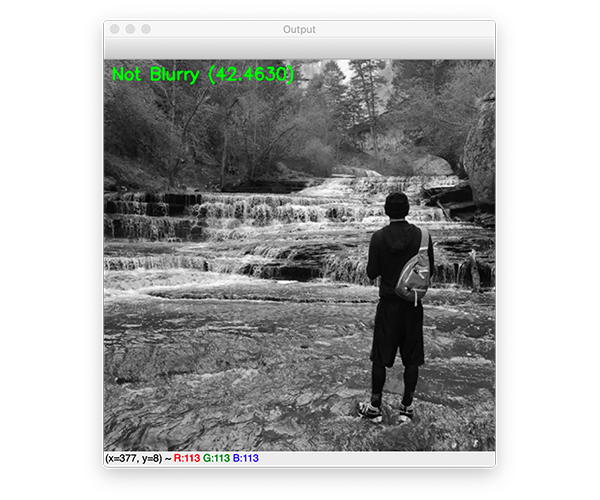
图3:结合快速傅里叶变换(FFT)算法,使用Python和OpenCV来确定照片是否模糊
这里你可以看到我在锡安国家公园的地铁徒步旅行的输入图像-图像被正确地标记为不模糊。
让我们试试另一张图片,这是我家的狗,Jemma:
$ python blur_detector_image.py --image images/jemma.png
[INFO] Blurry (12.4738)
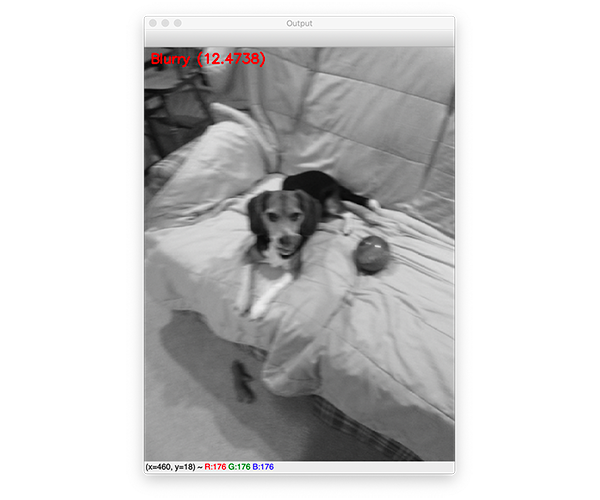
图4:基于Python、OpenCV和NumPy的快速傅里叶变换(FFT)模糊检测算法已经自动判定Janie的这张图像模糊。
这幅图像有明显的模糊,因此被标记为模糊。
为了了解当图像变得越来越模糊时,FFT的平均幅度值是如何变化的,让我们提供——test命令行参数:
$ python blur_detector_image.py --image images/adrian_02.png --test 1
[INFO] Not Blurry (32.0934)
[INFO] Kernel: 1, Result: Not Blurry (32.0934)
[INFO] Kernel: 3, Result: Not Blurry (25.1770)
[INFO] Kernel: 5, Result: Not Blurry (20.5668)
[INFO] Kernel: 7, Result: Blurry (13.4830)
[INFO] Kernel: 9, Result: Blurry (7.8893)
[INFO] Kernel: 11, Result: Blurry (0.6506)
[INFO] Kernel: 13, Result: Blurry (-5.3609)
[INFO] Kernel: 15, Result: Blurry (-11.4612)
[INFO] Kernel: 17, Result: Blurry (-17.0109)
[INFO] Kernel: 19, Result: Blurry (-19.6464)
[INFO] Kernel: 21, Result: Blurry (-20.4758)
[INFO] Kernel: 23, Result: Blurry (-20.7365)
[INFO] Kernel: 25, Result: Blurry (-20.9362)
[INFO] Kernel: 27, Result: Blurry (-21.1911)
[INFO] Kernel: 29, Result: Blurry (-21.3853)
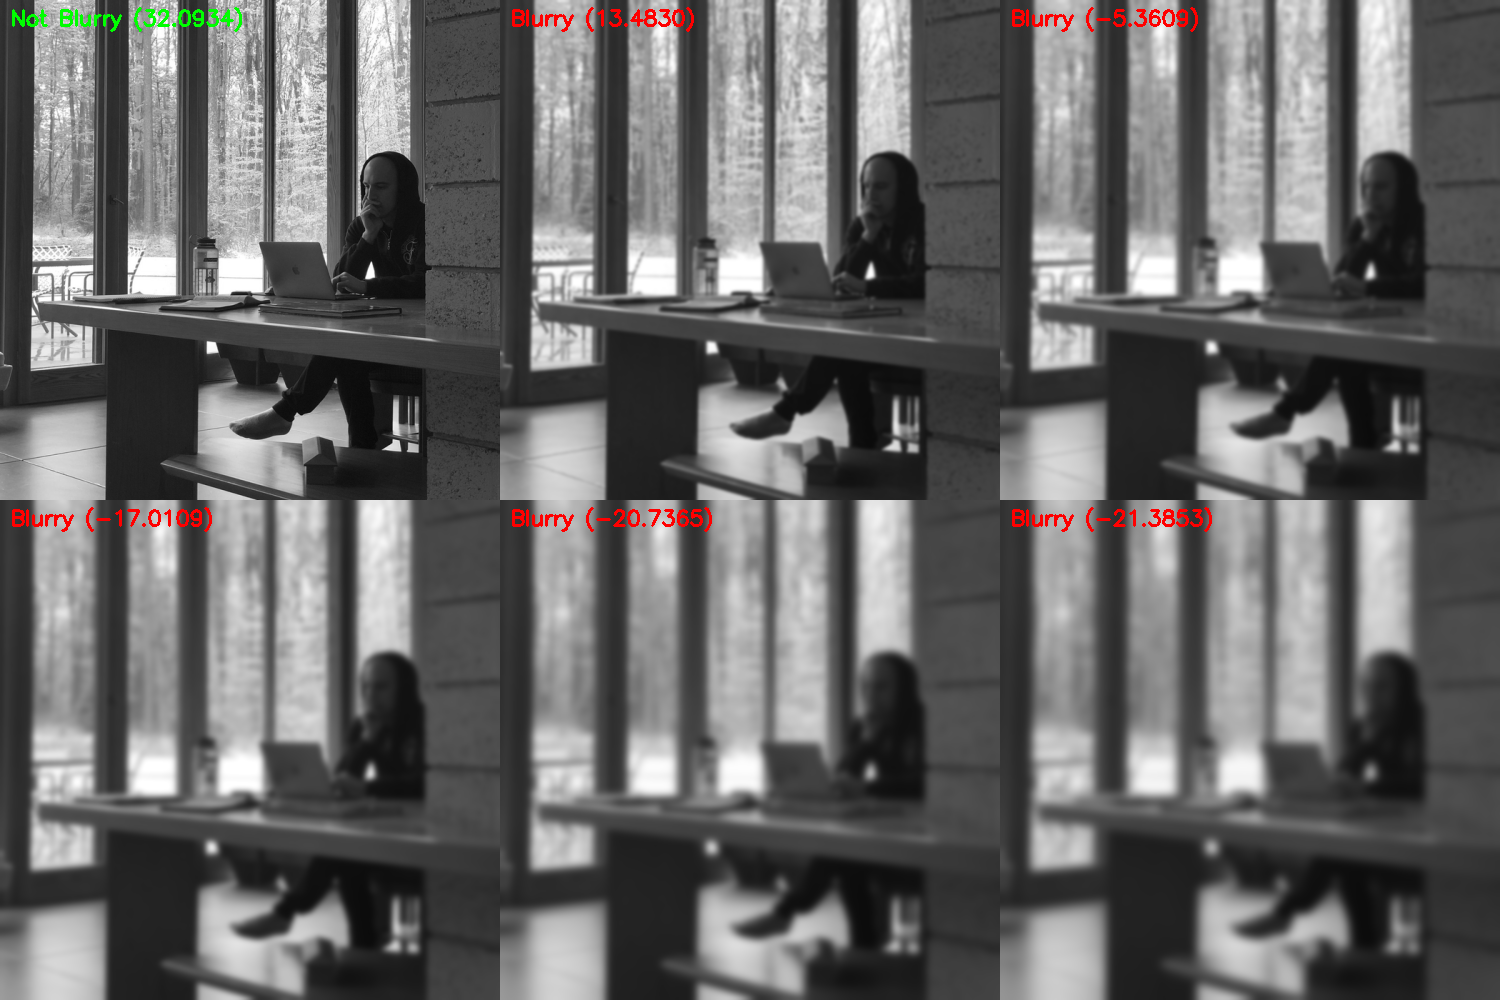
图5:使用Python模糊检测器脚本的——测试例程,我们应用了一系列有意的模糊以及快速傅里叶变换(FFT)方法来确定图像是否模糊。这个测试例程非常有用,因为它允许您调优模糊阈值参数。
在这里,你可以看到,当我们的图像变得越来越模糊,FFT的平均幅度值下降。 我们的FFT模糊检测方法也适用于非自然场景图像。 例如,假设我们想要构建一个自动文档扫描器应用程序——这样的计算机视觉项目应该会自动拒绝模糊图像。 然而,文档图像与自然场景图像有很大的不同,从本质上来说,文档图像对模糊更加敏感。 任何类型的模糊都会严重影响OCR的精度。 因此,我们应该增加我们的——thresh值(我还将使用——vis参数,以便我们可以可视化FFT幅度值的变化):
$ python blur_detector_image.py --image images/resume.png --thresh 27 --test 1 --vis 1
[INFO] Not Blurry (34.6735)
[INFO] Kernel: 1, Result: Not Blurry (34.6735)
[INFO] Kernel: 3, Result: Not Blurry (29.2539)
[INFO] Kernel: 5, Result: Blurry (26.2893)
[INFO] Kernel: 7, Result: Blurry (21.7390)
[INFO] Kernel: 9, Result: Blurry (18.3632)
[INFO] Kernel: 11, Result: Blurry (12.7235)
[INFO] Kernel: 13, Result: Blurry (9.1489)
[INFO] Kernel: 15, Result: Blurry (2.3377)
[INFO] Kernel: 17, Result: Blurry (-2.6372)
[INFO] Kernel: 19, Result: Blurry (-9.1908)
[INFO] Kernel: 21, Result: Blurry (-15.9808)
[INFO] Kernel: 23, Result: Blurry (-20.6240)
[INFO] Kernel: 25, Result: Blurry (-29.7478)
[INFO] Kernel: 27, Result: Blurry (-29.0728)
[INFO] Kernel: 29, Result: Blurry (-37.7561)

图6:OpenCV快速傅里叶变换(FFT)用于图像和视视频中的模糊检测,可以判断简历等文档是否模糊。
在这里,您可以看到我们的图像很快变得模糊和不可读,正如输出所示,我们的OpenCV FFT模糊检测器正确地将这些图像标记为模糊。
下面是一个可视化的快速傅里叶变换幅度值,图像变得越来越模糊:
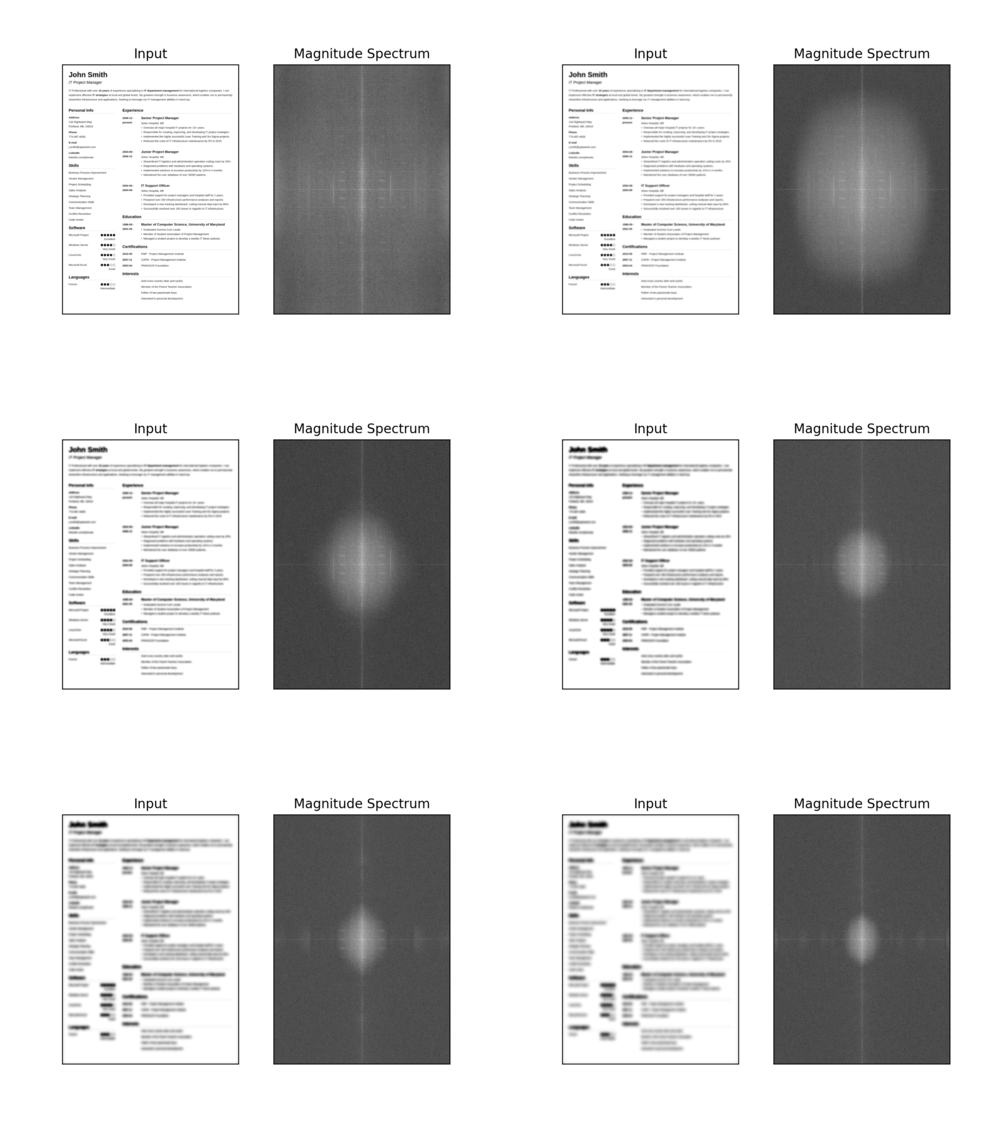
图7:当图像变得越来越模糊时,我们可以看到幅度谱可视化的变化。本教程使用OpenCV和NumPy在图像和视流中执行快速傅里叶变换(FFT)模糊检测。
利用OpenCV和FFT检测视频中的模糊 到目前为止,我们已经对图像应用了快速傅里叶变换模糊检测器。 但是有可能将FFT模糊检测应用到视频流吗? 整个过程也能实时完成吗? 打开一个新文件,命名为blur_detector_video.py,并插入以下代码:
# import the necessary packages
from imutils.video import VideoStream
from pyimagesearch.blur_detector import detect_blur_fft
import argparse
import imutils
import time
import cv2
# construct the argument parser and parse the arguments
ap = argparse.ArgumentParser()
ap.add_argument("-t", "--thresh", type=int, default=10,
  help="threshold for our blur detector to fire")
args = vars(ap.parse_args())
我们从导入开始,特别是我们的VideoStream类和detect_blur_fft函数。 对于这个Python脚本,我们只有一个命令行参数:FFT模糊检测的阈值(——thresh)。 从这里,我们准备初始化我们的视频流,并开始循环从我们的摄像头的帧:
# initialize the video stream and allow the camera sensor to warm up
print("[INFO] starting video stream...")
vs = VideoStream(src=0).start()
time.sleep(2.0)
# loop over the frames from the video stream
while True:
  # grab the frame from the threaded video stream and resize it
  # to have a maximum width of 400 pixels
  frame = vs.read()
  frame = imutils.resize(frame, width=500)
  # convert the frame to grayscale and detect blur in it
  gray = cv2.cvtColor(frame, cv2.COLOR_BGR2GRAY)
  (mean, blurry) = detect_blur_fft(gray, size=60,
    thresh=args["thresh"], vis=False)
第3行和第4行初始化了我们的摄像头图像流,并允许相机有时间预热。 从这里开始,我们在第7行开始帧处理循环。在内部,我们抓取一帧并将其转换为灰度(第10-14行),就像在我们的单一图像模糊检测脚本。 然后,第15和16行应用我们的快速傅里叶变换模糊检测算法,同时传递我们的灰色框架和——thresh命令行参数。我们不会把幅度谱的表示形象化,所以vis=False。 接下来,我们将处理这个特定帧的结果:
  # draw on the frame, indicating whether or not it is blurry
  color = (0, 0, 255) if blurry else (0, 255, 0)
  text = "Blurry ({:.4f})" if blurry else "Not Blurry ({:.4f})"
  text = text.format(mean)
  cv2.putText(frame, text, (10, 25), cv2.FONT_HERSHEY_SIMPLEX,
    0.7, color, 2)
  # show the output frame
  cv2.imshow("Frame", frame)
  key = cv2.waitKey(1) & 0xFF
  # if the `q` key was pressed, break from the loop
  if key == ord("q"):
    break
# do a bit of cleanup
cv2.destroyAllWindows()
vs.stop()
最后一个代码块此时看起来应该非常熟悉,因为这是我们第三次看到这些代码行了。我们在这里:
注释模糊(红色文本)或不模糊(绿色文本)以及平均值(第2-6行)
显示结果(第9行)
如果按下q键就退出(第10-14行),并执行家务清理(第17和18行)
快速傅里叶变换视频模糊检测结果 我们现在准备看看我们的OpenCV FFT模糊检测器是否可以应用于实时视频流。 请确保使用本教程的“下载”部分下载源代码。 然后打开终端,执行以下命令:
$ python blur_detector_video.py
[INFO] starting video stream...
当我移动我的笔记本电脑,运动模糊被引入帧。 如果我们要实现一个计算机视觉系统来自动提取关键、重要的帧,或者创建一个自动的视频OCR系统,我们会想要丢弃这些模糊的帧——使用我们的OpenCV FFT模糊检测器,我们可以做到这一点!
-
OpenCV的移植方法2021-02-04 0
-
如何使用Python中的OpenCV模块检测颜色2023-02-09 0
-
openCV边缘检测原理是什么?2023-10-10 0
-
战场目标的模糊逻辑检测与识别方法2009-07-09 694
-
基于独特码检测的载波相位模糊纠正方法2010-01-13 561
-
Android系统下OpenCV的人脸检测模块的设计2012-11-07 1025
-
OpenCV3编程入门-源码例程全集-blur图像模糊2016-09-18 459
-
基于模糊分类的流体管道泄漏故障智能检测方法研究_刘金海2017-01-21 573
-
基于方位向模糊区位置去除虚假船的检测方法2017-12-07 679
-
一种新的图像局部模糊区域检测方法2018-02-05 987
-
OpenCV快速傅里叶变换(FFT)模糊检测2020-09-24 6934
-
基于DSP的通用FFT在电网检测中的应用2021-06-24 729
-
BorlandCBuilder6.0安装OPENCV方法2021-09-17 564
-
如何使用Python OpenCV进行面部标志检测2022-08-12 1466
-
使用opencv和python进行智能火灾检测2022-11-02 488
全部0条评论

快来发表一下你的评论吧 !

