1 STM32CubeIDE Home
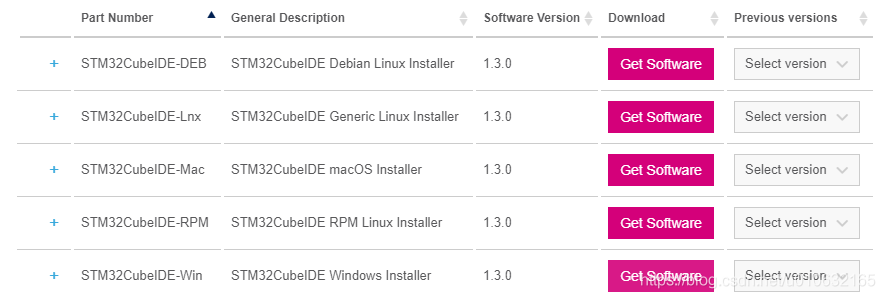
进入到官网的下载界面,选择符合对应的操作系统和对应的版本,下载安装,下载界面如下图所示;

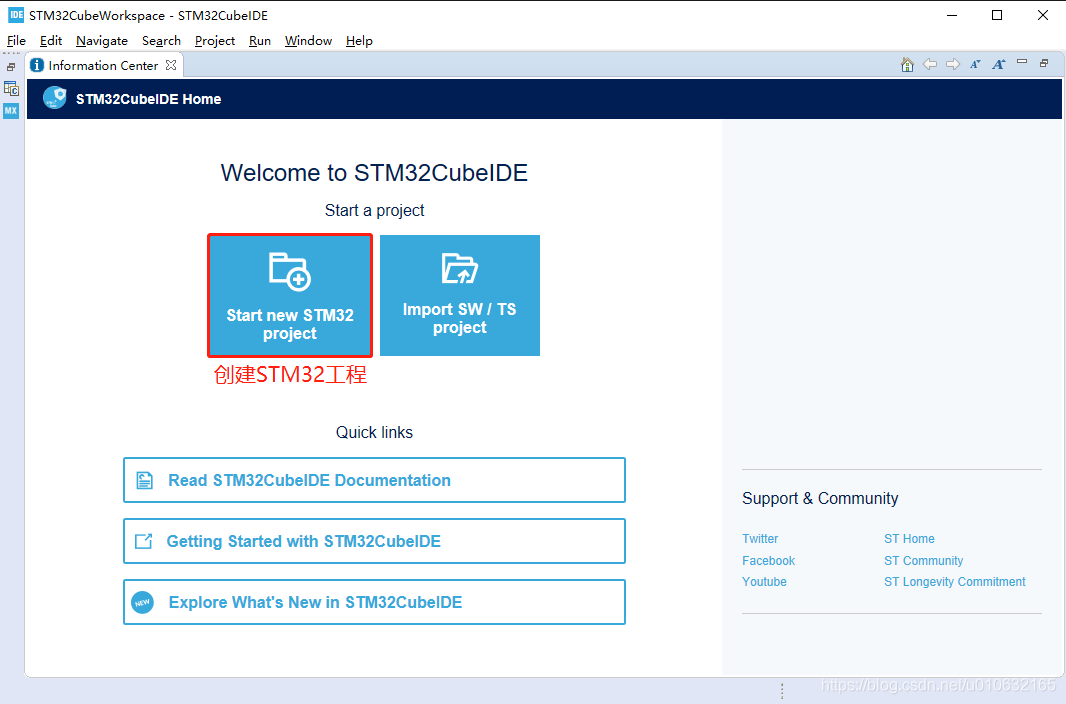
安装完成之后,打开STM32CubeIDE会直接进入主页,这里开始创建STM32工程或者导入工程,如下图所示;

Read STM32CubeIDE Documentation有大量的官方文档;可以快速入门,包括;
安装教程;
用户手册;
2 生成工程

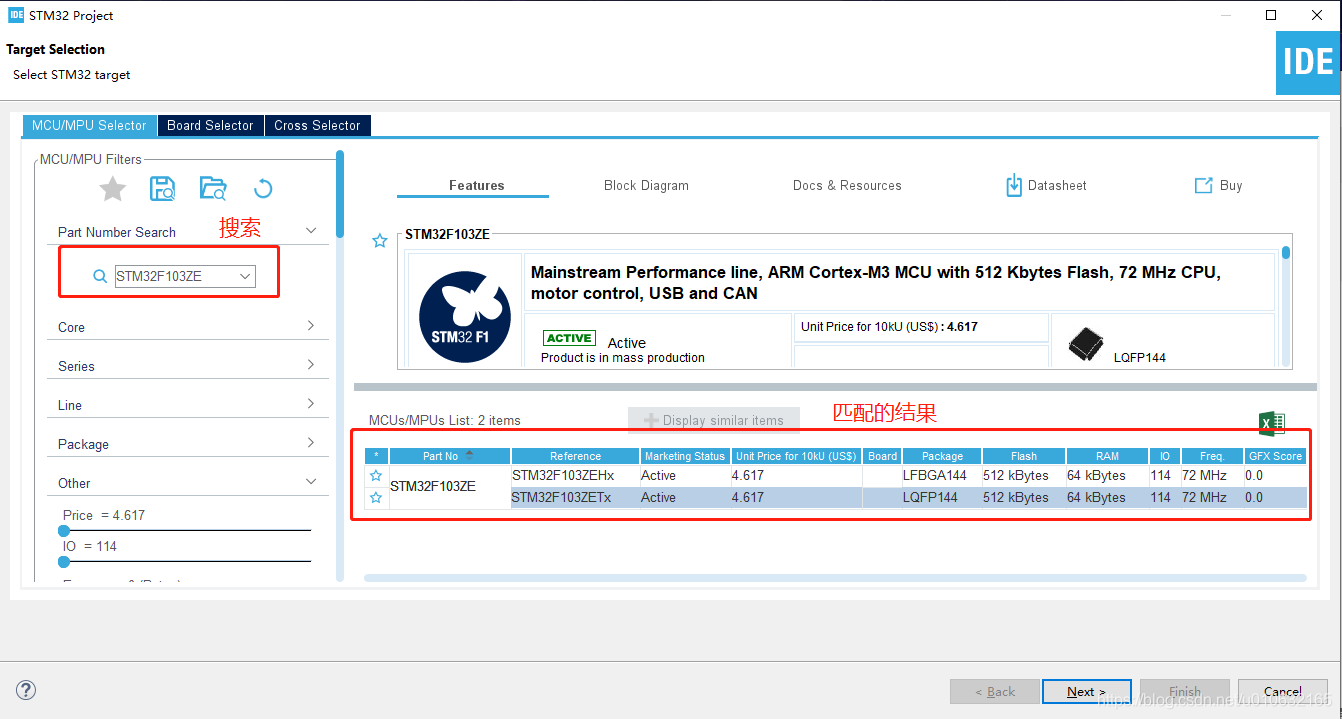
设置工程名称和路径之后就基本完成工程的创建了,具体如下图所示;

在此期间可能会联机下载库文件和相应MCU的外设文件,这里要保持网络畅通,并耐心等待;
成功创建工程之后,如下图所示;

可以看到左边是HAL库,右边是CubeMAX的配置界面,至此已经完成了工程的生成了,那么下一步进行进行编译和下载。
另外在文件列表中可以看到TEST.ioc文件,这是CubeMAX的配置文件,相当于一些软件的ini文件,CubeMAX主要通过读写该文件将设备的配置保存和加载的软件中,直接用文本编辑器打开可以看到具体的信息如下所示;
#MicroXplorer Configuration settings - do not modify
FREERTOS.IPParameters=Tasks01
FREERTOS.Tasks01=defaultTask,0,128,StartDefaultTask,Default,NULL
File.Version=6
KeepUserPlacement=false
Mcu.Family=STM32F1
Mcu.IP0=FREERTOS
Mcu.IP1=NVIC
Mcu.IP2=RCC
Mcu.IP3=SYS
Mcu.IPNb=4
Mcu.Name=STM32F103Z(C-D-E)Tx
Mcu.Package=LQFP144
Mcu.Pin0=VP_FREERTOS_VS_CMSIS_V1
Mcu.Pin1=VP_SYS_VS_ND
Mcu.Pin2=VP_SYS_VS_Systick
Mcu.PinsNb=3
Mcu.ThirdPartyNb=0
Mcu.UserConstants=
Mcu.UserName=STM32F103ZETx
MxCube.Version=5.3.0
MxDb.Version=DB.5.0.30
NVIC.BusFault_IRQn=true:0:0:false:false:true:false:false:false
NVIC.DebugMonitor_IRQn=true:0:0:false:false:true:false:false:false
NVIC.HardFault_IRQn=true:0:0:false:false:true:false:false:false
NVIC.MemoryManagement_IRQn=true:0:0:false:false:true:false:false:false
NVIC.NonMaskableInt_IRQn=true:0:0:false:false:true:false:false:false
NVIC.PendSV_IRQn=true:15:0:false:false:false:true:false:false
NVIC.PriorityGroup=NVIC_PRIORITYGROUP_4
NVIC.SVCall_IRQn=true:0:0:false:false:false:false:false:false
NVIC.SysTick_IRQn=true:15:0:false:false:true:true:false:true
NVIC.UsageFault_IRQn=true:0:0:false:false:true:false:false:false
PCC.Checker=false
PCC.Line=STM32F103
PCC.MCU=STM32F103Z(C-D-E)Tx
PCC.PartNumber=STM32F103ZETx
PCC.Seq0=0
PCC.Series=STM32F1
PCC.Temperature=25
PCC.Vdd=3.3
PinOutPanel.RotationAngle=0
ProjectManager.AskForMigrate=true
ProjectManager.BackupPrevious=false
ProjectManager.CompilerOptimize=6
ProjectManager.ComputerToolchain=false
ProjectManager.CoupleFile=false
ProjectManager.CustomerFirmwarePackage=
ProjectManager.DefaultFWLocation=true
ProjectManager.DeletePrevious=true
ProjectManager.DeviceId=STM32F103ZETx
ProjectManager.FirmwarePackage=STM32Cube FW_F1 V1.8.0
ProjectManager.FreePins=false
ProjectManager.HalAssertFull=false
ProjectManager.HeapSize=0x200
ProjectManager.KeepUserCode=true
ProjectManager.LastFirmware=true
ProjectManager.LibraryCopy=1
ProjectManager.MainLocation=Src
ProjectManager.NoMain=false
ProjectManager.PreviousToolchain=
ProjectManager.ProjectBuild=false
ProjectManager.ProjectFileName=TEST.ioc
ProjectManager.ProjectName=TEST
ProjectManager.StackSize=0x400
ProjectManager.TargetToolchain=STM32CubeIDE
ProjectManager.ToolChainLocation=
ProjectManager.UnderRoot=true
ProjectManager.functionlistsort=1-SystemClock_Config-RCC-false-HAL-false
RCC.APB1Freq_Value=8000000
RCC.APB2Freq_Value=8000000
RCC.FamilyName=M
RCC.IPParameters=APB1Freq_Value,APB2Freq_Value,FamilyName,PLLCLKFreq_Value,PLLMCOFreq_Value,TimSysFreq_Value
RCC.PLLCLKFreq_Value=8000000
RCC.PLLMCOFreq_Value=4000000
RCC.TimSysFreq_Value=8000000
VP_FREERTOS_VS_CMSIS_V1.Mode=CMSIS_V1
VP_FREERTOS_VS_CMSIS_V1.Signal=FREERTOS_VS_CMSIS_V1
VP_SYS_VS_ND.Mode=No_Debug
VP_SYS_VS_ND.Signal=SYS_VS_ND
VP_SYS_VS_Systick.Mode=SysTick
VP_SYS_VS_Systick.Signal=SYS_VS_Systick
board=custom
i***adioc=false
这个不用太关心,因为可以通过图形化界面去配置,软件会自动修改这个配置文件的。
3 程序下载
可以在工具栏直接点击锤子

快速进行构建,最终会自动生成elf的文件,也就是仿真器可以烧录的文件;然后可以在窗口直接查看Build的信息,包括报错等等,具体如下;
12:52:59 **** Incremental Build of configuration Debug for project TEST ****
make -j4 all
arm-none-eabi-gcc “。./Drivers/STM32F1xx_HAL_Driver/Src/stm32f1xx_hal_cortex.c” -mcpu=cortex-m3 -std=gnu11 -g3 -DSTM32F103xE -DUSE_HAL_DRIVER -DDEBUG -c -I.。/Inc -I.。/Drivers/CMSIS/Device/ST/STM32F1xx/Include -I.。/Drivers/CMSIS/Include -I.。/Drivers/STM32F1xx_HAL_Driver/Inc/Legacy -I.。/Drivers/STM32F1xx_HAL_Driver/Inc -O0 -ffunction-sections -fdata-sections -Wall -fstack-usage -MMD -MP -MF“Drivers/STM32F1xx_HAL_Driver/Src/stm32f1xx_hal_cortex.d” -MT“Drivers/STM32F1xx_HAL_Driver/Src/stm32f1xx_hal_cortex.o” --specs=nano.specs -mfloat-abi=soft -mthumb -o “Drivers/STM32F1xx_HAL_Driver/Src/stm32f1xx_hal_cortex.o”
。..
Finished building target: TEST.elf
arm-none-eabi-objdump -h -S TEST.elf 》 “TEST.list”
arm-none-eabi-size TEST.elf
text data bss dec hex filename
3860 20 8228 12108 2f4c TEST.elf
Finished building: default.size.stdout
点击工具栏的虫子图标

进行调试;

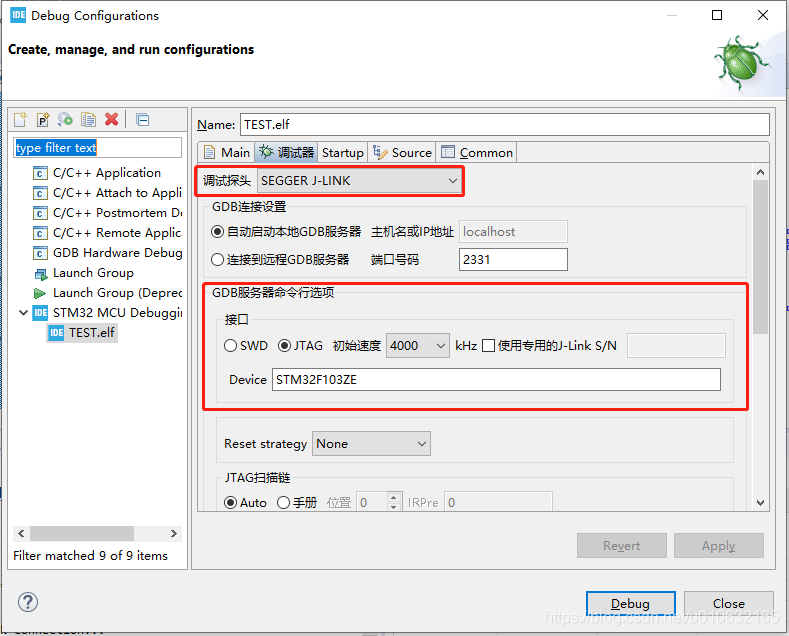
在菜单栏Run选项中找到Debug Configuratons,如下图所示,配置调试用的仿真器和接口方式,最后点击Debug即可将TEST.elf下载到target中。

成功开始调试之后,如下图所示;

1 STM32CubeIDE Home
进入到官网的下载界面,选择符合对应的操作系统和对应的版本,下载安装,下载界面如下图所示;

安装完成之后,打开STM32CubeIDE会直接进入主页,这里开始创建STM32工程或者导入工程,如下图所示;

Read STM32CubeIDE Documentation有大量的官方文档;可以快速入门,包括;
安装教程;
用户手册;
2 生成工程

设置工程名称和路径之后就基本完成工程的创建了,具体如下图所示;

在此期间可能会联机下载库文件和相应MCU的外设文件,这里要保持网络畅通,并耐心等待;
成功创建工程之后,如下图所示;

可以看到左边是HAL库,右边是CubeMAX的配置界面,至此已经完成了工程的生成了,那么下一步进行进行编译和下载。
另外在文件列表中可以看到TEST.ioc文件,这是CubeMAX的配置文件,相当于一些软件的ini文件,CubeMAX主要通过读写该文件将设备的配置保存和加载的软件中,直接用文本编辑器打开可以看到具体的信息如下所示;
#MicroXplorer Configuration settings - do not modify
FREERTOS.IPParameters=Tasks01
FREERTOS.Tasks01=defaultTask,0,128,StartDefaultTask,Default,NULL
File.Version=6
KeepUserPlacement=false
Mcu.Family=STM32F1
Mcu.IP0=FREERTOS
Mcu.IP1=NVIC
Mcu.IP2=RCC
Mcu.IP3=SYS
Mcu.IPNb=4
Mcu.Name=STM32F103Z(C-D-E)Tx
Mcu.Package=LQFP144
Mcu.Pin0=VP_FREERTOS_VS_CMSIS_V1
Mcu.Pin1=VP_SYS_VS_ND
Mcu.Pin2=VP_SYS_VS_Systick
Mcu.PinsNb=3
Mcu.ThirdPartyNb=0
Mcu.UserConstants=
Mcu.UserName=STM32F103ZETx
MxCube.Version=5.3.0
MxDb.Version=DB.5.0.30
NVIC.BusFault_IRQn=true:0:0:false:false:true:false:false:false
NVIC.DebugMonitor_IRQn=true:0:0:false:false:true:false:false:false
NVIC.HardFault_IRQn=true:0:0:false:false:true:false:false:false
NVIC.MemoryManagement_IRQn=true:0:0:false:false:true:false:false:false
NVIC.NonMaskableInt_IRQn=true:0:0:false:false:true:false:false:false
NVIC.PendSV_IRQn=true:15:0:false:false:false:true:false:false
NVIC.PriorityGroup=NVIC_PRIORITYGROUP_4
NVIC.SVCall_IRQn=true:0:0:false:false:false:false:false:false
NVIC.SysTick_IRQn=true:15:0:false:false:true:true:false:true
NVIC.UsageFault_IRQn=true:0:0:false:false:true:false:false:false
PCC.Checker=false
PCC.Line=STM32F103
PCC.MCU=STM32F103Z(C-D-E)Tx
PCC.PartNumber=STM32F103ZETx
PCC.Seq0=0
PCC.Series=STM32F1
PCC.Temperature=25
PCC.Vdd=3.3
PinOutPanel.RotationAngle=0
ProjectManager.AskForMigrate=true
ProjectManager.BackupPrevious=false
ProjectManager.CompilerOptimize=6
ProjectManager.ComputerToolchain=false
ProjectManager.CoupleFile=false
ProjectManager.CustomerFirmwarePackage=
ProjectManager.DefaultFWLocation=true
ProjectManager.DeletePrevious=true
ProjectManager.DeviceId=STM32F103ZETx
ProjectManager.FirmwarePackage=STM32Cube FW_F1 V1.8.0
ProjectManager.FreePins=false
ProjectManager.HalAssertFull=false
ProjectManager.HeapSize=0x200
ProjectManager.KeepUserCode=true
ProjectManager.LastFirmware=true
ProjectManager.LibraryCopy=1
ProjectManager.MainLocation=Src
ProjectManager.NoMain=false
ProjectManager.PreviousToolchain=
ProjectManager.ProjectBuild=false
ProjectManager.ProjectFileName=TEST.ioc
ProjectManager.ProjectName=TEST
ProjectManager.StackSize=0x400
ProjectManager.TargetToolchain=STM32CubeIDE
ProjectManager.ToolChainLocation=
ProjectManager.UnderRoot=true
ProjectManager.functionlistsort=1-SystemClock_Config-RCC-false-HAL-false
RCC.APB1Freq_Value=8000000
RCC.APB2Freq_Value=8000000
RCC.FamilyName=M
RCC.IPParameters=APB1Freq_Value,APB2Freq_Value,FamilyName,PLLCLKFreq_Value,PLLMCOFreq_Value,TimSysFreq_Value
RCC.PLLCLKFreq_Value=8000000
RCC.PLLMCOFreq_Value=4000000
RCC.TimSysFreq_Value=8000000
VP_FREERTOS_VS_CMSIS_V1.Mode=CMSIS_V1
VP_FREERTOS_VS_CMSIS_V1.Signal=FREERTOS_VS_CMSIS_V1
VP_SYS_VS_ND.Mode=No_Debug
VP_SYS_VS_ND.Signal=SYS_VS_ND
VP_SYS_VS_Systick.Mode=SysTick
VP_SYS_VS_Systick.Signal=SYS_VS_Systick
board=custom
i***adioc=false
这个不用太关心,因为可以通过图形化界面去配置,软件会自动修改这个配置文件的。
3 程序下载
可以在工具栏直接点击锤子

快速进行构建,最终会自动生成elf的文件,也就是仿真器可以烧录的文件;然后可以在窗口直接查看Build的信息,包括报错等等,具体如下;
12:52:59 **** Incremental Build of configuration Debug for project TEST ****
make -j4 all
arm-none-eabi-gcc “。./Drivers/STM32F1xx_HAL_Driver/Src/stm32f1xx_hal_cortex.c” -mcpu=cortex-m3 -std=gnu11 -g3 -DSTM32F103xE -DUSE_HAL_DRIVER -DDEBUG -c -I.。/Inc -I.。/Drivers/CMSIS/Device/ST/STM32F1xx/Include -I.。/Drivers/CMSIS/Include -I.。/Drivers/STM32F1xx_HAL_Driver/Inc/Legacy -I.。/Drivers/STM32F1xx_HAL_Driver/Inc -O0 -ffunction-sections -fdata-sections -Wall -fstack-usage -MMD -MP -MF“Drivers/STM32F1xx_HAL_Driver/Src/stm32f1xx_hal_cortex.d” -MT“Drivers/STM32F1xx_HAL_Driver/Src/stm32f1xx_hal_cortex.o” --specs=nano.specs -mfloat-abi=soft -mthumb -o “Drivers/STM32F1xx_HAL_Driver/Src/stm32f1xx_hal_cortex.o”
。..
Finished building target: TEST.elf
arm-none-eabi-objdump -h -S TEST.elf 》 “TEST.list”
arm-none-eabi-size TEST.elf
text data bss dec hex filename
3860 20 8228 12108 2f4c TEST.elf
Finished building: default.size.stdout
点击工具栏的虫子图标

进行调试;

在菜单栏Run选项中找到Debug Configuratons,如下图所示,配置调试用的仿真器和接口方式,最后点击Debug即可将TEST.elf下载到target中。

成功开始调试之后,如下图所示;


 举报
举报


 举报
举报

