
如何使用Arduino制作倒数计时器
描述
计时器是一种用于测量时间间隔的时钟。有两种类型的计时器,一种从零开始向上计数,用于测量经过的时间,称为秒表。并且,第二个从用户提供的指定持续时间开始倒计时,通常称为倒数计时器。
在这里,在本教程中,我们将向您展示如何使用Arduino制作倒数计时器。
所需材料
Arduino UNO
液晶屏 16*2
4*4矩阵键盘
蜂鸣器
按钮
电位器 (10k)
电阻器(10k,100欧姆)
连接线
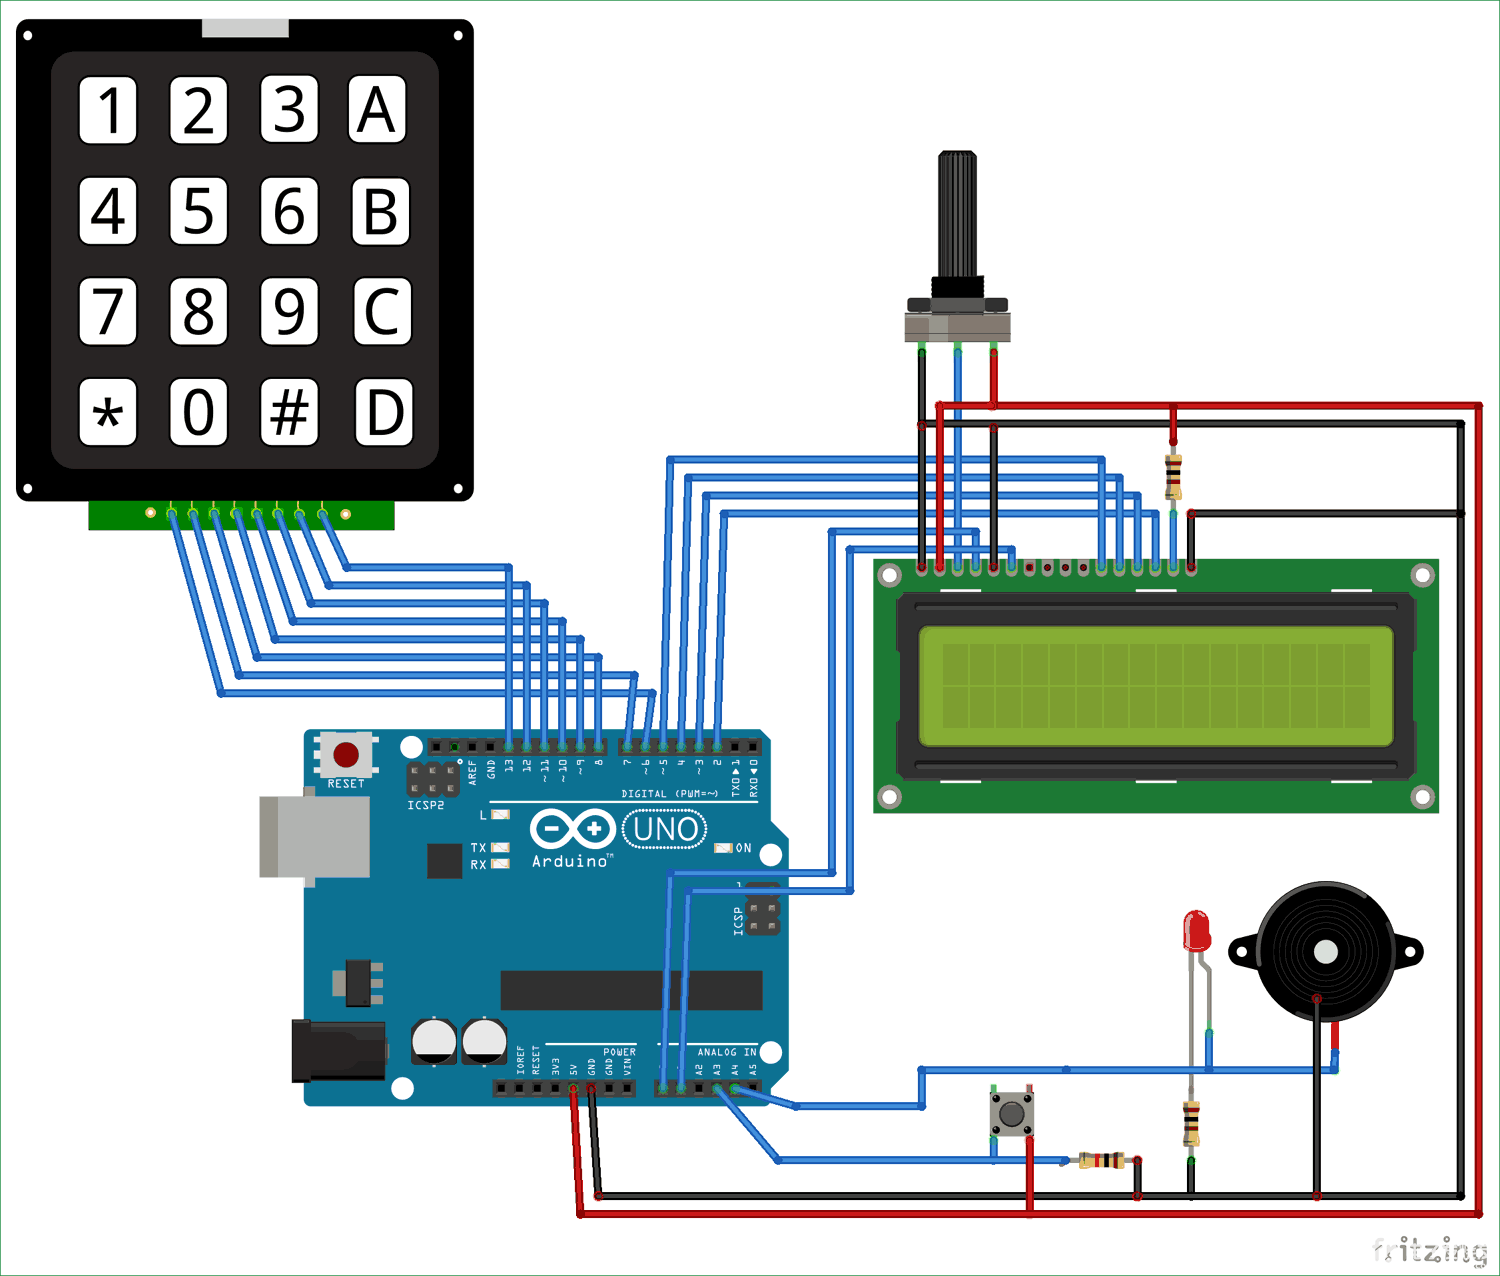
Arduino倒数计时器威廉希尔官方网站 图

Arduino Uno在这里用作主控制器。键盘用于馈送持续时间,16*2 LCD用于显示倒计时。按钮用于启动时间。
Arduino倒数计时器代码和解释
完整的Arduino定时器代码在本项目结束时给出。
在下面的代码中,我们将初始化键盘和LCD的库以及代码中使用的变量。
#include
#include
long int set1;
long int set2;
long int set3;
long int set4;
long int j;
int t1, t2, t3, t4, t5, t6;
int r1, r2, r3;
char key;
String r[8];
String hours;
String minutes;
String seconds;
现在,在下面的代码中,我们正在初始化 no。用于定义键盘矩阵的行和列。
const byte ROWS = 4; // Four rows
const byte COLS = 4; // Three columns
char keys[ROWS][COLS] = {
{'1','2','3','A'},
{'4','5','6','B'},
{'7','8','9','C'},
{'*','0','#','D'}
};
要将 4*4 矩阵键盘与 Arduino 连接,我们必须定义行和列的引脚。因此,在下面的代码中,我们定义了键盘和 16x2 LCD 的引脚。
byte rowPins[ROWS] = { 6, 7, 8, 9 };// Connect keypad ROW0, ROW1, ROW2 and ROW3 to these Arduino pins
byte colPins[COLS] = { 10, 11, 12, 13 };// Connect keypad COL0, COL1 and COL2 to t
LiquidCrystal lcd(A0, A1, 5, 4, 3, 2); // Creates an LC object. Parameters: (rs, enable, d4, d5, d6, d7)
下面的代码用于制作键盘,
Keypad kpd = Keypad( makeKeymap(keys), rowPins, colPins, ROWS, COLS );
在 void setFeedingTime() 函数代码中,按下按钮后我们可以输入计时器的时间,然后在输入计时器持续时间后,我们必须按 D 开始倒计时。
void setFeedingTime()
{
feed = true;
int i=0;
lcd.clear();
lcd.setCursor(0,0);
lcd.print("Set feeding Time");
lcd.clear();
lcd.print("HH:MM:SS");
lcd.setCursor(0,1);
while(1){
key = kpd.getKey();
char j;
if(key!=NO_KEY){
lcd.setCursor(j,1);
lcd.print(key);
r[i] = key-48;
i++;
j++;
if (j==2 || j == 5)
{
lcd.print(":"); j++;
}
delay(500);
}
if (key == 'D')
{key=0; break; }
}
lcd.clear();
}
在void setup()函数中,我们初始化了LCD和串行通信,并在下面的代码中将引脚定义为INPUT和OUTPUT。
void setup()
{
lcd.begin(16,2);
Serial.begin(9600);
pinMode(A0, OUTPUT);
pinMode(A1, OUTPUT);
pinMode(A3, INPUT);
pinMode(A4, OUTPUT);
}
这个Arduino倒数计时器的工作很简单,但代码有点复杂。代码由代码中的注释解释。
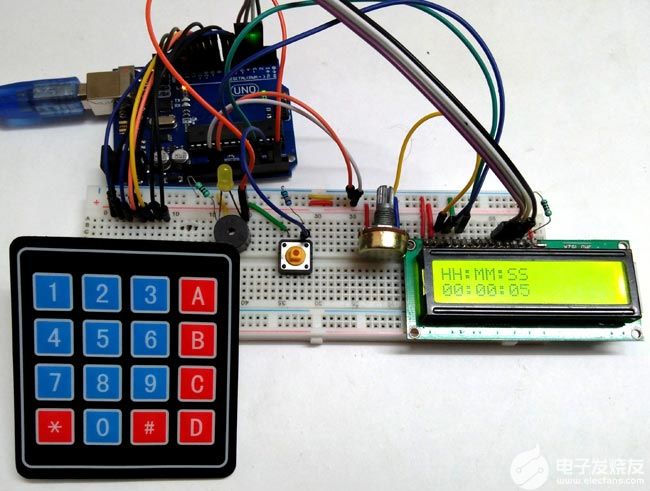
最初,它将在LCD显示屏上打印“ Arduino Timer”,直到您按下按钮。一旦您按下按钮,它将通过调用“setFeedingTime”函数要求进入倒计时持续时间。然后,您可以在键盘的帮助下输入持续时间。然后,您需要按“ D”以节省时间并开始倒数计时器。在void loop()函数中,我们做了一些计算来逐秒递减时间,并根据剩余时间显示小时,分钟和秒(HH:MM:SS)的正确值。所有代码都通过注释进行了很好的解释。您可以查看下面的完整代码和演示视频。

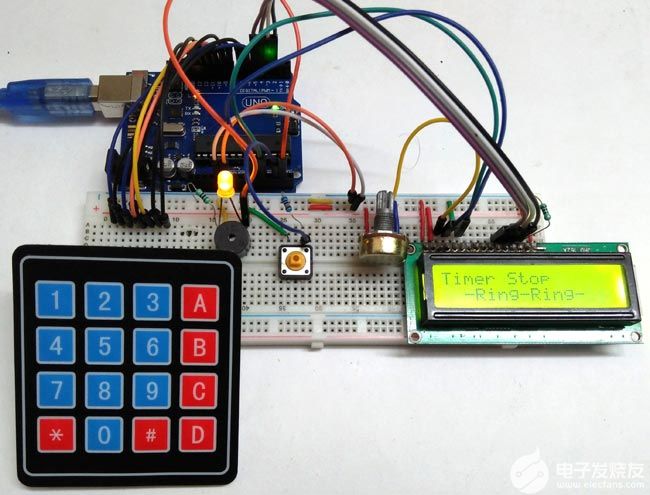
当计时器达到零时,蜂鸣器开始发出哔哔声并仅发出 100 次哔哔声(根据代码)。要停止蜂鸣器,请按住按钮。您可以随时使用按钮在计数之间停止计时器。

// Arduino Countdown Timer Code
#include
#include
const byte ROWS = 4; // Four rows
const byte COLS = 4; // Three columns
long int set1;
long int set2;
long int set3;
long int set4;
long int j;
String hours;
String minutes;
String seconds;
// Define the Keymap
char keys[ROWS][COLS] = {
{'1','2','3','A'},
{'4','5','6','B'},
{'7','8','9','C'},
{'*','0','#','D'}
};
byte rowPins[ROWS] = { 6, 7, 8, 9 };// Connect keypad ROW0, ROW1, ROW2 and ROW3 to these Arduino pins
byte colPins[COLS] = { 10, 11, 12, 13 };// Connect keypad COL0, COL1 and COL2 to t
Keypad kpd = Keypad( makeKeymap(keys), rowPins, colPins, ROWS, COLS );
LiquidCrystal lcd(A0, A1, 5, 4, 3, 2); // Creates an LC object. Parameters: (rs, enable, d4, d5, d6, d7)
int t1, t2, t3, t4, t5, t6;
int r1, r2, r3;
boolean feed = true; // condition for alarm
char key;
String r[8];
void setFeedingTime()
{
feed = true;
int i=0;
lcd.clear();
lcd.setCursor(0,0);
lcd.print("Set feeding Time");
lcd.clear();
lcd.print("HH:MM:SS");
lcd.setCursor(0,1);
while(1){
key = kpd.getKey();
char j;
if(key!=NO_KEY){
lcd.setCursor(j,1);
lcd.print(key);
r[i] = key-48;
i++;
j++;
if (j==2 || j == 5)
{
lcd.print(":"); j++;
}
delay(500);
}
if (key == 'D')
{key=0; break; }
}
lcd.clear();
}
void setup()
{
lcd.begin(16,2);
Serial.begin(9600);
pinMode(A0, OUTPUT);
pinMode(A1, OUTPUT);
pinMode(A3, INPUT);
pinMode(A4, OUTPUT);
}
void loop()
{
lcd.setCursor(0,0);
lcd.print("Arduino Timer");
//Serial.println(A3);
if (digitalRead(A3)==1) //
{
lcd.clear();
setFeedingTime();
for(int i = 0; i < 6; i++) // this for loop is used to get the value of the feeding time and print it serially
{
Serial.print(r[i]);
Serial.println();
}
hours = String (r[0]) + String (r[1]) ; //combining two separate int values of r[0] and r[1] into one string and save it to "hours"
minutes = String (r[2]) + String (r[3]) ; //combining two separate int values of r[2] and r[3] into one string and save it to "minutes"
seconds = String (r[4]) + String (r[5]) ; //combining two separate int values of r[4] and r[5] into one string and save it to "seconds"
set1 = (hours.toInt()*3600); //converting hours into seconds
set2 = (minutes.toInt() * 60); //converting minutes into seconds
set3 = seconds.toInt();
set4 = (hours.toInt() * 3600)+ (minutes.toInt() * 60) + seconds.toInt(); //adding set1, set2 and set3 together in set4
Serial.print("set4");
Serial.print(set4);
Serial.println();
lcd.setCursor(0,0);
lcd.print("Countdown begins");
delay(1000);
lcd.clear();
for(long int j = set4; j >= 0; j--) // this for loopis used to decrease the total time in seconds
{
Serial.println(j);
lcd.setCursor(0,0);
lcd.print("HH:MM:SS");
long int HH = j / 3600; // converting the remaining time into remaining hours
lcd.setCursor(0,1);
Serial.println(HH);
if (HH < 10) { lcd.print('0'); }
lcd.print(HH);
lcd.print(":");
long int MM = (j - (HH*3600))/60 ; //converting the remaining time into remaining minutes
lcd.setCursor(3,1);
Serial.println(MM);
if (MM < 10) { lcd.print('0'); }
lcd.print(MM);
lcd.print(":");
long int SS = j - ((HH*3600)+(MM*60)); //converting the remaining time into remaining seconds
lcd.setCursor(6,1);
Serial.println(SS);
if (SS < 10) { lcd.print('0'); }
lcd.print(SS);
delay(1000);
if (digitalRead(A3)==1){break;}
if (j == 0)
{
lcd.clear();
lcd.setCursor(0,0);
lcd.print("Timer Stop");
lcd.setCursor(2,1);
lcd.print("-Ring-Ring-");
for(int k =0; k<= 100; k++) //this for loop is used for the buzzer to beep 100 time as the timer reaches zero
{
digitalWrite(A4,HIGH);
delay(300);
digitalWrite(A4,LOW);
delay(300);
if (digitalRead(A3)==1){break;}
}
}
}
}
}
-
倒数计时器设计2012-05-29 0
-
基于FPGA的音乐倒数计时器2017-05-05 0
-
计时器,什么是计时器,计时器原理是什么2010-03-08 9515
-
时钟计时器设计与制作2018-06-26 1160
-
带继电器的Arduino倒数计时器开源分享2022-10-26 521
-
Arduino倒数计时器2022-10-28 569
-
带Arduino的计时器2022-10-28 554
-
使用Arduino制作显示分钟和秒的4位倒数计时器2022-11-07 2508
-
带7段显示的Arduino可调倒数计时器2022-11-08 381
-
红外遥控LED倒数计时器2022-11-11 321
-
使用Arduino Uno制作洗手计时器2022-11-29 594
-
复古1980年代LED时钟/倒数计时器2022-12-13 399
-
带Arduino的OLED倒数计时器2023-06-09 1067
-
Snap:bit-带灯光和声音的倒数计时器2023-06-20 422
-
Arduino沙漏计时器2023-07-06 692
全部0条评论

快来发表一下你的评论吧 !

