
利用FPGA的自身特性实现随机数发生器
FPGA/ASIC技术
描述
本文主要介绍利用FPGA的自身的特性实现随机数发生器,在Virtex-II Pro开发板上用ChipScope观察随机数序列,以及在PCIe4Base(基于Virtex-4 FPGA)上实现。
基本的原理
随机数在计算机科学中的密码学中有着重要的用途,常常被用作密钥的来源。随机数包括伪随机数以及真随机数。伪随机数是通过一定的算法计算得出,具有类似于随机数的统计特征,这样的发生器称为伪随机数发生器。而真随机数是通过物理现象产生,例如使用电子元件的噪声、核裂变等等作为噪声源[2],这样的随机数发生器叫做物理随机数发生器,也叫做真随机数发生器(TRNG:Ture Random Number Generator)。
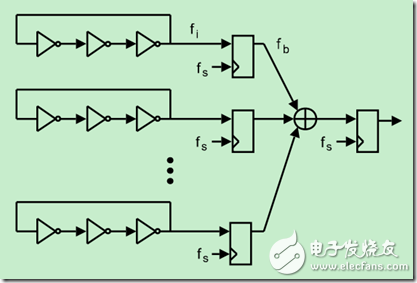
基于FPGA的随机数发生器基本原理是利用奇数个反相器组成振荡器作为随机数发生器的噪声源,因为由于FPGA自身的特性--信号传输存在抖动,所以多个反相器组成振荡器输出也不是很稳定的时钟信号,每个振荡器输出不是相同的,这样成为了理想的噪声源,见图1。振荡器输出通过D触发器进行采样输出,采样频率是fs,然后多个采样输出结果经过异或门之后再通过一个D触发器进行采样,采样频率还是fs。这样简单的随机数发生器就完成了。

实现
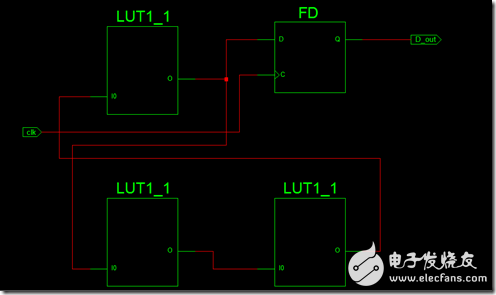
根据前面所述的原理图,进行如下设计:抽样频率是fs为50MHz,用3个反相器组成一个振荡器,共用了25个振荡器。因为整个结构很简单,这里就不多讲述,主要想说的是振荡器的描述。为了避免综合器将振荡器进行一定的优化从而背离当初的设计,所以在代码中添加了属性语句,用于保证网络不被优化掉。见28至31行,36至39行。
1: library IEEE;
2: use IEEE.STD_LOGIC_1164.ALL;
3: use IEEE.STD_LOGIC_ARITH.ALL;
4: use IEEE.STD_LOGIC_UNSIGNED.ALL;
5: ---- Uncomment the following library declaration if instantiating
6: ---- any Xilinx primitives in this code.
7: library UNISIM;
8: use UNISIM.VComponents.all;
9:
10: entity Ring_osc_3 is
11: port ( clk : in STD_LOGIC;
12: D_out : out STD_LOGIC
13: );
14: end Ring_osc_3;
15:
16: architecture Behavioral of Ring_osc_3 is
17: ---------------------------------------
18: -- Interial signal in the Ring_OSC
19: ---------------------------------------
20: signal delay1 : std_logic;
21: signal delay2 : std_logic;
22: signal delay3 : std_logic;
23:
24: ---------------------------------------------------------------------
25: --Attributes to stop delay logic from being optimised.
26: ---------------------------------------------------------------------
27: attribute keep : string;
28: attribute keep of delay1 :signal is "true";
29: attribute keep of delay2 :signal is "true";
30: attribute keep of delay3 :signal is "true";
31:
32: ---------------------------------------------------------------------
33: --Attributes to stop trim logic from being optimised
34: ---------------------------------------------------------------------
35: attribute s : string;
36: attribute s of delay1 : signal is "true";
37: attribute s of delay2 : signal is "true";
38: attribute s of delay3 : signal is "true";
39: 40: ---------------------------------------
41: --Code start
42: ---------------------------------------
43:
44: begin
45: --osc_out is the last invertor output,
46: --and also the output feeds back to the first invertor
47: --invertor 1
48: inv_lut1: LUT1
49: generic map (init => X"1")
50: port map (
51: I0 => delay1,
52: O => delay2);
53:
54: --invertor 2
55: inv_lut2: LUT1
56: generic map (init => X"1")
57: port map (
58: I0 => delay2,
59: O => delay3);
60:
61: --invertor 3
62: inv_lut3: LUT1
63: generic map (init => X"1")
64: port map (
65: I0 => delay3,
66: O => delay1);
67:
68: --D Flip-flop
69: D_ff : FD
70: port map (
71: D => delay3,
72: Q => D_out,
73: C => clk);
74:
75: end Behavioral;
振荡器最后综合出来的结果是(图2):

ChipScope的观察
首先对管脚以及时钟进行约束,为了通过ChipScope观察随机数的输出序列,还需要添加ICON以及ILA IP core。操作如下,在ISE窗口左侧的source栏中右键选择new source,然后见到New Source Wizard窗口。输入一个名字,然后点击OK。然后在Source窗口中看到生成的cdc source file。接下来就是配置触发信号、观察信号、时钟信号等属性。

这里不细说如何配置,具体见参考文献3。
在这里,观察的RNG输出信号同时作为触发信号来配置。配置完后编译实现。然后再Process栏中选择Analyze Design Using ChipScope 同时连接Virtex-II Pro板子并且上电。进入ChipScope Pro Analyzer界面后点击工具栏中的OPEN Cable/Search JTAG Chain,然后看到JTAG Chain上的三个设备。右键选中FPGA芯片(XC2VP30),选择配置,选中刚才生成的bit文件。配置完成后会出现图5的信号列表。
图5中Trigger Setup是触发配置,Waveform 是波形列表。


双击 Waveform打开波形观察窗口,因为触发信号就是需要观察的信号,所以这里不用设置触发。在工具栏中点击 ,你就可以观察到随机数的输出波形了,图6。肉眼观察信号比较随机,但是没有定性的测试。
随机数的测试
常用的测试随机数的工具有ENT[4],DIEHARD[5]等。而这些工具需要大量的随机数(最好是10M以上的数据)才可以测试,而用ChipScope最多一次只能才是65536bit的数据,这样的测试肯定是不行的。所以将同样的设计放到了PCIeV4base,这个板子具有PCIe插槽,用的是Virtex-4的FPGA芯片。PC机通过PCIe桥接芯片读取数据,这样很方便得到大量的随机数数据。
具体的原理图,图7。看起来有些麻烦,涉及到了FIFO,Wishbone上添加从设备,以及Linux下PCIe的编程,幸好相关的东西已经有实例和SDK提供,只要做一些修改就可以了。

最后通过软件得到15MB的数据。然后通过ENT工具进行测试,测试的结果如下:
D:\Document\RNG\ent>ent out
Entropy = 7.999890 bits per byte.
Optimum compression would reduce the size
of this 16777212 byte file by 0 percent.
Chi square distribution for 16777212 samples is 2563.57, and randomly
would exceed this value less than 0.01 percent of the times.
Arithmetic mean value of data bytes is 127.5056 (127.5 = random).
Monte Carlo value for Pi is 3.141033445 (error 0.02 percent).
Serial correlation coefficient is -0.000568 (totally uncorrelated = 0.0).
测试的结果分析,得到随机数比较理想。
- 相关推荐
- F
-
【assingle分享】labview随机数发生器2011-04-07 0
-
【总结】LabVIEW随机数发生器2015-01-30 0
-
怎么设计基于USB和FPGA的随机数发生器验证平台?2019-08-27 0
-
请问随机数发生器的主要特性和功能以及如何操作?2020-11-13 0
-
随机数发生器的相关资料分享2022-02-14 0
-
学习笔记 | 基于FPGA的伪随机数发生器(附代码)2023-04-21 0
-
基于FPGA的真随机数发生器设计2011-05-30 1266
-
真随机数发生器的容差分析2011-06-10 1079
-
基于FPGA的随机数性能检测设计2013-07-24 899
-
PIC32系列参考手册之加密引擎和随机数发生器(RNG)2018-06-05 1262
-
基于FPGA的伪随机数发生器设计方案2021-06-28 4709
-
【STM32】随机数发生器详解2021-12-08 887
-
FPGA的伪随机数发生器学习介绍2023-09-12 1572
-
基于多级反馈环形振荡器的真随机数发生器设计2023-09-14 345
-
如何在FPGA中实现随机数发生器2024-08-06 673
全部0条评论

快来发表一下你的评论吧 !

