资料下载

使用MKR IoT Bundle组件和纸板来教猫的晚餐时间
描述
注意:本教程可能已过时,请到此处获取更新版本。
如果你曾经尝试过训练一只猫,你就会知道这有多难。猫是它们自己的主人,但现在您有机会让猫使用这种支持物联网的设备进行竞标。
欢迎来到巴甫洛夫的猫实验!
在这个项目中,您将学习如何使用 MKR IoT Bundle 中的组件和一些纸板来教您的猫什么时候(和不是)晚餐时间。
我们都知道猫已经喜欢纸板箱了!
猫每听到一段旋律,就会得到食物。光传感器检测猫的存在。另一个旋律什么也没做。看看这将如何工作?
您将能够随着时间的推移监控猫的进展,并通过手机设置食物分配率。一旦达到令人满意的统计数据,就该将传感器重新用于可穿戴设备了。如果您发出哔哔声,您的猫应该从那时起跟随您。
免责声明:在这个实验的开发过程中没有猫受到伤害。此外,不能保证猫会吃食物,但你明白了,对吧?
简而言之
按照这些简单的分步说明,您将能够构建自己的食品分配器。分配器基本上只是一些纸板和一个伺服电机,添加了一些 Arduino 魔法。
使用名为 Telegram 的消息服务,您可以设置要分配的食物量并触发蜂鸣器播放的旋律。
光传感器用于检测猫是否对旋律做出反应并得到食物。
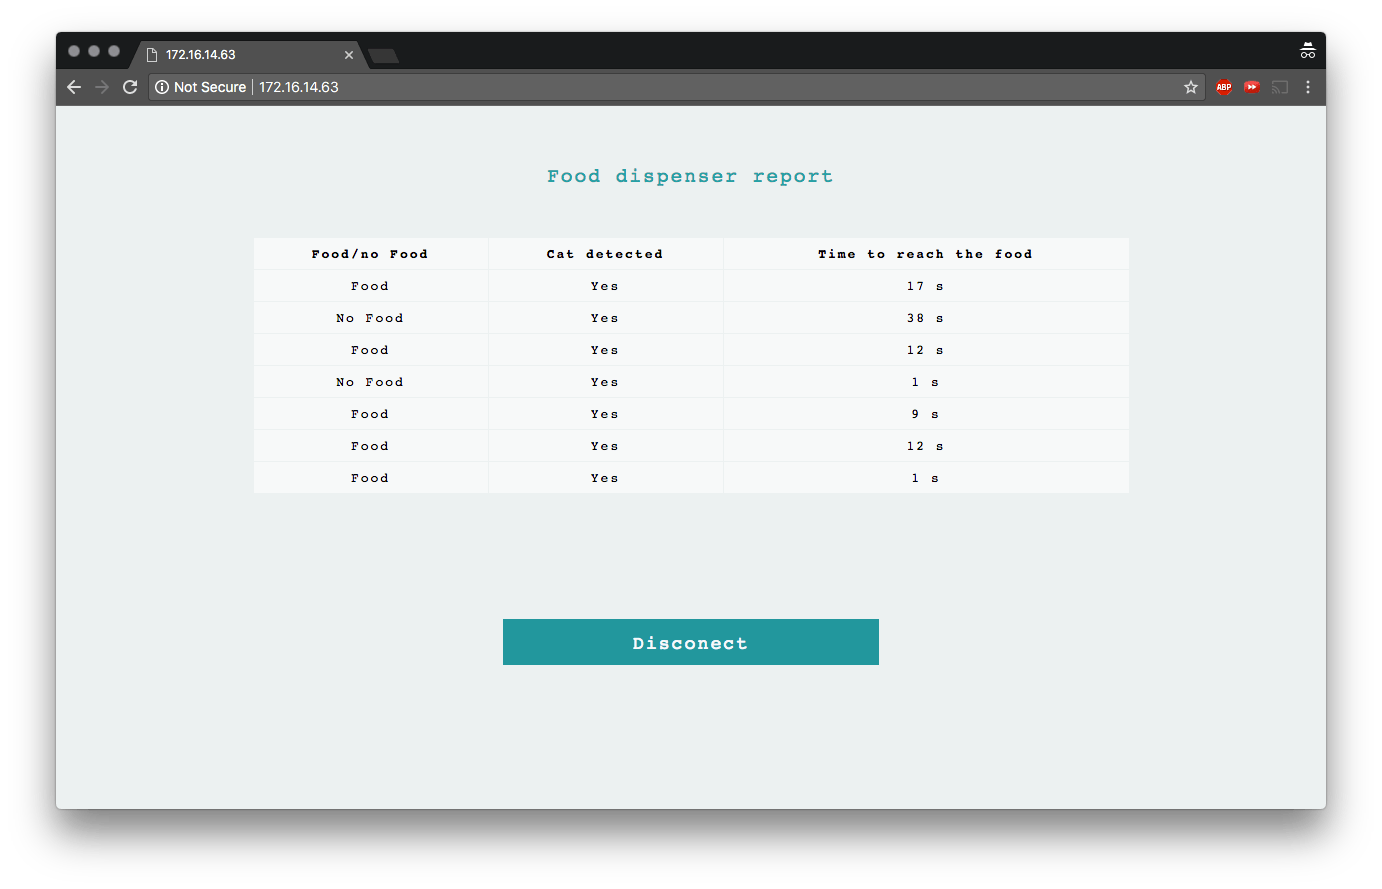
专业提示:您可以在 MKR1000 上托管一个网页,并将收集到的数据显示在一个方便的表格中。
成分
- 伺服电机
- 光电晶体管
- 220欧姆电阻
- 蜂鸣器
学习目标
在本实验中,您将学习如何:
- 使用自定义键盘管理 Telegram Bot
- 从 MKR1000 本身设置和管理 Web 服务器功能。#专家提示
专业提示是有用但并非绝对必要的步骤,它们会为项目增加一层复杂性。
想知道更多?
本教程是让您熟悉 MKR1000 和 IoT 的一系列实验的一部分。所有实验都可以使用 MKR IoT Bundle 中包含的组件构建。
- 巴甫洛夫的猫
电报和 Arduino
Telegram是一款流行的移动和桌面消息传递应用程序。除了让我们与朋友聊天之外,它还允许我们创建方便且强大的聊天机器人!
Arduino的TelegramBot 库为我们提供了一种简单的方法来实现聊天机器人背后的逻辑。
要了解如何创建机器人和管理基本功能,请查看I Love You Pillow教程。
创建您的自定义键盘
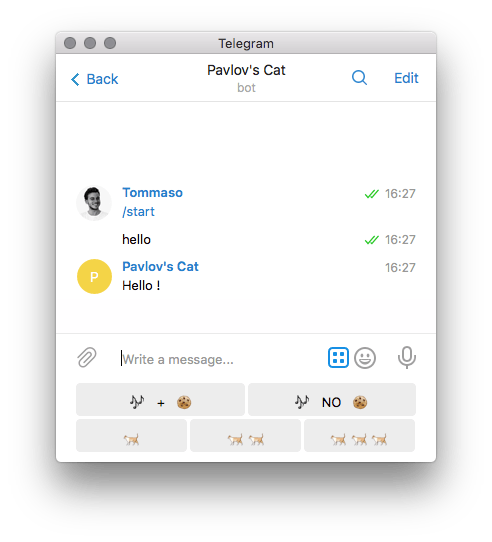
Telegram 允许我们为快速回复创建自定义键盘。这意味着当您与机器人交谈时,将显示特定的按钮选择,而不是默认键盘。您可以轻松自定义这些按钮并改善设备的用户体验。
我们的自定义键盘如下所示:

我们将使用第一排按钮播放旋律并分配食物,而第二排按钮将用于设置伺服电机的速度,从而设置要分配的食物量。
要创建自定义键盘,我们首先需要声明它:
TelegramKeyboard keyboard_one;
然后定义行:
 const char* row_one[] = {MusicAndFood, MusicNoFood};
 const char* row_two[] = {OnePortion, TwoPortion, ThreePortion};
最后将行分配给键盘:
keyboard_one.addRow(row_one, 2); // assign a row to one or more keyboards
keyboard_one.addRow(row_two, 3); // second argument is the length of the row
请记住,表情符号需要使用 UNICODE 发送。例如,要发送一个心形表情符号,我们将使用:\U00002764
您可以在此处查看 unicode 表情符号代码的完整列表。这意味着要定义我们的按钮,我们将使用它:
 const char*  MusicAndFood = "\U0001F3B6   +   \U0001F36A"; // Note + Cookie
 const char*  MusicNoFood = "\U0001F3B6   NO   \U0001F36A"; // Note NO Cookie
 const char*  OnePortion = "\U0001F408"; // CAT
 const char*  TwoPortion = "\U0001F408 \U0001F408"; // 2 CATS
 const char*  ThreePortion = "\U0001F408 \U0001F408 \U0001F408"; // 3 CATS
这是完整的草图:
#include
#include
#include
const char* ssid = SECRET_SSID;    //  your network SSID (name)
const char* password = SECRET_PSWD;  // your network password
const char BotToken[] = SECRET_BOT_TOKEN;
WiFiSSLClient client;
TelegramBot bot (BotToken, client);
TelegramKeyboard keyboard_one;
String OldChatId = "";
void setup() {
 Serial.begin(115200);
 delay(3000);
 // attempt to connect to Wifi network:
 Serial.print("Connecting Wifi: ");
 Serial.println(ssid);
 while (WiFi.begin(ssid, password) != WL_CONNECTED) {
   Serial.print(".");
   delay(500);
 }
 Serial.println("");
 Serial.println("WiFi connected");
 // choose the emoji you like using UNICODE
 // here's the list https://unicode.org/emoji/charts/full-emoji-list.html
 const char*  MusicAndFood = "\U0001F3B6   +   \U0001F36A"; // Note + Cookie
 const char*  MusicNoFood = "\U0001F3B6   NO   \U0001F36A"; // Note NO Cookie
 const char*  OnePortion = "\U0001F408"; // CAT
 const char*  TwoPortion = "\U0001F408 \U0001F408"; // 2 CATS
 const char*  ThreePortion = "\U0001F408 \U0001F408 \U0001F408"; // 3 CATS
 // define your row's
 const char* row_one[] = {MusicAndFood, MusicNoFood};
 const char* row_two[] = {OnePortion, TwoPortion, ThreePortion};
 keyboard_one.addRow(row_one, 2); // assing a row to one or more keyboards
 keyboard_one.addRow(row_two, 3); // second argument is the length of the row
 bot.begin();
}
void loop() {
 message m = bot.getUpdates(); // Read new messages
 if ( m.chat_id != 0 ) { // Checks if there are some updates
   OldChatId = m.chat_id;
   Serial.println(m.text);
   bot.sendMessage(m.chat_id, "Hello !", keyboard_one);
 }
 delay(1000);
}
不幸的是,机器人发送表情符号的方式与接收它们的方式不同。使用 EchoBot 示例是了解机器人如何接收表情符号的简单方法。
例如,我们将使用的表情符号是这样收到的:
ud83cudfb6  // Melody
ud83cudf6a  // Cookie
ud83dudc08  // Cat
检测猫!
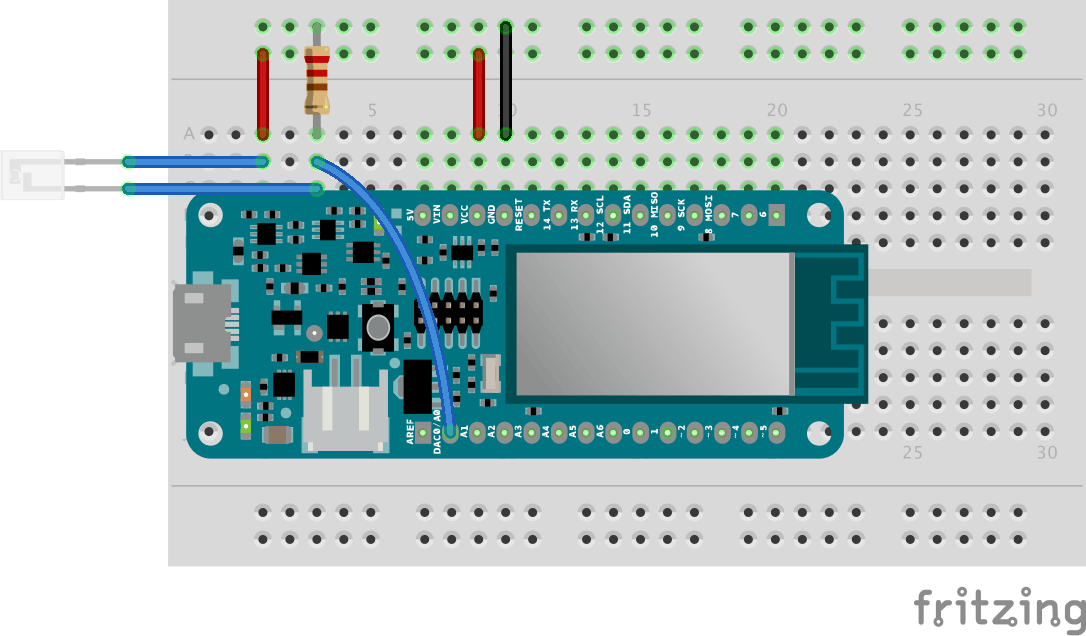
为了检测猫的存在,我们将使用光电晶体管,它能够测量光强度,因此是否有人靠近它。

请注意,我们使用了一个 220 欧姆的电阻。
要从传感器读取值,我们只需要一个analogRead(A6).
由于我们只在旋律之后才对检测猫的存在感兴趣,并且仅在一定时间内,我们可以使用以下逻辑:
unsigned long timer;
bool startDetecting = true;
int threshold=200; // arbitrary value
void setup(){
timer=millis()
Serial.begin(9600);
}
void loop(){
if (startDetecting) {
   int value = analogRead(A6);
   if (value < threshold) {
     Serial.println("cat detected!");
     startDetecting = false;
   }
   else if (millis() - timer > 120000) {
     Serial.println("no cat detected in the past two minutes");
     startDetecting = false;
   }
 }
}
请注意,我们使用该函数来设置计时器。 为我们提供了自开发板启动并运行以来的毫秒数。我们可以使用它来设置计时器并在一定时间后触发事件。millis()Millis()
我们还使用阈值来确定是否检测到猫。该阈值是任意的,您可以根据您的光照条件进行设置。
播放歌曲
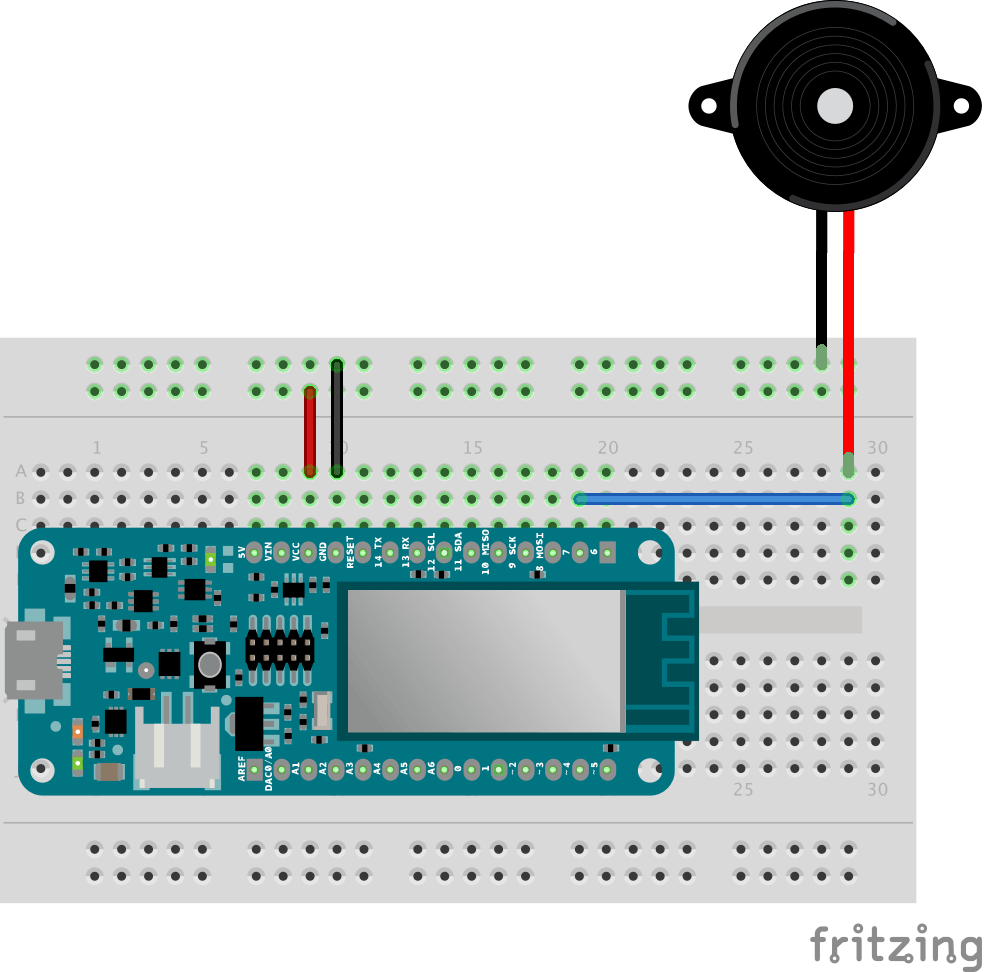
要播放歌曲,我们将使用蜂鸣器和tone() 功能。

我们将使用标准示例toneMelody 的略微修改版本。您可以在下拉菜单中找到它:
examples > digital > toneMelody.
添加伺服电机
伺服器用于打开盒子并运送食物。
请注意,我们使用一个变量int PortionAmount = 1; 来设置伺服必须保持转动 90 度的时间量。我们将能够通过 Telegram 改变它的价值。
将伺服连接到引脚 7 并上传此草图以查看它的工作原理。
#include
Servo myservo;  // create servo object to control a servo
int pos = 0;    // variable to store the servo position
int PortionAmount = 1; // Set default amount of food to 1 portion
void setup() {
 myservo.attach(7);  // attaches the servo on pin 6 to the servo object
}
void loop() {
   moveServo();
   delay(2000);
}
void moveServo() {
 Serial.println("moving servo");
 for (pos = 0; pos <= 90; pos += 1) { // goes from 0 degrees to 90 degrees
   myservo.write(pos);  // tell servo to go to position in variable 'pos'
   delay(15); // waits 15ms for the servo to reach the position
 }
 delay(PortionAmount * 300);  // keep the box open for a time interval based on the amount of food you want to deliver
 for (pos = 90; pos >= 0; pos -= 1) { // goes from 90 degrees to 0 degrees
   myservo.write(pos); / tell servo to go to position in variable 'pos'
   delay(15); // waits 15ms for the servo to reach the position
 }
}
#ProTip:添加 Web 服务器
MKR1000 最强大的功能之一是接入点模式。
它允许我们在 MKR1000 上托管一个网页,我们可以通过使用板 IP 地址并连接到同一网络来访问该网页。
我们将使用此工具打印食品分配器收集的数据。

此步骤需要 HTML 和 CSS 的基本知识(或对示例草图非常信任。您可以在以下位置查看基本 Web 服务器示例:
> example > WiFi101 > AP_SimpleWebServer
我们将通过向我们的 Telegram Bot发送特定单词来触发接入点模式,它会回复链接以访问网页。然后电报客户端将断开连接并启动网络服务器。
else if(m.text == "Server"){
  IPAddress ip = WiFi.localIP();
  web_server_mode=true;
  String message = "To see the webpage go to http://"+IpToString(ip);
  bot.sendMessage(m.chat_id, message , keyboard_one);
  telegram_client.stop();
  delay(1000);
  server.begin();   // start the web server on port 80
  }
该网页包含一个按钮,该按钮将关闭 Web 服务器模式并作为电报客户端返回:
if (currentLine.endsWith("GET /BACKBUTTON")) {  // if button pressed
   web_server_mode=false;
   client.stop();
   delay(1000);
   bot.begin();
   bot.sendMessage(OldChatId, "Back online !", keyboard_one);
   }
每次猫检测结束时,都会在表格的新单元格中添加收集到的数据:食物是否送达、猫是否在两分钟内出现以及到达分配器需要多长时间。
AddTableCell(food/noFood, Yes/No, TimeValue);
然后包含所有表格单元格的字符串被更新并集成到主 html 的其余部分中。
 table_cells+=cell; // add new cell
 html = html_1 + table_cells + html_2; // add cells to main html
查看最终的 Pro 示例,了解如何集成所有这些新功能!
提示:如果您希望您的数据在威廉希尔官方网站 板重置后仍然存在,请查看Flash Storage库或检查Nerd项目!
声明:本文内容及配图由入驻作者撰写或者入驻合作网站授权转载。文章观点仅代表作者本人,不代表电子发烧友网立场。文章及其配图仅供工程师学习之用,如有内容侵权或者其他违规问题,请联系本站处理。 举报投诉
- 相关下载
- 相关文章


