

用ESP32和RTC做一个“唤醒闹钟”吧!
电子说
描述
这篇文章来源于DevicePlus.com英语网站的翻译稿。
本文最初发布在deviceplus.jp网站上,而后被翻译成英语。
目录
前言
关于ESP32闹钟
创建日期和时间的“RTC”
在ESP32 LCD上显示日期和时间
使用MP3模块发出闹铃响声
给闹钟主机接线
给ESP32闹钟分机接线
安装库和字体文件
Arduino IDE闹钟程序
分机程序
确认运行情况
结论
相关文章
前言
您每天早上被什么闹钟吵醒?早上人们的一个常见问题是关掉闹钟并直接回去睡觉。
这一次,我们决定使用ESP32制作一个“唤醒闹钟”,应该有助于解决这个问题。
设计步骤
预计完成时间:120分钟
| 名称 | 卖方 | 价格 |
| ESP32-DevKitC(2 件) | 贸泽电子 | 约10.00美元 |
| DS3231 模块 | 亚马逊 | 约3.00美元 |
| LIR2032(纽扣充电电池) | 亚马逊 | 约3.60美元 |
| 扬声器 | 亚马逊 | 约1.00~3.00美元 |
| 2.8英寸SPI连接器 320×240像素LCD屏幕 | 亚马逊 | 约15.00美元 |
*除上述物品外,还需要一个轻触开关、一个LED和一个约100Ω的电阻器。
关于ESP32闹钟
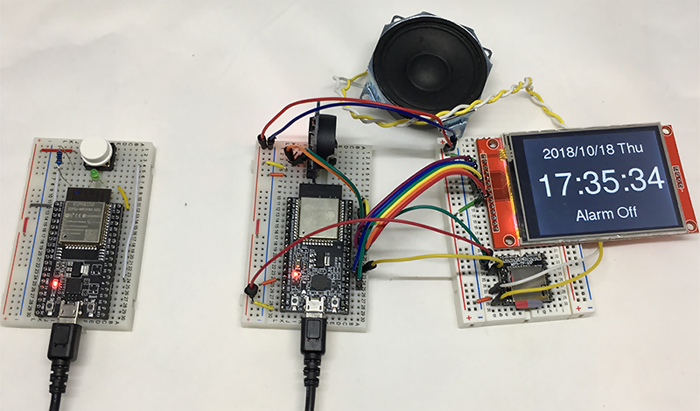
我们来使用ESP32完成一个目标吧:像普通闹钟一样在屏幕上显示日期和时间,并在指定的时间响起。在设计制作这款“唤醒闹钟”时,我们需要将分机按钮(用于关闭闹钟)与闹钟主机分开放置。之所以这样设计,是因为想要您必须起床并走到分机按钮处才能将闹钟关掉。
如下面的视频所示,使用两个ESP,一个用于主机,另一个用于分机。在视频中,主机和分机是挨着的,但如果通过Wi-Fi连接,它们是可以在Wi-Fi范围内分开放置的。
将主机和分机分开放置时,请使用ESP32的Wi-Fi功能。两个ESP32作为Web服务器和客户端运行,并相互通信,如图1所示。
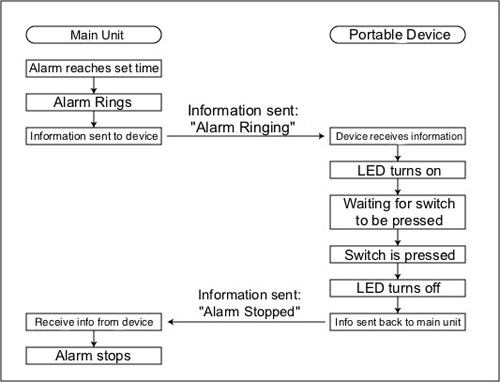
图 1 主机和分机之间的通信
创建日期和时间的“RTC”
对于Arduino等微控制器来说,通常能够获取在启动程序后经过的时间。但是,您获得的时间通常不是很准确,因为断电时会重置经过时间。
而如果使用ESP32,则可以通过Wi-Fi连接到互联网,以定期从互联网上的NTP服务器获取日期和时间,并将其设置到ESP32上。但Arduino Uno等部分微控制器没有互联网连接功能,因此,拥有一种可以更轻松地处理日期和时间的机制会很方便。
这就是为什么经常使用一种被称作“RTC”(实时时钟)的IC。 RTC是基于周期性发出信号的元件来计时的IC。此外,通过将其连接到电池等外部电源,即使在微控制器断电时也可以继续计时。
许多产品都采用RTC,此次,我们将使用一种名为“DS3231”的RTC模块。
在电子设计所用的RTC模块当中,DS3231模块很受欢迎,且很容易获得。由于接口是I2C,因此只需要4根线。除了RTC功能,还具有温度传感器功能(不过本文不会用到温度传感器)。
此外,在照片1所示的DS3231上,安装一个名为“LIR2032”的纽扣电池,这样即使在微控制器关闭的情况下也能继续记录日期和时间。LIR2032的电池尺寸与CR2032的相同,但不同的是它可充电。
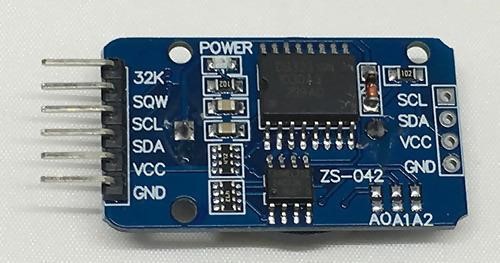
照片1 DS3231模块
在ESP32 LCD上显示日期和时间
由于闹钟用于查看当前日期和时间,因此需要以易于理解的方式显示日期和时间。以下设备用于显示日期和时间。
7段LED
LED 矩阵
OLED 显示器
字符液晶显示器
图形液晶显示器
根据设备的不同,有不同的库和不同的编程方法。这还取决于它是否适合您想要制作的作品。例如,7段LED仅适合以低成本显示数字,但不适合显示详情。其中,图形液晶显示器是最通用的,可以用于许多不同的项目,所以我这次决定使用它。
市面上有各种类型的液晶显示器模块,但对于今天的项目,我们将使用一个名为“ILI9341”的控制器,并使用SPI接口(照片2)。此外,液晶显示器通常以2.2英寸/2.4英寸/2.8英寸尺寸出售,因此,请根据您正在做的作品类型进行相应调整。
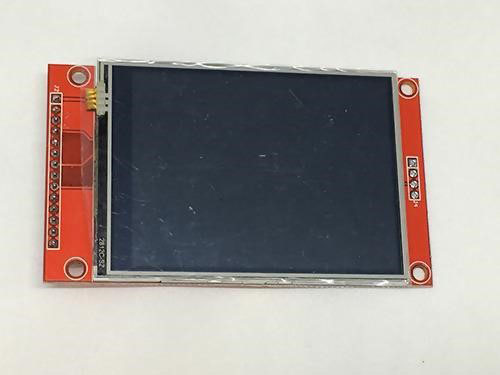
照片2 控制器用ILI9341 2.8英寸液晶显示器
使用MP3模块发出闹钟铃声
既然是闹钟,在指定时间发出铃声是必需的。您可以将蜂鸣器连接到ESP32以产生单一铃声,但如果您愿意,也可以使用自己喜欢的铃声。为此,我们将使用一个名为“DFPlayer Mini”的模块,它可以播放任何MP3数据(照片3)。
DFPlayer Mini是一个可以通过串口发送命令来播放microSD卡中MP3的模块。可以将一个小型扬声器连接到扬声器输出引脚以产生铃声。
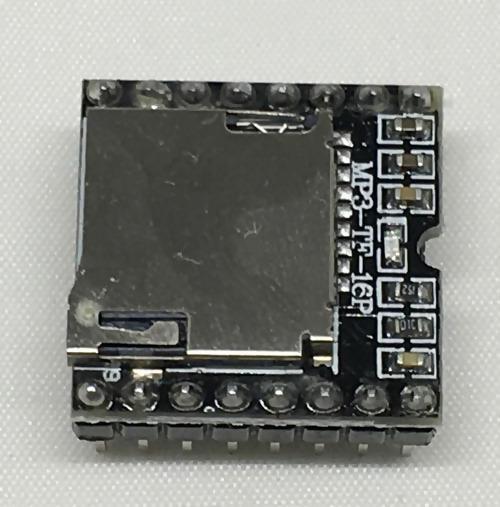
照片3 DFPlayer Mini
给闹钟主机接线
让我们进入实际构建吧。首先,给闹钟接线。
使用两个面包板,一个配有ESP32和DS3231,另一个配有液晶显示器(LCD)和DFPlayer Mini。各部件接线如图2所示。
由于ESP32很宽,您只能在普通面包板的一面放一根跳线。因此,请改用电源线只在一侧、多一排插孔的面包板(例如Sanhayato的SAD-101)。
ESP32和液晶显示器通过SPI进行连接。ESP32可以使用两个 SPI(VSPI和HSPI),但使用的是VSPI(引脚18/19/23)(表1)。
ESP32和DS3231通过I2C进行连接。在ESP32中,I2C可以分配给任何引脚,但我们使用标准引脚(SDA=21和SCL=22)(表 2)。
DFPlayer Mini 进行串行连接。ESP32可以使用3个串口,但为此请同时使用引脚16和引脚17(表3)。此外,将扬声器连接到DFPlayer Mini“SPK1”和“SPK2”两个引脚。
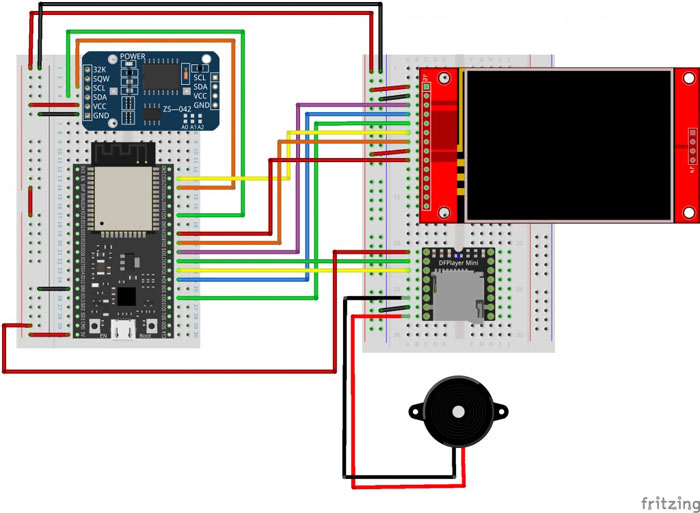
图2 闹钟主机接线
| ESP32 引脚 | 液晶显示器引脚 |
| 5V | VCC |
| GND | GND |
| 5 | CS |
| 4 | RESET |
| 2 | DC |
| 23 | MOSI |
| 18 | SCK |
| 19 | MISO |
表 1:ESP32 与液晶显示器的连接
| ESP32 引脚 | DS3231 引脚 |
| 5V | VCC |
| GND | GND |
| 21 | SDA |
| 22 | SCL |
表 2:ESP32与DS3231的连接
| ESP32 引脚 | DFPlayer Mini 引脚 |
| 5V | VCC |
| GND | GND |
| 16 | TX |
| 17 | RX |
表 3:ESP32与DFPlayer Mini的连接
给ESP32闹钟分机接线
接下来,我们将给分机接线。分机接线应按图3所示进行。您所要做的就是将开关和 LED连接到ESP32。将开关的一侧连接到ESP32的3V3引脚,另一侧连接到引脚4。通过电阻器→LED再通过ESP32的引脚13连接到GND。
在读取开关状态的威廉希尔官方网站 上插入一个上拉电阻或下拉电阻。但是,由于ESP32可以通过内部电阻进行上拉/下拉,因此省略了外部电阻。
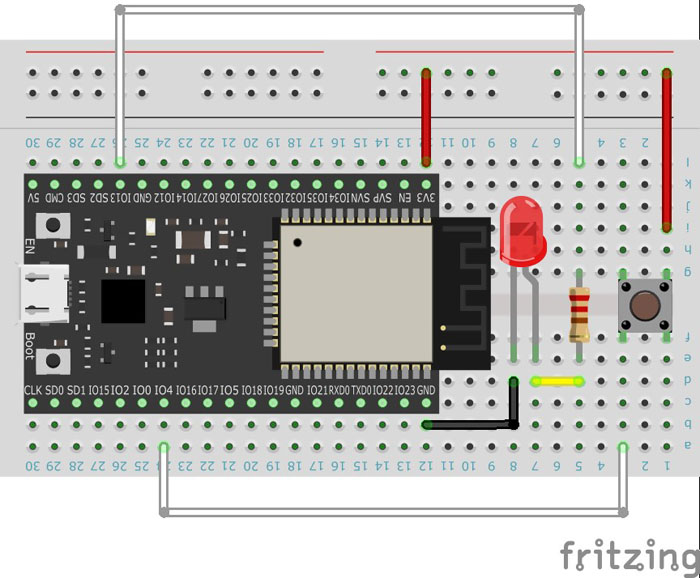
图3 分机接线
安装库和字体文件
完成接线工作后,您可以创建程序。首先,从安装下面的各个库开始。
Adafruit GFX
Adafruit ILI9341
RTCLib
DFRobotDFPlayerMini
安装步骤如下:
启动Arduino IDE。
选择“Sketch”->“Include Library”->“Manage Library”菜单,以打开Library Manager。
在“Filter search”字段中输入“Adafruit GFX”。
Adafruit GFX将在库列表中显示。单击“Install”按钮(图 4)。
以相同的方式安装每个库。
有几个名称相似的RTCLib和DFPlayer库。RTCLib 安装“RTCLib by Adafruit”,而DFPlayer安装“DFRobotDFPlayerMini by DFRobot”。
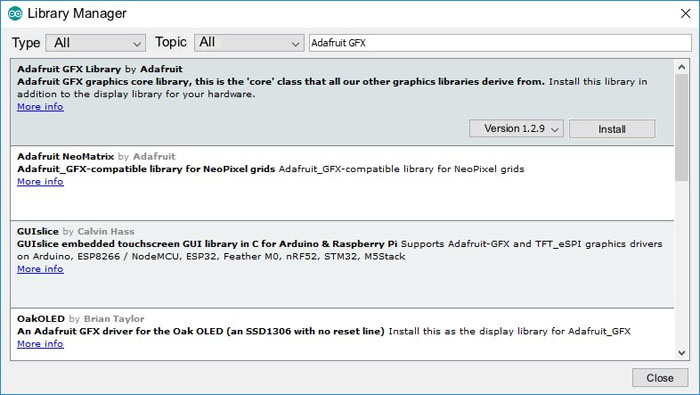
图 4 Adafruit GFX库安装
此外,为通过大字符显示时间,需要安装字体文件。如果您下载并解压缩以下zip文件,将可以获得一个名为“FreeSans40pt7b.h”的文件。
打开Arduino IDE的标准草图目标文件夹,再打开“libraries”->“Adafruit_GFX_Library”->“Fonts”文件夹,将字体文件复制到那里。
https://www.h-fj.com/deviceplus/font.zip
Arduino IDE闹钟程序
接下来,在Arduino IDE中创建一个闹钟程序并将其写入ESP32。程序内容如清单1所示。
清单1:闹钟主机程序
程序内容(放在这里)
但是,第17行到第21行需要改写如下:
・第17/18行
根据您的Wi-Fi路由器的SSID/密码重写。
・第19行
指定要分配给ESS32的IP地址。根据您的Wi-Fi路由器的网络配置自行决定IP地址。
在普通IP地址中,四组数字用句点分隔,但在这一行中,它是函数参数的形式,所以四组数字用逗号分隔。
・第20行
指定网络默认网关的IP地址。通常,它是Wi-Fi路由器的IP地址。用逗号分隔IP地址中的四组数字。
・第21行
根据分配给分机ESP32的IP地址重写。
例如,如果您想按照表4所示进行设置,请重写第17行至第21行,如清单2所示。
| 项目 | 设定值 |
| Wi-Fi路由器SSID | my_wifi |
| Wi-Fi路由器密码 | my_password |
| 分配给主机ESP32的IP地址 | 192.168.1.101 |
| 默认网关IP地址 | 192.168.1.1 |
| 分配给分机ESP32的IP地址 | 192.168.1.102 |
表4:主机网络设置示例
清单 2:重写第17-21行的示例
分机程序
分机程序如清单3所示。
以与闹钟主机相同的方式重写第5行到第9行。 但是,在第7行,指定分配给分机的IP地址。 此外,在第9行的“Main console IP address(主控台IP地址)”中指定闹钟的IP地址。
清单 3:分机程序
程序内容
#include
#include
#include
#include
#include
#include
#include
#include
#include "time.h"
#include
#include
#include
#include
#include
// Initial setup
const char *ssid = “Wi-Fi SSID”;
const char *pass = “Wi-Fi password”;
IPAddress ip(IP address assigned to main unit);
IPAddress gateway(IP address of default gateway);
const char* notify_url = “http://IP address of extension unit/alarm”;
const char* adjust_time = “04:00:00”;
#define DF_VOLUME 30
// Constants, etc.
#define ALARM_SIG 25
#define TFT_DC 2
#define TFT_CS 5
#define TFT_RST 4
#define TFT_WIDTH 320
Adafruit_ILI9341 tft = Adafruit_ILI9341(TFT_CS, TFT_DC, TFT_RST);
RTC_DS3231 rtc;
HardwareSerial hs(1);
DFRobotDFPlayerMini myDFPlayer;
WebServer server(80);
char old_date[15];
char old_time[9];
char old_alarm[15];
char alarm_time[9];
char wdays[7][4] = { “Sun”, “Mon”, “Tue”, “Wed”, “Thu”, “Fri”, “Sat” };
bool alarm_checked = false;
bool alarm_on = false;
bool ntp_adjusted = false;
int alarm_ctr;
// Set date and time using NTP
void setTimeByNTP() {
struct tm t;
configTime(9 * 3600L, 0, “ntp.nict.jp”, “time.google.com”, “ntp.jst.mfeed.ad.jp”);
if (!getLocalTime(&t)) {
Serial.println(“getLocalTime Error”);
return;
}
rtc.adjust(DateTime(t.tm_year + 1900, t.tm_mon + 1, t.tm_mday, t.tm_hour, t.tm_min, t.tm_sec));
}
// Display string on LCD
void showMessage(char* s_new, char* s_old, int y0, int height) {
int16_t x1, y1;
uint16_t w, w2, h;
int x, y;
if (strcmp(s_new, s_old) != 0) {
tft.getTextBounds(s_old, 0, 0, &x1, &y1, &w, &h);
w2 = w * 11 / 10;
tft.fillRect((TFT_WIDTH – w2) / 2 , y0 – (height / 2) + 1, w2, height, ILI9341_BLACK),
tft.getTextBounds(s_new, 0, 0, &x1, &y1, &w, &h);
tft.setCursor((TFT_WIDTH – w) / 2, y0 + (h / 2) – 1);
tft.print(s_new);
strcpy(s_old, s_new);
}
}
// Main settings page
void handleRoot() {
int i;
String html =
“n”
“
n”
“n”
“ n”
“ n”
“n”
“n”
“ n”
“
n”
“n”; for (i = 0; i < 24; i++) { html += “html += String(i); html += “”>”; html += String(i); html += “n”; } html += “(h)n”;
html += “n”; for (i = 0; i < 60; i++) { html += “html += String(i); html += “”>”; html += String(i); html += “n”; } html += “(min) n”;
html += “n”;
html += “
n”;
html += “ n”;
html += “ n”;
html += “n”;
html += “
n”;
html += “ n”;
html += “n”;
html += “n”;
server.send(200, “text/html”, html);
}
// Set alarm
void handleSetAlarm() {
int i, hour, min, sec;
bool is_off = false;
String s_hour = “”, s_min = “”, s_sec = “”;
// Get “off/hour/min/sec” parameters from URL
for (i = 0; i < server.args(); i++) {
if (server.argName(i).compareTo(“off”) == 0) {
is_off = true;
break;
}
else if (server.argName(i).compareTo(“hour”) == 0) {
s_hour = server.arg(i);
}
else if (server.argName(i).compareTo(“min”) == 0) {
s_min = server.arg(i);
}
else if (server.argName(i).compareTo(“sec”) == 0) {
s_sec = server.arg(i);
}
}
// Turn off alarm if “off” parameter is set if (is_off) {
strcpy(alarm_time, “Off”);
server.send(200, “text/plain; charset=utf-8”, “Alarm turned off.”);
}
// Set alarm time else if (s_hour.length() > 0 && s_min.length() > 0) {
hour = s_hour.toInt();
min = s_min.toInt();
if (s_sec.length() > 0) {
sec = s_sec.toInt();
}
else {
sec = 0;
}
if (hour >= 0 && hour <= 23 && min >= 0 && min <= 59 && sec >= 0 && sec <= 59) {
sprintf(alarm_time, “%02d:%02d:%02d”, hour, min, sec);
String msg = “Alarm set to “;
msg.concat(alarm_time);
msg.concat(” .”);
server.send(200, “text/plain; charset=utf-8”, msg);
}
else {
server.send(200, “text/plain; charset=utf-8”, “Incorrect date/time.”);
}
}
else {
server.send(200, “text/plain; charset=utf-8”, “Incorrect parameters.”);
}
}
/ Stop alarm
void handleStopAlarm() {
myDFPlayer.pause();
alarm_on = false;
tft.drawRect(30, 180, 260, 40, ILI9341_BLACK);
server.send(200, “text/plain”, “Alarm stop”);
}
// If an invalid URL is specified
void handleNotFound() {
String message = “Not Found : “;
message += server.uri();
server.send(404, “text/plain”, message);
}
// Setup
void setup() {
int16_t x1, y1;
uint16_t w, h;
Serial.begin(115200);
strcpy(old_date, “00000000000000”);
strcpy(old_time, “00000000”);
strcpy(old_alarm, “00000000000000”);
strcpy(alarm_time, “Off”);
// Initialize display
tft.begin();
tft.setRotation(3);
tft.fillScreen(ILI9341_BLACK);
tft.setTextColor(ILI9341_WHITE);
tft.setFont(&FreeSans12pt7b);
String s = “Initializing…”;
tft.getTextBounds(s, 0, 0, &x1, &y1, &w, &h);
tft.setCursor(0, h);
tft.println(s);
// Connect to WiFi
WiFi.begin(ssid, pass);
while (WiFi.status() != WL_CONNECTED) {
delay(500);
Serial.print(“.”);
}
WiFi.config(ip, gateway, WiFi.subnetMask(), IPAddress(8, 8, 8, 8), IPAddress(8, 8, 4, 4));
Serial.println(“”);
Serial.println(“WiFi Connected.”);
tft.println(“WiFi Connected.”);
// Initialize DFPlayer
hs.begin(9600, SERIAL_8N1, 16, 17);
int count = 0;
while (count < 10) {
if (!myDFPlayer.begin(hs)) {
count++;
Serial.print(“DFPlayer initialize attempt “);
Serial.println(count);
}
else {
break;
}
}
if (count < 10) {
Serial.println(“DFPlayer Initialized.”);
tft.println(“DFPlayer Initialized.”);
myDFPlayer.pause();
myDFPlayer.volume(DF_VOLUME);
}
else {
Serial.println(“DFPlayer Error.”);
tft.println(“DFPlayer Error.”);
while(1);
}
// Initialize RTC
if (!rtc.begin()) {
Serial.println(“Couldn’t find RTC”);
while (1);
}
Serial.println(“RTC Initialized”);
tft.println(“RTC Initialized.”);
// Get current date/time via NTP and set to RTC
setTimeByNTP();
// Initialize web server
server.on(“/”, handleRoot);
server.on(“/set”, handleSetAlarm);
server.on(“/stop”, handleStopAlarm);
server.onNotFound(handleNotFound);
server.begin();
// Fill display with black
tft.fillScreen(ILI9341_BLACK);
}
void loop() {
char new_time[9], new_date[15], new_alarm[15];
// Launch web server
server.handleClient();
// Display current date/time on LCD
DateTime now = rtc.now();
sprintf(new_date, “%04d/%02d/%02d “, now.year(), now.month(), now.day());
strcat(new_date, wdays[now.dayOfTheWeek()]);
sprintf(new_time, “%02d:%02d:%02d”, now.hour(), now.minute(), now.second());
strcpy(new_alarm, “Alarm “);
strcat(new_alarm, alarm_time);
tft.setFont(&FreeSans18pt7b);
tft.setTextColor(ILI9341_WHITE);
showMessage(new_date, old_date, 40, 28);
showMessage(new_alarm, old_alarm, 200, 28);
tft.setFont(&FreeSans40pt7b);
showMessage(new_time, old_time, 120, 64);
// Check if current time is time set for alarm
if (strstr(new_time, alarm_time) != NULL) {
if (!alarm_checked) {
// If it’s alarm time, ring out then send message to extension unit
myDFPlayer.loop(1);
alarm_checked = true;
alarm_on = true;
alarm_ctr = 0;
HTTPClient http;
http.begin(notify_url);
int httpCode = http.GET();
}
}
else {
alarm_checked = false;
}
// While alarm is sounding, make red frame flash around alarm time on display
if (alarm_on) {
if (alarm_ctr == 0) {
审核编辑 黄宇
-
在做一个微功耗的esp32,因为esp32需要500mA工作电流,可以用2个LDO电源对系统供电吗?2024-07-01 0
-
请问怎样设置待机唤醒为RTC闹钟事件唤醒?2019-01-11 0
-
HAL库RTC闹钟唤醒能实现吗?2019-01-16 0
-
STM32F103上的RTC闹钟中断功能以及用闹钟中断唤醒STM32的待机模式2021-08-13 0
-
从深度睡眠唤醒时DacAudio ESP32不工作的原因?2023-02-22 0
-
esp32c3不能操纵RTC引脚而只能保持它们或被唤醒吗?2023-03-02 0
-
ESP32深度睡眠被锁定无法唤醒的原因?2023-04-13 0
-
深度睡眠唤醒时的RTC重置问题如何解决?2023-04-13 0
-
RTC闹钟唤醒实验2016-01-13 626
-
STM32实现对RTC闹钟唤醒的设计2018-11-12 14024
-
STM32 RTC闹钟的中断和唤醒待机模式2021-07-23 16584
-
MM32F013x——RTC闹钟定时唤醒2022-02-08 643
-
如何使用ESP32构建一个BLE iBeacon2022-07-12 7136
-
ESP32 Feather RTC与SD开源分享2022-12-09 449
全部0条评论

快来发表一下你的评论吧 !

