×

PyTorch教程13.2之异步计算

消耗积分:0 | 格式:pdf | 大小:0.27 MB | 2023-06-05

刘涛

分享资料个

当今的计算机是高度并行的系统,由多个 CPU 内核(通常每个内核多个线程)、每个 GPU 多个处理元素以及每个设备通常多个 GPU 组成。简而言之,我们可以同时处理许多不同的事情,通常是在不同的设备上。不幸的是,Python 并不是编写并行和异步代码的好方法,至少在没有一些额外帮助的情况下是这样。毕竟 Python 是单线程的,这在未来不太可能改变。MXNet 和 TensorFlow 等深度学习框架采用 异步编程模型来提高性能,而 PyTorch 使用 Python 自己的调度程序导致不同的性能权衡。对于 PyTorch,默认情况下,GPU 操作是异步的。当您调用使用 GPU 的函数时,操作会排入特定设备的队列,但不一定会在稍后执行。这使我们能够并行执行更多计算,包括在 CPU 或其他 GPU 上的操作。

因此,了解异步编程的工作原理有助于我们通过主动减少计算要求和相互依赖性来开发更高效的程序。这使我们能够减少内存开销并提高处理器利用率。

import os
import subprocess
import numpy
import torch
from torch import nn
from d2l import torch as d2l
import os
import subprocess
import numpy
from mxnet import autograd, gluon, np, npx
from mxnet.gluon import nn
from d2l import mxnet as d2l

npx.set_np()

13.2.1。通过后端异步

作为热身,请考虑以下玩具问题:我们想要生成一个随机矩阵并将其相乘。让我们在 NumPy 和 PyTorch 张量中都这样做以查看差异。请注意,PyTorchtensor是在 GPU 上定义的。

# Warmup for GPU computation
device = d2l.try_gpu()
a = torch.randn(size=(1000, 1000), device=device)
b = torch.mm(a, a)

with d2l.Benchmark('numpy'):
  for _ in range(10):
    a = numpy.random.normal(size=(1000, 1000))
    b = numpy.dot(a, a)

with d2l.Benchmark('torch'):
  for _ in range(10):
    a = torch.randn(size=(1000, 1000), device=device)
    b = torch.mm(a, a)
numpy: 2.2001 sec
torch: 0.0057 sec

通过 PyTorch 的基准输出要快几个数量级。NumPy 点积在 CPU 处理器上执行,而 PyTorch 矩阵乘法在 GPU 上执行,因此后者预计会更快。但巨大的时差表明一定有其他事情在发生。默认情况下,GPU 操作在 PyTorch 中是异步的。强制 PyTorch 在返回之前完成所有计算显示了之前发生的情况:计算由后端执行,而前端将控制权返回给 Python。

with d2l.Benchmark():
  for _ in range(10):
    a = torch.randn(size=(1000, 1000), device=device)
    b = torch.mm(a, a)
  torch.cuda.synchronize(device)
Done: 0.0039 sec

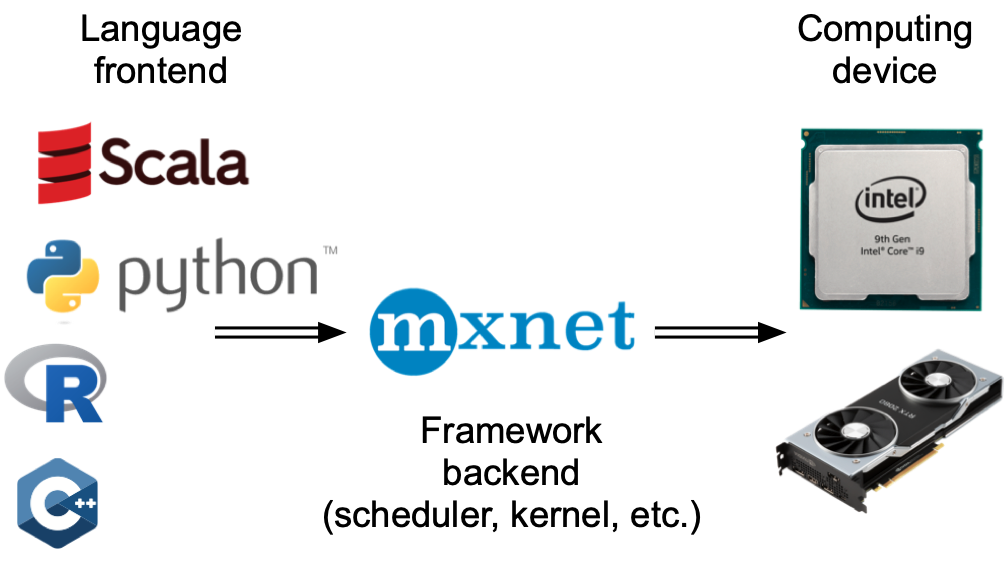
从广义上讲,PyTorch 有一个用于与用户直接交互的前端(例如,通过 Python),以及一个供系统用来执行计算的后端。如图13.2.1所示,用户可以使用Python、C++等多种前端语言编写PyTorch程序。无论使用何种前端编程语言,PyTorch 程序的执行主要发生在 C++ 实现的后端。前端语言发出的操作被传递到后端执行。后端管理自己的线程,这些线程不断收集和执行排队的任务。请注意,要使其正常工作,后端必须能够跟踪计算图中各个步骤之间的依赖关系。因此,不可能并行化相互依赖的操作。

For a warmup consider the following toy problem: we want to generate a random matrix and multiply it. Let’s do that both in NumPy and in mxnet.np to see the difference.

with d2l.Benchmark('numpy'):
  for _ in range(10):
    a = numpy.random.normal(size=(1000, 1000))
    b = numpy.dot(a, a)

with d2l.Benchmark('mxnet.np'):
  for _ in range(10):
    a = np.random.normal(size=(1000, 1000))
    b = np.dot(a, a)
numpy: 2.1419 sec
mxnet.np: 0.0728 sec

The benchmark output via MXNet is orders of magnitude faster. Since both are executed on the same processor something else must be going on. Forcing MXNet to finish all the backend computation prior to returning shows what happened previously: computation is executed by the backend while the frontend returns control to Python.

with d2l.Benchmark():
  for _ in range(10):
    a = np.random.normal(size=(1000, 1000))
    b = np.dot(a, a)
  npx.waitall()
Done: 2.1325 sec

Broadly speaking, MXNet has a frontend for direct interactions with users, e.g., via Python, as well as a backend used by the system to perform the computation. As shown in Fig. 13.2.1, users can write MXNet programs in various frontend languages, such as Python, R, Scala, and C++. Regardless of the frontend programming language used, the execution of MXNet programs occurs primarily in the backend of C++ implementations. Operations issued by the frontend language are passed on to the backend for execution. The backend manages its own threads that continuously collect and execute queued tasks. Note that for this to work the backend must be able to keep track of the dependencies between various steps in the computational graph. Hence, it is not possible to parallelize operations that depend on each other.

https://file.elecfans.com/web2/M00/A9/38/pYYBAGR3JV2AP9YmAAMyVzf4gz4123.png

图 13.2.1编程语言前端和深度学习框架后端。

让我们看另一个玩具示例以更好地理解依赖关系图。

x = torch.ones((1, 2), device=device)
y = torch.ones((1, 2), device=device)
z = x * y + 2
z
tensor([[3., 3.]], device='cuda:0')
x = np.ones((1, 2))
y = np.ones((1, 2))
z = x * y + 2
z
array([[3., 3.]])
https://file.elecfans.com/web2/M00/AA/46/pYYBAGR9OpWAYqN7AABuMUC0sRc200.svg

图 13.2.2后端跟踪计算图中各个步骤之间的依赖关系。

上面的代码片段也如图 13.2.2所示 每当 Python 前端线程执行前三个语句之一时,它只是将任务返回到后端队列。当需要打印最后一条语句的结果时 Python 前端线程将等待 C++ 后端线程完成对变量结果的计算z这种设计的一个好处是 Python 前端线程不需要执行实际计算。因此,无论 Python 的性能如何,对程序的整体性能影响都很小。 图 13.2.3说明了前端和后端如何交互。

https://file.elecfans.com/web2/M00/AA/46/pYYBAGR9OpeAW4-ZAAF-uY5QXNk814.svg

图 13.2.3前后端交互。

13.2.2。障碍和阻滞剂

有许多操作会强制 Python 等待完成:

  • 最明显的npx.waitall()是等待所有计算完成,而不管计算指令何时发出。在实践中,除非绝对必要,否则使用此运算符不是一个好主意,因为它会导致性能不佳。

  • 如果我们只想等到特定变量可用,我们可以调用z.wait_to_read(). z在这种情况下,MXNet 会阻止返回 Python,直到计算出变量为止。之后可能会继续进行其他计算。

让我们看看这在实践中是如何工作的。

with d2l.Benchmark('waitall'):
  b = np.dot(a, a)
  npx.waitall()

with d2l.Benchmark('wait_to_read'):
  b = np.dot(a, a)
  b.wait_to_read()
waitall: 0.0155 sec
wait_to_read: 0.0500 sec

完成这两个操作大约需要相同的时间。除了明显的阻塞操作之外,我们建议您了解 隐式阻塞程序。打印变量显然需要变量可用,因此是一个障碍。最后,转换为 NumPy via z.asnumpy()和转换为标量 viaz.item()是阻塞的,因为 NumPy 没有异步的概念。它需要像函数一样访问值print

频繁地将少量数据从 MXNet 的范围复制到 NumPy 并返回可能会破坏原本高效代码的性能,因为每个此类操作都需要计算图来评估获得相关术语所需的所有中间结果,然后才能完成任何其他操作

with d2l.Benchmark('numpy conversion'):
  b = np.dot(a, a)
  b.asnumpy()

with d2l.Benchmark('scalar conversion'):
  b = np.dot(a, a)
  b.sum().item()
numpy conversion: 0.0780 sec
scalar conversion: 0.0727 sec

13.2.3。改进计算

在高度多线程的系统上(即使是普通笔记本电脑也有 4 个或更多线程,而在多插槽服务器上,这个数字可能超过 256),调度操作的开销会变得很大。这就是为什么非常需要异步和并行进行计算和调度的原因。为了说明这样做的好处,让我们看看如果我们将变量递增 1 多次(顺序或异步)会发生什么。我们通过wait_to_read在每次添加之间插入一个屏障来模拟同步执行。

with d2l.Benchmark('synchronous'):
  for _ in range(10000):
    y = x + 1
    y.wait_to_read()

with d2l.Benchmark('asynchronous'):
  for _ in range(10000):
    y = x + 1
  npx.waitall()
synchronous: 1.4076 sec
asynchronous: 1.1700 sec

Python前端线程和C++后端线程之间的一个稍微简化的交互可以概括如下: 1. 前端命令后端将计算任务插入到队列中。1. 后端从队列中接收计算任务并进行实际计算。1. 后端将计算结果返回给前端。假设这三个阶段的持续时间是y = x + 1t1,t2t3, 分别。如果我们不使用异步编程,执行 10000 次计算所花费的总时间大约是10000(t1+t2+t3)


声明:本文内容及配图由入驻作者撰写或者入驻合作网站授权转载。文章观点仅代表作者本人,不代表电子发烧友网立场。文章及其配图仅供工程师学习之用,如有内容侵权或者其他违规问题,请联系本站处理。 举报投诉

评论(0)
发评论

下载排行榜

全部0条评论

快来发表一下你的评论吧 !

'+ '

'+ '

'+ ''+ '
'+ ''+ ''+ '
'+ ''+ '' ); $.get('/article/vipdownload/aid/'+webid,function(data){ if(data.code ==5){ $(pop_this).attr('href',"/login/index.html"); return false } if(data.code == 2){ //跳转到VIP升级页面 window.location.href="//m.obk20.com/vip/index?aid=" + webid return false } //是会员 if (data.code > 0) { $('body').append(htmlSetNormalDownload); var getWidth=$("#poplayer").width(); $("#poplayer").css("margin-left","-"+getWidth/2+"px"); $('#tips').html(data.msg) $('.download_confirm').click(function(){ $('#dialog').remove(); }) } else { var down_url = $('#vipdownload').attr('data-url'); isBindAnalysisForm(pop_this, down_url, 1) } }); }); //是否开通VIP $.get('/article/vipdownload/aid/'+webid,function(data){ if(data.code == 2 || data.code ==5){ //跳转到VIP升级页面 $('#vipdownload>span').text("开通VIP 免费下载") return false }else{ // 待续费 if(data.code == 3) { vipExpiredInfo.ifVipExpired = true vipExpiredInfo.vipExpiredDate = data.data.endoftime } $('#vipdownload .icon-vip-tips').remove() $('#vipdownload>span').text("VIP免积分下载") } }); }).on("click",".download_cancel",function(){ $('#dialog').remove(); }) var setWeixinShare={};//定义默认的微信分享信息,页面如果要自定义分享,直接更改此变量即可 if(window.navigator.userAgent.toLowerCase().match(/MicroMessenger/i) == 'micromessenger'){ var d={ title:'PyTorch教程13.2之异步计算',//标题 desc:$('[name=description]').attr("content"), //描述 imgUrl:'https://'+location.host+'/static/images/ele-logo.png',// 分享图标,默认是logo link:'',//链接 type:'',// 分享类型,music、video或link,不填默认为link dataUrl:'',//如果type是music或video,则要提供数据链接,默认为空 success:'', // 用户确认分享后执行的回调函数 cancel:''// 用户取消分享后执行的回调函数 } setWeixinShare=$.extend(d,setWeixinShare); $.ajax({ url:"//www.obk20.com/app/wechat/index.php?s=Home/ShareConfig/index", data:"share_url="+encodeURIComponent(location.href)+"&format=jsonp&domain=m", type:'get', dataType:'jsonp', success:function(res){ if(res.status!="successed"){ return false; } $.getScript('https://res.wx.qq.com/open/js/jweixin-1.0.0.js',function(result,status){ if(status!="success"){ return false; } var getWxCfg=res.data; wx.config({ //debug: true, // 开启调试模式,调用的所有api的返回值会在客户端alert出来,若要查看传入的参数,可以在pc端打开,参数信息会通过log打出,仅在pc端时才会打印。 appId:getWxCfg.appId, // 必填,公众号的唯一标识 timestamp:getWxCfg.timestamp, // 必填,生成签名的时间戳 nonceStr:getWxCfg.nonceStr, // 必填,生成签名的随机串 signature:getWxCfg.signature,// 必填,签名,见附录1 jsApiList:['onMenuShareTimeline','onMenuShareAppMessage','onMenuShareQQ','onMenuShareWeibo','onMenuShareQZone'] // 必填,需要使用的JS接口列表,所有JS接口列表见附录2 }); wx.ready(function(){ //获取“分享到朋友圈”按钮点击状态及自定义分享内容接口 wx.onMenuShareTimeline({ title: setWeixinShare.title, // 分享标题 link: setWeixinShare.link, // 分享链接 imgUrl: setWeixinShare.imgUrl, // 分享图标 success: function () { setWeixinShare.success; // 用户确认分享后执行的回调函数 }, cancel: function () { setWeixinShare.cancel; // 用户取消分享后执行的回调函数 } }); //获取“分享给朋友”按钮点击状态及自定义分享内容接口 wx.onMenuShareAppMessage({ title: setWeixinShare.title, // 分享标题 desc: setWeixinShare.desc, // 分享描述 link: setWeixinShare.link, // 分享链接 imgUrl: setWeixinShare.imgUrl, // 分享图标 type: setWeixinShare.type, // 分享类型,music、video或link,不填默认为link dataUrl: setWeixinShare.dataUrl, // 如果type是music或video,则要提供数据链接,默认为空 success: function () { setWeixinShare.success; // 用户确认分享后执行的回调函数 }, cancel: function () { setWeixinShare.cancel; // 用户取消分享后执行的回调函数 } }); //获取“分享到QQ”按钮点击状态及自定义分享内容接口 wx.onMenuShareQQ({ title: setWeixinShare.title, // 分享标题 desc: setWeixinShare.desc, // 分享描述 link: setWeixinShare.link, // 分享链接 imgUrl: setWeixinShare.imgUrl, // 分享图标 success: function () { setWeixinShare.success; // 用户确认分享后执行的回调函数 }, cancel: function () { setWeixinShare.cancel; // 用户取消分享后执行的回调函数 } }); //获取“分享到腾讯微博”按钮点击状态及自定义分享内容接口 wx.onMenuShareWeibo({ title: setWeixinShare.title, // 分享标题 desc: setWeixinShare.desc, // 分享描述 link: setWeixinShare.link, // 分享链接 imgUrl: setWeixinShare.imgUrl, // 分享图标 success: function () { setWeixinShare.success; // 用户确认分享后执行的回调函数 }, cancel: function () { setWeixinShare.cancel; // 用户取消分享后执行的回调函数 } }); //获取“分享到QQ空间”按钮点击状态及自定义分享内容接口 wx.onMenuShareQZone({ title: setWeixinShare.title, // 分享标题 desc: setWeixinShare.desc, // 分享描述 link: setWeixinShare.link, // 分享链接 imgUrl: setWeixinShare.imgUrl, // 分享图标 success: function () { setWeixinShare.success; // 用户确认分享后执行的回调函数 }, cancel: function () { setWeixinShare.cancel; // 用户取消分享后执行的回调函数 } }); }); }); } }); } function openX_ad(posterid, htmlid, width, height) { if ($(htmlid).length > 0) { var randomnumber = Math.random(); var now_url = encodeURIComponent(window.location.href); var ga = document.createElement('iframe'); ga.src = 'https://www1.elecfans.com/www/delivery/myafr.php?target=_blank&cb=' + randomnumber + '&zoneid=' + posterid+'&prefer='+now_url; ga.width = width; ga.height = height; ga.frameBorder = 0; ga.scrolling = 'no'; var s = $(htmlid).append(ga); } } openX_ad(828, '#berry-300', 300, 250);