

HarmonyOS开发实例:【菜单app】
电子说
描述
简介
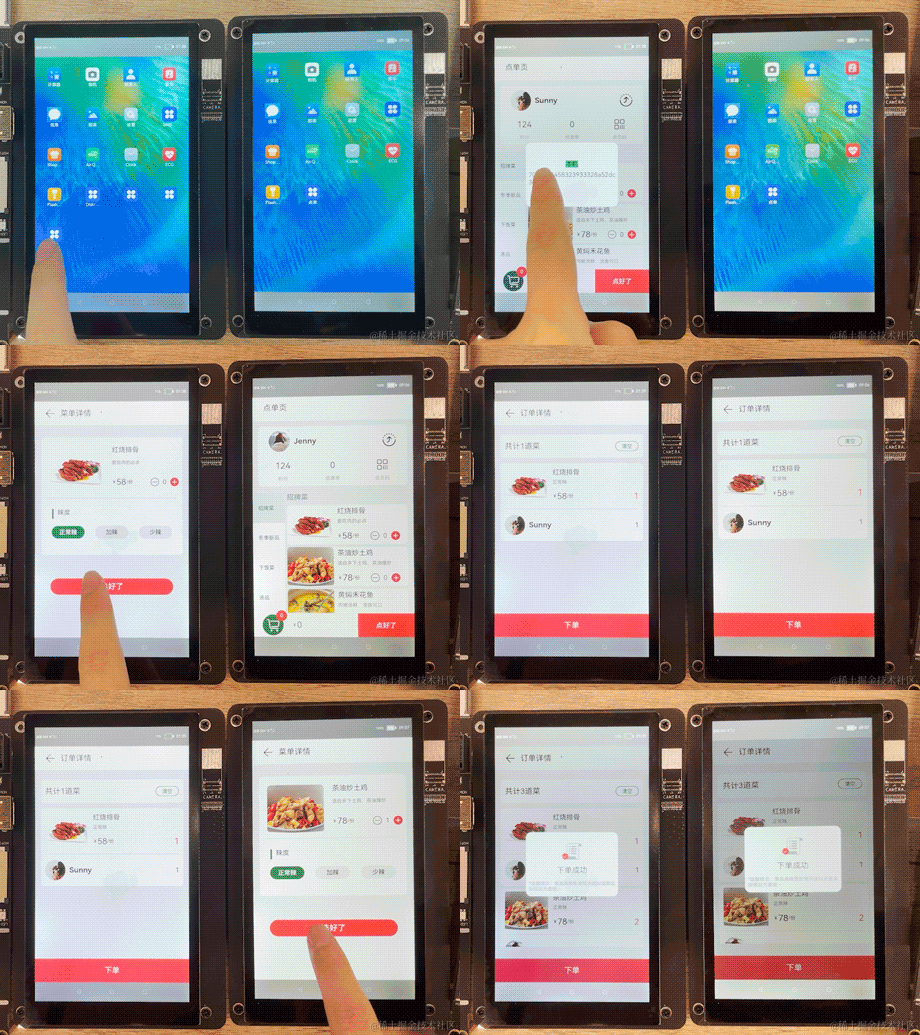
分布式菜单demo 模拟的是多人聚餐点菜的场景,不需要扫码关注公众号等一系列操作,通过分布式数据库可以方便每个人可及时查看到订单详情,数量,总额等;效果如下
- demo效果
工程目录
完整的项目结构目录如下
├─entry
│  └─src
│      └─main
│          │  config.json  // 应用配置文件
│          │
│          ├─ets
│          │  └─MainAbility
│          │      │  app.ets  // 应用程序主入口
│          │      │
│          │      ├─model
│          │      │      CommonLog.ets  // 日志类
│          │      │      MenuData.ets  // 初始化菜单数据类
│          │      │      MenuListDistributedData.ets  // 加入菜单分布式数据库
│          │      │      RemoteDeviceManager.ets  // 分布式拉起设备管理类
│          │      │      SubmitData.ets   // 结算订单分布式数据库
│          │      │
│          │      └─pages
│          │              detailedPage.ets // 菜品详细页面
│          │              index.ets // 英国威廉希尔公司网站

│          │              menuAccount.ets // 订单详情页面
│          │
│          └─resources
│              ├─base
│              │  ├─element
│              │  │      string.json
│              │  │
│              │  ├─graphic
│              │  ├─layout
│              │  ├─media   // 存放媒体资源
│              │  │      icon.png
│              │  │      icon_add.png
│              │  │      icon_back.png
│              │  │      icon_cart.png
│              │  │
│              │  └─profile
│              └─rawfile
鸿蒙开发文档[qr23.cn/AKFP8k]
开发步骤
1. 新建OpenHarmony ETS项目
鸿蒙next星河版紫料mau123789是v拿取
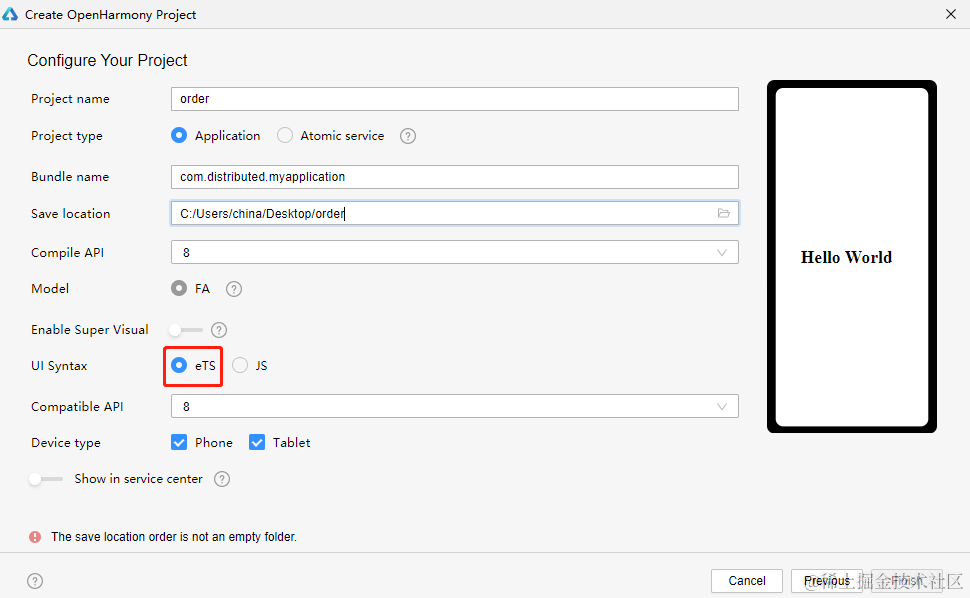
在DevEco Studio中点击File -> New Project ->Empty Ability->Next,Language 选择ETS语言,最后点击Finish即创建成功。 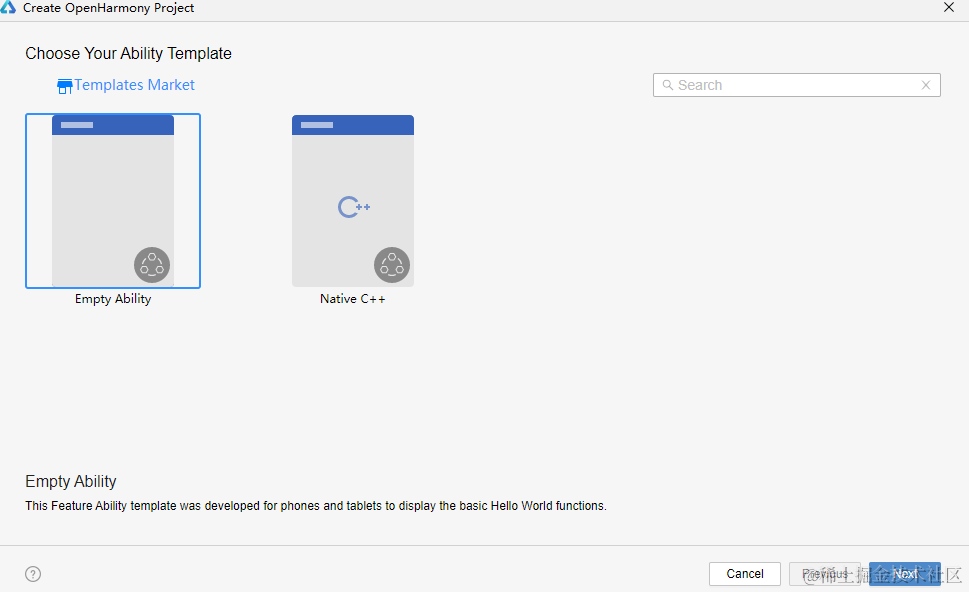
2. 编写商品展示主页面
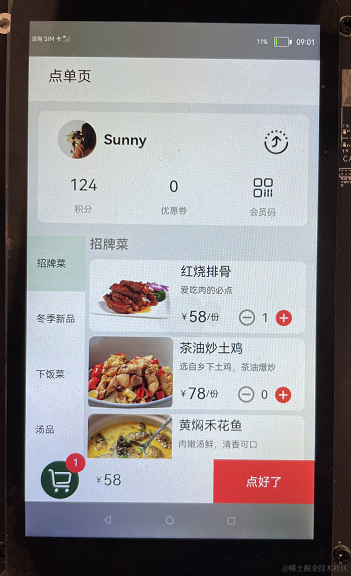
2.1用户信息
1): 主要用到[Flex]容器[Image]和[Text]组件;
2): 用户名称和头像图标,根据设备序列号不同,可展示不同的名称和图标;
3): 点击右上角分享的小图标,可分布式拉起局域网内的另一台设备;
@Component
struct MemberInfo {
  @Consume userImg: Resource
  @Consume userName: string

  aboutToAppear() {
  // 根据设备序列号不同,展示不同的名称和图标
    CommonLog.info('==serial===' + deviceInfo.serial);
    if (deviceInfo.serial == '150100384754463452061bba4c3d670b') {
      this.userImg = $r("app.media.icon_user")
      this.userName = 'Sunny'
    }
    else {
      this.userImg = $r("app.media.icon_user_another")
      this.userName = 'Jenny'
    }
  }

  build() {
    Flex({ direction: FlexDirection.Column }) {
      Flex({ direction: FlexDirection.Row, alignItems: ItemAlign.Center }) {
        Image(this.userImg)
          .width('96lpx')
          .height('96lpx')
          .margin({ right: '18lpx' })
        Text(this.userName)
          .fontSize('36lpx')
          .fontWeight(FontWeight.Bold)
          .flexGrow(1)
        Image($r("app.media.icon_share"))
          .width('64lpx')
          .height('64lpx')
      }
      // 打开分布式设备列表
      .onClick(() = > {
        this.DeviceDialog.open()
      })
      .layoutWeight(1)
      .padding({ left: '48lpx', right: '48lpx' })

      Flex({ direction: FlexDirection.Row, alignItems: ItemAlign.Center }) {
        Column() {
          Text('124')
            .fontSize('40lpx')
            .margin({ bottom: '24lpx' })
          Text('积分')
            .fontSize('22lpx')
            .opacity(0.4)
        }
        .flexGrow(1)

        Column() {
          Text('0')
            .fontSize('40lpx')
            .margin({ bottom: '24lpx' })
          Text('优惠劵')
            .fontSize('22lpx')
            .opacity(0.4)
        }
        .flexGrow(1)

        Column() {
          Image($r("app.media.icon_member"))
            .width('48lpx')
            .height('48lpx')
            .margin({ bottom: '24lpx' })
          Text('会员码')
            .fontSize('22lpx')
            .fontColor('#000000')
            .opacity(0.4)
        }
        .flexGrow(1)
      }
      .layoutWeight(1)
    }
    .width('93%')
    .height('25%')
    .borderRadius('16lpx')
    .backgroundColor('#FFFFFF')
    .margin({ top: '24lpx', bottom: '32lpx' })
  }
}
2.2列表展示
1): 主要用到[Flex]容器 和[Scroll]容器[Image]和[Text]组件;
2): 从英国威廉希尔公司网站 点击列表进入菜品详细页面,点菜成功后会自动返回英国威廉希尔公司网站 ,此时列表需要动态更新菜品的数量;
@Component
struct MenuHome {
  private specialty: any[]
  private winterNew: any[]
  private classic: any[]
  private soup: any[]
  private menuItems: MenuData[]
  private titleList = ['招牌菜', '冬季新品', '下饭菜', '汤品']
  @State name: string = '招牌菜'

  build() {
    Flex({ direction: FlexDirection.Row, alignItems: ItemAlign.Start }) {
      Flex({ direction: FlexDirection.Column, justifyContent: FlexAlign.SpaceAround }) {
        ForEach(this.titleList, item = > {
          Flex({ alignItems: ItemAlign.Center, justifyContent: FlexAlign.Start }) {
            Text(item)
              .fontSize('24lpx')
          }
          .padding({ left: '24lpx' })
          .backgroundColor(this.name == item ? '#1A006A3A' : '#FFFFFF')
          .height('160lpx')
          .onClick(() = > {
            this.name = item
            if (this.name == '招牌菜') {
              this.menuItems = initializeOnStartup(this.specialty);
            }
            else if (this.name == '冬季新品') {
              this.menuItems = initializeOnStartup(this.winterNew);
            }
            else if (this.name == '下饭菜') {
              this.menuItems = initializeOnStartup(this.classic);
            }
            else if (this.name == '汤品') {
              this.menuItems = initializeOnStartup(this.soup);
            }
          })
        }, item = > item)
      }
      .width('20%')
      .backgroundColor('#FFFFFF')

      Flex({ direction: FlexDirection.Column }) {
        Text(this.name)
          .fontSize('32lpx')
          .fontWeight(FontWeight.Bold)
          .opacity(0.4)
          .height('8%')
        Scroll() {
          Column() {
            List() {
              ForEach(this.menuItems, item = > {
                ListItem() {
                  MenuListItem({ menuItem: item })
                }
              }, item = > item.id.toString())
            }
          }
        }
        .height('92%')
      }
      .margin({ left: '10lpx' })
      .width('75%')

    }
    .height('50%')
  }
}
2.3底部总额
1): 主要用到[Flex]容器 和[Stack]容器[Image]和[Text]组件;
2): 从英国威廉希尔公司网站 点击列表进入菜品详细页面,点菜成功后会自动返回英国威廉希尔公司网站 ,更新订单数量和总额;
3): 点击底部总额框,将订单列表加入分布式数据库,@entry模拟监听数据库变化,拉起订单列表详情页面;
@Component
struct TotalInfo {
  @Consume TotalMenu: any[];
  private total: number = 0;
  private amount: number = 0;
  private remoteData: MenuListData

  aboutToAppear() {
    for (var index = 0; index < this.TotalMenu.length; index++) {
      this.total = this.total + this.TotalMenu[index].price * this.TotalMenu[index].quantity
      this.amount = this.amount + this.TotalMenu[index].quantity
    }
  }

  build() {
    Flex({ direction: FlexDirection.Row, alignItems: ItemAlign.Center }) {
      Stack({ alignContent: Alignment.Center }) {
        Image($r("app.media.icon_cart"))
          .width('96lpx')
          .height('96lpx')
          .margin({ left: '22lpx' })
        Text(this.amount.toString())
          .backgroundColor('#F84747')
          .borderRadius('30plx')
          .fontSize('24plx')
          .textAlign(TextAlign.Center)
          .fontColor('#FFFFFF')
          .width('50lpx')
          .height('50lpx')
          .margin({ left: '100lpx', bottom: '85lpx' })
      }
      .width('150lpx')
      .height('150lpx')

      Text('¥')
        .fontSize('22lpx')
        .fontColor('#006A3A')
        .margin({ left: '22lpx' })
      Text(this.total.toString())
        .fontSize('40lpx')
        .fontColor('#006A3A')
        .flexGrow(1)
      Text('点好了')
        .height('100%')
        .width('35%')
        .fontColor('#FFFFFF')
        .backgroundColor('#F84747')
        .textAlign(TextAlign.Center)
    }
    // 将总的订单数据,加入分布式数据库
    .onClick(() = > {
      this.remoteData.putData("menu_list", this.TotalMenu)
    })
    .width('100%')
    .height('10%')
    .backgroundColor('#FFFFFF')
  }
}
3. 编写菜单详细页面
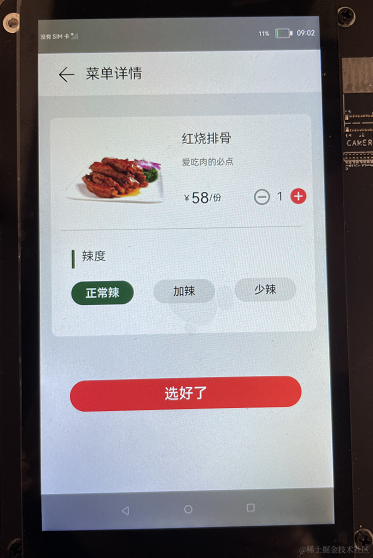
3.1 菜单详情
1): 主要用到[Flex]容器 [Image]和[Text]组件[Button]组件;
2): 辣度可以选择;
3):点击选好了,需要判断该菜品是否已经在总订单里面,并判断是哪一个用户添加,根据判断,做出相应的增加;
@Component
struct detailInfo {
  private menuItem
  private spicyList = ['正常辣', '加辣', '少辣']
  @State spicy: string = '正常辣'
  private TotalMenu: any[]
  private index = 0
  private userName: string

  build() {
    Flex({ direction: FlexDirection.Column, alignItems: ItemAlign.Center }) {
      Flex({ direction: FlexDirection.Column, alignItems: ItemAlign.Start, justifyContent: FlexAlign.Start }) {
        Flex({ direction: FlexDirection.Row }) {
          Flex() {
            Image(this.menuItem.imgSrc)
              .objectFit(ImageFit.Contain)
          }

          Flex({ direction: FlexDirection.Column }) {
            Text(this.menuItem.name)
              .fontSize('32lpx')
              .flexGrow(1)
            Text(this.menuItem.remarks)
              .fontSize('22lpx')
              .fontColor('#000000')
              .opacity(0.6)
              .flexGrow(1)
            Flex({ direction: FlexDirection.Row, alignItems: ItemAlign.Center }) {
              Text('¥')
                .fontSize('22lpx')
              Text(this.menuItem.price.toString())
                .fontSize('40lpx')
              Text('/份')
                .fontSize('22lpx')
                .flexGrow(1)
              Image($r("app.media.icon_reduce"))
                .width('44lpx')
                .height('44lpx')
                .onClick(() = > {
                  prompt.showToast({
                    message: "Reduce function  to be completed",
                    duration: 5000
                  })
                })
              Text(this.menuItem.quantity.toString())
                .margin({ left: '15lpx', right: '15lpx' })
              Image($r("app.media.icon_add"))
                .width('44lpx')
                .height('44lpx')
                .margin({ right: '15lpx' })
                .onClick(() = > {
                  prompt.showToast({
                    message: "Increase function to be completed",
                    duration: 5000
                  })
                })
            }
            .flexGrow(2)
          }
        }
        .height('40%')
        .margin({ top: '40lpx', bottom: '24lpx' })

        Button()
          .backgroundColor('#000000')
          .opacity(0.1)
          .height('2lpx')
          .margin({ left: '24lpx' })
          .width('92%')

        Flex({ direction: FlexDirection.Row }) {
          Button()
            .backgroundColor('#006A3A ')
            .width('8lpx')
            .height('48lpx')
            .margin({ right: '12lpx' })
          Text('辣度')
        }
        .margin({ left: '44lpx', top: '48lpx', bottom: '32lpx' })

        Flex({ direction: FlexDirection.Row, justifyContent: FlexAlign.SpaceEvenly }) {
          ForEach(this.spicyList, item = > {

            Button(item)
              .fontSize('28lpx')
              .height('60lpx')
              .width('156lpx')
              .borderRadius('12lpx')
              .backgroundColor(this.spicy == item ? '#006A3A' : '#0D000000')
              .fontColor(this.spicy == item ? '#FFFFFF' : '#000000')

              .onClick(() = > {
                this.spicy = item
              })
          }, item = > item)
        }
      }
      .margin({ top: '56lpx' })
      .width('92%')
      .height('50%')
      .borderRadius('16lpx')
      .backgroundColor('#FFFFFF')


      Button('选好了')
        .fontSize('36lpx')
        .width('80%')
        .height('7%')
        .backgroundColor('#F84747')
        .onClick(() = > {
          for (this.index = 0; this.index < this.TotalMenu.length; this.index++) {
            if (this.TotalMenu[this.index].name == this.menuItem.name && this.TotalMenu[this.index].spicy == this.spicy) {
              this.TotalMenu[this.index].quantity = this.TotalMenu[this.index].quantity + 1;
              if (this.userName == 'Sunny') {
                this.TotalMenu[this.index].userNumber = this.TotalMenu[this.index].userNumber + 1;
              } else if (this.userName == 'Jenny') {
                this.TotalMenu[this.index].anotherUserNumber = this.TotalMenu[this.index].anotherUserNumber + 1;
              }
              break;
            }
          }
          // 菜名不一样,辣度不一样,都需要重新push到列表里面
          if (this.index == this.TotalMenu.length) {
            this.menuItem.spicy = this.spicy;
            this.menuItem.quantity = 1;
            //根据不用的用户名称,
            if (this.userName == 'Sunny') {
              this.menuItem.userNumber = 1;
            } else if (this.userName == 'Jenny') {
              this.menuItem.anotherUserNumber = 1;
            }
            this.TotalMenu.push(this.menuItem);
          }
          router.push({
            uri: 'pages/index',
            params: { menuItem: this.menuItem, TotalMenu: this.TotalMenu }
          })
        })
        .margin({ top: '10%' })
    }
  }
}
4. 编写订单详情页面
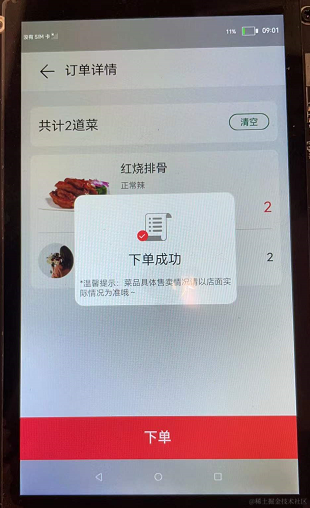
4.1 订单列表
1): 主要用到[Flex]容器[Image]和[Text]组件[Button]组件;
2): 点击下单,将"submitOk" 加入分布式数据库,监听数据库变化后,弹出自定义对话框;
@Component
struct TotalItem {
  private totalMenu: MenuData

  build() {
    Flex({ direction: FlexDirection.Column }) {
      Flex({ direction: FlexDirection.Row, alignContent: FlexAlign.Start, justifyContent: FlexAlign.Start }) {

        Image(this.totalMenu.imgSrc)
          .width('210lpx')
          .height('100%')
        Flex({ direction: FlexDirection.Column }) {
          Text(this.totalMenu.name)
            .fontSize('32lpx')
            .flexGrow(1)
          Text(this.totalMenu.spicy)
            .fontSize('22lpx')
            .fontColor('#000000')
            .opacity(0.6)
            .flexGrow(1)
          Flex({ direction: FlexDirection.Row, alignItems: ItemAlign.Center }) {
            Text('¥')
              .fontSize('22lpx')
            Text(this.totalMenu.price.toString())
              .fontSize('40lpx')
            Text('/份')
              .fontSize('22lpx')
              .flexGrow(1)
            Text(this.totalMenu.quantity.toString())
              .fontColor("#F84747")
              .fontSize('40lpx')
          }
          .flexGrow(2)
        }
        .padding({ left: '5%', top: '6%' })
        .width('70%')
      }
      .height('180lpx')

      Button()
        .backgroundColor('#000000')
        .opacity(0.1)
        .height('2lpx')
        .margin({ top: '20lpx' })
        .width('100%')


      if (this.totalMenu.userNumber > 0) {
        Flex({ direction: FlexDirection.Row, alignItems: ItemAlign.Center }) {
          Image(this.totalMenu.userImg)
            .width('96lpx')
            .height('96lpx')
          Text(this.totalMenu.userName)
            .fontSize('36lpx')
            .fontWeight(FontWeight.Bold)
            .margin({ left: '12lpx' })
            .flexGrow(1)
          Text(this.totalMenu.userNumber.toString())
            .fontSize('32lpx')
            .margin({ right: '11plx' })

        }
        .height('150lpx')
      }
      if (this.totalMenu.anotherUserNumber > 0) {
        Flex({ direction: FlexDirection.Row, alignItems: ItemAlign.Center }) {
          Image(this.totalMenu.anotherUserImg)
            .width('96lpx')
            .height('96lpx')
          Text(this.totalMenu.anotherUserName)
            .fontSize('36lpx')
            .fontWeight(FontWeight.Bold)
            .margin({ left: '12lpx' })
            .flexGrow(1)
          Text(this.totalMenu.anotherUserNumber.toString())
            .fontSize('32lpx')
            .margin({ right: '11plx' })

        }
        .height('150lpx')
      }
    }
    .margin({ top: '12lpx' })
    .borderRadius('16lpx')
    .padding({ left: '3%', right: '3%', top: '2%' })
    .backgroundColor('#FFFFFF')
  }
}
4.2自定义弹框
1)通过**@CustomDialog**装饰器来创建自定义弹窗,使用方式可参考 [自定义弹窗];
2)规则弹窗效果如下,弹窗组成由一个[Image]和两个[Text]竖向排列组成;
所有我们可以在build()下使用[Flex]容器来包裹,组件代码如下:
@CustomDialog
struct SubmitDialog {
  private controller: CustomDialogController

  build() {
    Flex({ direction: FlexDirection.Column, alignItems: ItemAlign.Center }) {
      Flex({ justifyContent: FlexAlign.Center }) {
        Image($r("app.media.icon_success"))
          .width('100lpx')
          .height('80lpx')
      }
      .flexGrow(1)

      Text('下单成功')
        .fontSize('36lpx')
        .fontColor('#000000')
        .flexGrow(1)
      Text('*温馨提示:菜品具体售卖情况请以店面实际情况为准哦~')
        .fontSize('22lpx')
        .opacity(0.6)
        .fontColor('#000000')
        .padding({ left: '10lpx', right: '10lpx' })
    }
    .height('300lpx')
    .width('100%')
    .padding({ top: '50lpx', bottom: '20lpx' })

  }
}
3)在@entry创建CustomDialogController对象并传入弹窗所需参数,设置点击允许点击遮障层退出,通过open()方法,显示弹窗;
SubmitDialog: CustomDialogController = new CustomDialogController({
    builder: SubmitDialog(),
    autoCancel: true
  })
aboutToAppear() {

    this.remoteData.createManager(() = > {
      let self = this;
      var data;
      if (JSON.stringify(self.remoteData.dataItem).length > 0) {
      	data = self.remoteData.dataItem;
        CommonLog.info("======submit==" + data[0].submit);
        if (data[0].submit == "submitOk") {
          this.SubmitDialog.open()
        }
      }
    }, "com.distributed.order", "submit")
  }
5. 添加分布式流转
分布式流转需要在同一网络下通过 [DeviceManager组件]进行设备间发现和认证,获取到可信设备的deviceId调用 [featureAbility].startAbility ,即可把应用程序流转到另一设备。
1)创建DeviceManager实例;
2)调用实例的startDeviceDiscovery(),开始设备发现未信任设备;
3)设置设备状态监听on('deviceFound',callback),获取到未信任设备,并用discoverList变量进行维护;
4)传入未信任设备参数,调用实例authenticateDevice方法,对设备进行PIN码认证;
5)若是已信任设备,可通过实例的getTrustedDeviceListSync()方法来获取设备信息;
6)将设备信息中的deviceId传入[featureAbility].startAbility方法,实现流转;
7)流转接收方可通过[featureAbility].getWant()获取到发送方携带的数据;
项目中将上面设备管理封装至RemoteDeviceManager,通过RemoteDeviceManager的四个方法来动态维护deviceList设备信息列表,实现分布式流转只需要在deviceList中获取deviceId,然后调用featureAbility.startAbility并携带数据,即可实现分布式流转。
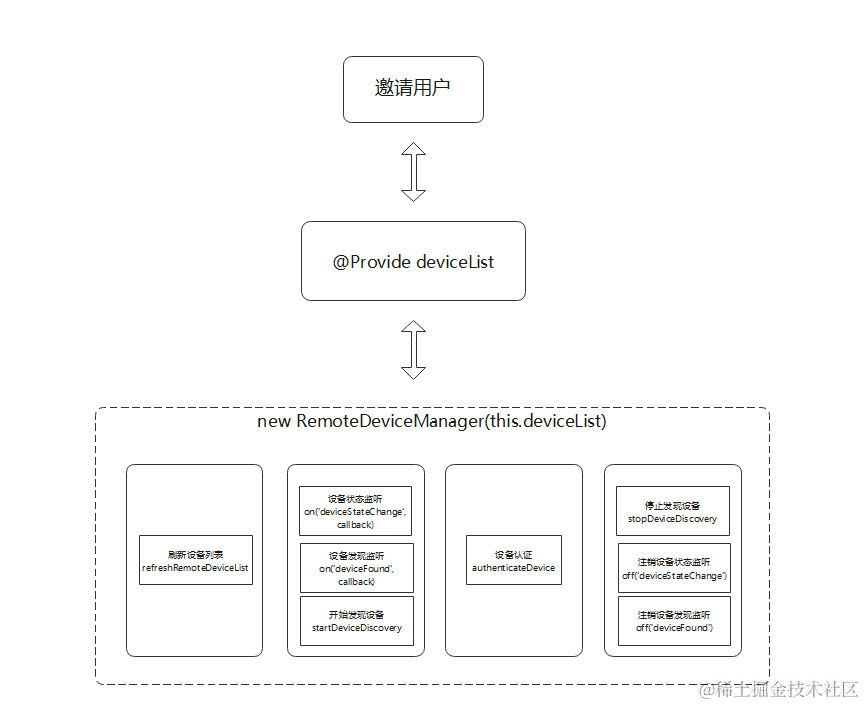
6.分布式数据管理
[分布式数据管理]要求两个或多个设备在同一网络,才能监听到数据库的改变,从而渲染页面;开发步骤:
1)创建一个KVManager对象实例,用于管理数据库对象;
2)通过指定Options和storeId,创建并获取KVStore数据库,如下是参数说明;需要先通过createKVManager构建一个KVManager实例;
| 参数名 | 类型 | 必填 | 说明 |
|---|---|---|---|
| storeId | string | 是 | 数据库唯一标识符,长度不大于[MAX_STORE_ID_LENGTH]。 |
| options | [Options] | 是 | 创建KVStore实例的配置信息。 |
3)KVStore数据库实例, KVStore.put提供增加数据的方法,如下是参数说明;
| 参数名 | 类型 | 必填 | 说明 |
|---|---|---|---|
| key | string | 是 | 要添加数据的key,不能为空且长度不大于[MAX_KEY_LENGTH]。 |
| value | Uint8Array | string | number |
| callback | AsyncCallback | 是 | 回调函数。 |
4) KVStore数据库实例,KVStore.on订阅指定类型的数据变更通知;一般监听远端设备变化,再进行相应操作达到分布式数据共享的效果;
本项目通过storeId 值不同,创建了两个数据库,分别是MenuListDistributedData类和SubmitData类;
MenuListDistributedData是将完整订单添加到分布式数据库
@Component
struct TotalInfo {
  @Consume TotalMenu: any[];
  private total: number = 0;
  private amount: number = 0;
  private remoteData: MenuListData

  aboutToAppear() {
    for (var index = 0; index < this.TotalMenu.length; index++) {
      this.total = this.total + this.TotalMenu[index].price * this.TotalMenu[index].quantity
      this.amount = this.amount + this.TotalMenu[index].quantity
    }
  }

  build() {
    Flex({ direction: FlexDirection.Row, alignItems: ItemAlign.Center }) {
      Stack({ alignContent: Alignment.Center }) {
        Image($r("app.media.icon_cart"))
          .width('96lpx')
          .height('96lpx')
          .margin({ left: '22lpx' })
        Text(this.amount.toString())
          .backgroundColor('#F84747')
          .borderRadius('30plx')
          .fontSize('24plx')
          .textAlign(TextAlign.Center)
          .fontColor('#FFFFFF')
          .width('50lpx')
          .height('50lpx')
          .margin({ left: '100lpx', bottom: '85lpx' })
      }
      .width('150lpx')
      .height('150lpx')

      Text('¥')
        .fontSize('22lpx')
        .fontColor('#006A3A')
        .margin({ left: '22lpx' })
      Text(this.total.toString())
        .fontSize('40lpx')
        .fontColor('#006A3A')
        .flexGrow(1)
      Text('点好了')
        .height('100%')
        .width('35%')
        .fontColor('#FFFFFF')
        .backgroundColor('#F84747')
        .textAlign(TextAlign.Center)
    }
    .onClick(() = > {
      this.remoteData.putData("menu_list", this.TotalMenu)
    })
    .width('100%')
    .height('10%')
    .backgroundColor('#FFFFFF')
  }
}
SubmitData在订单结算是点击下单,将submitOk 添加到数据库;
@Component
struct SubmitList {
  private remoteData: SubmitData
  private SubmitOK: any[] = [
    {
      submit: "submitOk"
    }
  ];

  build() {
    Flex({ alignItems: ItemAlign.Center, justifyContent: FlexAlign.Center }) {
      Text('下单')
        .fontSize('36lpx')
        .fontColor('#FFFFFF')
    }
    .width('100%')
    .height('10%')
    .backgroundColor('#F84747')
    .onClick(() = > {
      this.remoteData.putData("submit", this.SubmitOK)
    })
    .margin({ top: '5%' })
  }
}
审核编辑 黄宇
-
【HarmonyOS】开发跨设备的鸿蒙(HarmonyOS) App2020-11-02 0
-
HarmonyOS应用开发-编译、调试、应用发布资料2020-09-21 0
-
【HarmonyOS】开发跨设备的鸿蒙(HarmonyOS)App2020-11-03 0
-
开发跨设备的鸿蒙(HarmonyOS) App2020-11-13 0
-
手把手教你上架HarmonyOS应用2020-12-18 0
-
如何优雅地开发HarmonyOS APP应用2021-03-10 0
-
戈帅 开发的 HarmonyOS APP《拼夕夕》演示2021-08-28 0
-
浅析HarmonyOS APP和HAP的组成合集2022-03-22 0
-
harmonyOS开发的APP如何访问Webservice?2022-03-28 0
-
HarmonyOS APP打包运行和调试应用开发步骤2022-05-24 0
-
HarmonyOS/OpenHarmony应用开发-bindContextMenu绑定菜单选项2023-03-24 0
-
VF编程与软件开发若干实例2010-02-26 704
-
基于HarmonyOS的分镜头App开发技术详解2021-08-26 1934
-
鸿蒙APP开发鸿蒙权限请求框架2021-09-28 3005
-
HarmonyOS开发 XstoryMaker快速书写剧本场景动画2022-09-14 1288
全部0条评论

快来发表一下你的评论吧 !


