第 1 章 Cortex-M4 GPIO编程
实验目的
熟悉STM32CubeIDE工具软件的使用。
掌握STM32CubeIDE软件的基本设计流程和设计步骤,能够使用工具进行设计、编程、仿真调试。
学习GPIO口的使用方法,掌握如何利用STM32MP157A芯片的I/O口控制LED。
实验环境
FS_MP1A开发平台
ST-Link仿真器
STM32CubeIDE开发软件
PC机 XP、Window7/10 (32/64bit)
实验原理
只要是对硬件操作,就要首先查看原理图。查看外设是和模块的MCU的哪个引脚相连。FS_MP1A开发平台上的LED的亮灭状态,与芯片上的引脚I/O输出电平有关。
FS_MP1A开发平台上LED的I/O:

 IO操作重要结构体:GPIO_InitTypeDef
/**
* @brief GPIO Init structure definition
*/
typedef struct
{
uint32_t Pin; /*!< Specifies the GPIO pins to be configured.
This parameter can be any value of @ref GPIO_pins_define */
uint32_t Mode; /*!< Specifies the operating mode for the selected pins.
This parameter can be a value of @ref GPIO_mode_define */
uint32_t Pull; /*!< Specifies the Pull-up or Pull-Down activation for the selected pins.
This parameter can be a value of @ref GPIO_pull_define */
uint32_t Speed; /*!< Specifies the speed for the selected pins.
This parameter can be a value of @ref GPIO_speed_define */
uint32_t Alternate; /*!< Peripheral to be connected to the selected pins.
This parameter can be a value of @ref GPIO_Alternate_function_selection */
}GPIO_InitTypeDef;
第一个成员变量Pin是所操作的管脚,第二个Mode是模式选择,第三个Pull是上拉下拉,或者都不加,第四个Speed是速度选择,第五个是管脚复用功能。一般我们只操作前四个。
IO口可以由软件配置成4种模式,其实操作的是GPIO的端口模式寄存器:
- 输入(复位状态)/input(reset state)
- 通用输出模式 / general purpose output mode
- 复用功能模式 / alternate function mode
- 模拟模式 / analog mode
#define GPIO_MODE_INPUT ((uint32_t)0x00000000U) /*!< Input Floating Mode */
#define GPIO_MODE_OUTPUT_PP ((uint32_t)0x00000001U) /*!< Output Push Pull Mode */
#define GPIO_MODE_OUTPUT_OD ((uint32_t)0x00000011U) /*!< Output Open Drain Mode */
#define GPIO_MODE_AF_PP ((uint32_t)0x00000002U) /*!< Alternate Function Push Pull Mode */
#define GPIO_MODE_AF_OD ((uint32_t)0x00000012U) /*!< Alternate Function Open Drain Mode */
上面给两个寄存器赋值了,14位是GPIO端口模式寄存器,58位是端口输出类型寄存器(决定是推挽输出还是开漏输出)。
STM32的GPIO端口在作为输出时,可以软件配置端口最大支持的时钟速率,下图是端口输出速度寄存器,有以下几种速度选择:

/** @defgroup GPIO_speed_define GPIO speed define
* @brief GPIO Output Maximum frequency
* @{
*/
#define GPIO_SPEED_FREQ_LOW ((uint32_t)0x00000000U) /*!< Low speed */
#define GPIO_SPEED_FREQ_MEDIUM ((uint32_t)0x00000001U) /*!< Medium speed */
#define GPIO_SPEED_FREQ_HIGH ((uint32_t)0x00000002U) /*!< Fast speed */
#define GPIO_SPEED_FREQ_VERY_HIGH ((uint32_t)0x00000003U) /*!< High speed */
调用的HAL函数:
void HAL_GPIO_WritePin(GPIO_TypeDef* GPIOx, uint16_t GPIO_Pin, GPIO_PinState PinState 该函数其实是对BSRR寄存器进行操作:第一个参数传的是GPIO所在的组,第二个是该组的几号管脚,第三个是对管脚进行置位。
实验步骤
打开STM32CubeIDE->File->New->STM32 Project
 可以在左侧搜索框内输入芯片型号STM32MP157A进行搜索,选择对应芯片,点击Next
 填写工程名,点击Finsh
 点击Yes打开配置页面

 搜索框内搜索LED对应GPIO引脚PZ5、PZ6、PZ7,左键点击设置为GPIO_Output
 在Code Generator处选择为每个外设生成单独的C和H文件,这样设置方便阅读代码
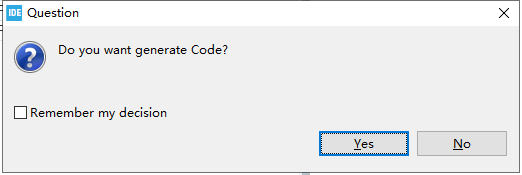
 完成以上设置后,Ctrl+S保存,会提示是否需要生成代码,选择Yes即可自动生成代码。系统会自动生成System Clock代码。
 可以在左侧工程文件夹找到LED_CM4子工程,打开main.c
 添加GPIO函数说明:我们需要在main.c中添加GPIO相关函数,GPIO初始化函数和GPIO引脚输出电平高低函数。
void bsp_led_init(void)
{
GPIO_InitTypeDef GPIO_InitStruct;
__HAL_RCC_GPIOZ_CLK_ENABLE();
HAL_GPIO_WritePin(GPIOZ, GPIO_PIN_5, GPIO_PIN_RESET);
HAL_GPIO_WritePin(GPIOZ, GPIO_PIN_6, GPIO_PIN_RESET);
HAL_GPIO_WritePin(GPIOZ, GPIO_PIN_7, GPIO_PIN_RESET);
GPIO_InitStruct.Pin = GPIO_PIN_5;
GPIO_InitStruct.Mode = GPIO_MODE_OUTPUT_PP;
GPIO_InitStruct.Pull = GPIO_PULLUP;
GPIO_InitStruct.Speed = GPIO_SPEED_FREQ_LOW;
HAL_GPIO_Init(GPIOZ, &GPIO_InitStruct);
GPIO_InitStruct.Pin = GPIO_PIN_6;
GPIO_InitStruct.Mode = GPIO_MODE_OUTPUT_PP;
GPIO_InitStruct.Pull = GPIO_PULLUP;
GPIO_InitStruct.Speed = GPIO_SPEED_FREQ_LOW;
HAL_GPIO_Init(GPIOZ, &GPIO_InitStruct);
GPIO_InitStruct.Pin = GPIO_PIN_7;
GPIO_InitStruct.Mode = GPIO_MODE_OUTPUT_PP;
GPIO_InitStruct.Pull = GPIO_PULLUP;
GPIO_InitStruct.Speed = GPIO_SPEED_FREQ_LOW;
HAL_GPIO_Init(GPIOZ, &GPIO_InitStruct);
}
void bsp_led_on(void)
{
HAL_GPIO_WritePin(GPIOZ, GPIO_PIN_5,GPIO_PIN_SET);
HAL_GPIO_WritePin(GPIOZ, GPIO_PIN_6,GPIO_PIN_SET);
HAL_GPIO_WritePin(GPIOZ, GPIO_PIN_7,GPIO_PIN_SET);
}
void bsp_led_off(void)
{
HAL_GPIO_WritePin(GPIOZ, GPIO_PIN_5,GPIO_PIN_RESET);
HAL_GPIO_WritePin(GPIOZ, GPIO_PIN_6,GPIO_PIN_RESET);
HAL_GPIO_WritePin(GPIOZ, GPIO_PIN_7,GPIO_PIN_RESET);
}
在main.c中调用这三个函数实现GPIO的初始化和通过改变GPIO引脚高低电平来改变LED灯的状态。
 上述为新建工程配置过程,可参考《Cortex-M4开发篇1:STM32MP1微控制器之开发环境》章节进行导入已有工程,工程存放路径【华清远见-FS_MP1A开发资料�2-程序源码ARM体系结构与接口技术Cortex-M4部分1_LED】。
配置完成或导入工程后进行程序下载,具体步骤参考《Cortex-M4开发篇1:STM32MP1微控制器之开发环境》节进行开发板连接,程序编译、下载。
实验现象
可看到LED灯循环亮灭

第 1 章 Cortex-M4 GPIO编程
实验目的
熟悉STM32CubeIDE工具软件的使用。
掌握STM32CubeIDE软件的基本设计流程和设计步骤,能够使用工具进行设计、编程、仿真调试。
学习GPIO口的使用方法,掌握如何利用STM32MP157A芯片的I/O口控制LED。
实验环境
FS_MP1A开发平台
ST-Link仿真器
STM32CubeIDE开发软件
PC机 XP、Window7/10 (32/64bit)
实验原理
只要是对硬件操作,就要首先查看原理图。查看外设是和模块的MCU的哪个引脚相连。FS_MP1A开发平台上的LED的亮灭状态,与芯片上的引脚I/O输出电平有关。
FS_MP1A开发平台上LED的I/O:

 IO操作重要结构体:GPIO_InitTypeDef
/**
* @brief GPIO Init structure definition
*/
typedef struct
{
uint32_t Pin; /*!< Specifies the GPIO pins to be configured.
This parameter can be any value of @ref GPIO_pins_define */
uint32_t Mode; /*!< Specifies the operating mode for the selected pins.
This parameter can be a value of @ref GPIO_mode_define */
uint32_t Pull; /*!< Specifies the Pull-up or Pull-Down activation for the selected pins.
This parameter can be a value of @ref GPIO_pull_define */
uint32_t Speed; /*!< Specifies the speed for the selected pins.
This parameter can be a value of @ref GPIO_speed_define */
uint32_t Alternate; /*!< Peripheral to be connected to the selected pins.
This parameter can be a value of @ref GPIO_Alternate_function_selection */
}GPIO_InitTypeDef;
第一个成员变量Pin是所操作的管脚,第二个Mode是模式选择,第三个Pull是上拉下拉,或者都不加,第四个Speed是速度选择,第五个是管脚复用功能。一般我们只操作前四个。
IO口可以由软件配置成4种模式,其实操作的是GPIO的端口模式寄存器:
- 输入(复位状态)/input(reset state)
- 通用输出模式 / general purpose output mode
- 复用功能模式 / alternate function mode
- 模拟模式 / analog mode
#define GPIO_MODE_INPUT ((uint32_t)0x00000000U) /*!< Input Floating Mode */
#define GPIO_MODE_OUTPUT_PP ((uint32_t)0x00000001U) /*!< Output Push Pull Mode */
#define GPIO_MODE_OUTPUT_OD ((uint32_t)0x00000011U) /*!< Output Open Drain Mode */
#define GPIO_MODE_AF_PP ((uint32_t)0x00000002U) /*!< Alternate Function Push Pull Mode */
#define GPIO_MODE_AF_OD ((uint32_t)0x00000012U) /*!< Alternate Function Open Drain Mode */
上面给两个寄存器赋值了,14位是GPIO端口模式寄存器,58位是端口输出类型寄存器(决定是推挽输出还是开漏输出)。
STM32的GPIO端口在作为输出时,可以软件配置端口最大支持的时钟速率,下图是端口输出速度寄存器,有以下几种速度选择:

/** @defgroup GPIO_speed_define GPIO speed define
* @brief GPIO Output Maximum frequency
* @{
*/
#define GPIO_SPEED_FREQ_LOW ((uint32_t)0x00000000U) /*!< Low speed */
#define GPIO_SPEED_FREQ_MEDIUM ((uint32_t)0x00000001U) /*!< Medium speed */
#define GPIO_SPEED_FREQ_HIGH ((uint32_t)0x00000002U) /*!< Fast speed */
#define GPIO_SPEED_FREQ_VERY_HIGH ((uint32_t)0x00000003U) /*!< High speed */
调用的HAL函数:
void HAL_GPIO_WritePin(GPIO_TypeDef* GPIOx, uint16_t GPIO_Pin, GPIO_PinState PinState 该函数其实是对BSRR寄存器进行操作:第一个参数传的是GPIO所在的组,第二个是该组的几号管脚,第三个是对管脚进行置位。
实验步骤
打开STM32CubeIDE->File->New->STM32 Project
 可以在左侧搜索框内输入芯片型号STM32MP157A进行搜索,选择对应芯片,点击Next
 填写工程名,点击Finsh
 点击Yes打开配置页面

 搜索框内搜索LED对应GPIO引脚PZ5、PZ6、PZ7,左键点击设置为GPIO_Output
 在Code Generator处选择为每个外设生成单独的C和H文件,这样设置方便阅读代码
 完成以上设置后,Ctrl+S保存,会提示是否需要生成代码,选择Yes即可自动生成代码。系统会自动生成System Clock代码。
 可以在左侧工程文件夹找到LED_CM4子工程,打开main.c
 添加GPIO函数说明:我们需要在main.c中添加GPIO相关函数,GPIO初始化函数和GPIO引脚输出电平高低函数。
void bsp_led_init(void)
{
GPIO_InitTypeDef GPIO_InitStruct;
__HAL_RCC_GPIOZ_CLK_ENABLE();
HAL_GPIO_WritePin(GPIOZ, GPIO_PIN_5, GPIO_PIN_RESET);
HAL_GPIO_WritePin(GPIOZ, GPIO_PIN_6, GPIO_PIN_RESET);
HAL_GPIO_WritePin(GPIOZ, GPIO_PIN_7, GPIO_PIN_RESET);
GPIO_InitStruct.Pin = GPIO_PIN_5;
GPIO_InitStruct.Mode = GPIO_MODE_OUTPUT_PP;
GPIO_InitStruct.Pull = GPIO_PULLUP;
GPIO_InitStruct.Speed = GPIO_SPEED_FREQ_LOW;
HAL_GPIO_Init(GPIOZ, &GPIO_InitStruct);
GPIO_InitStruct.Pin = GPIO_PIN_6;
GPIO_InitStruct.Mode = GPIO_MODE_OUTPUT_PP;
GPIO_InitStruct.Pull = GPIO_PULLUP;
GPIO_InitStruct.Speed = GPIO_SPEED_FREQ_LOW;
HAL_GPIO_Init(GPIOZ, &GPIO_InitStruct);
GPIO_InitStruct.Pin = GPIO_PIN_7;
GPIO_InitStruct.Mode = GPIO_MODE_OUTPUT_PP;
GPIO_InitStruct.Pull = GPIO_PULLUP;
GPIO_InitStruct.Speed = GPIO_SPEED_FREQ_LOW;
HAL_GPIO_Init(GPIOZ, &GPIO_InitStruct);
}
void bsp_led_on(void)
{
HAL_GPIO_WritePin(GPIOZ, GPIO_PIN_5,GPIO_PIN_SET);
HAL_GPIO_WritePin(GPIOZ, GPIO_PIN_6,GPIO_PIN_SET);
HAL_GPIO_WritePin(GPIOZ, GPIO_PIN_7,GPIO_PIN_SET);
}
void bsp_led_off(void)
{
HAL_GPIO_WritePin(GPIOZ, GPIO_PIN_5,GPIO_PIN_RESET);
HAL_GPIO_WritePin(GPIOZ, GPIO_PIN_6,GPIO_PIN_RESET);
HAL_GPIO_WritePin(GPIOZ, GPIO_PIN_7,GPIO_PIN_RESET);
}
在main.c中调用这三个函数实现GPIO的初始化和通过改变GPIO引脚高低电平来改变LED灯的状态。
 上述为新建工程配置过程,可参考《Cortex-M4开发篇1:STM32MP1微控制器之开发环境》章节进行导入已有工程,工程存放路径【华清远见-FS_MP1A开发资料�2-程序源码ARM体系结构与接口技术Cortex-M4部分1_LED】。
配置完成或导入工程后进行程序下载,具体步骤参考《Cortex-M4开发篇1:STM32MP1微控制器之开发环境》节进行开发板连接,程序编译、下载。
实验现象
可看到LED灯循环亮灭


 举报
举报


 举报
举报

