
资料下载

Netduino WiFi锁开源分享
描述
无钥匙进入和智能锁
智能锁的想法已经出现了一段时间,但归根结底,人们最终还是要么携带 RFID,要么只使用锁本身。我们现在几乎一直随身携带手机,到门口时,我们会自动连接到我们自己的 WiFi 网络。通过使用Netduino 3 WiFi,我们实际上可以实现真正的无钥匙体验,以我们的手机为钥匙,通过WiFi网络开锁。
第 1 步:收集材料
我们将需要以下物品:
- 网络杜伊诺 3 WiFi
- Seeed Grove 基础护盾
- 种子继电器
- 锁舌
- 安卓手机
- 一个外壳的盒子
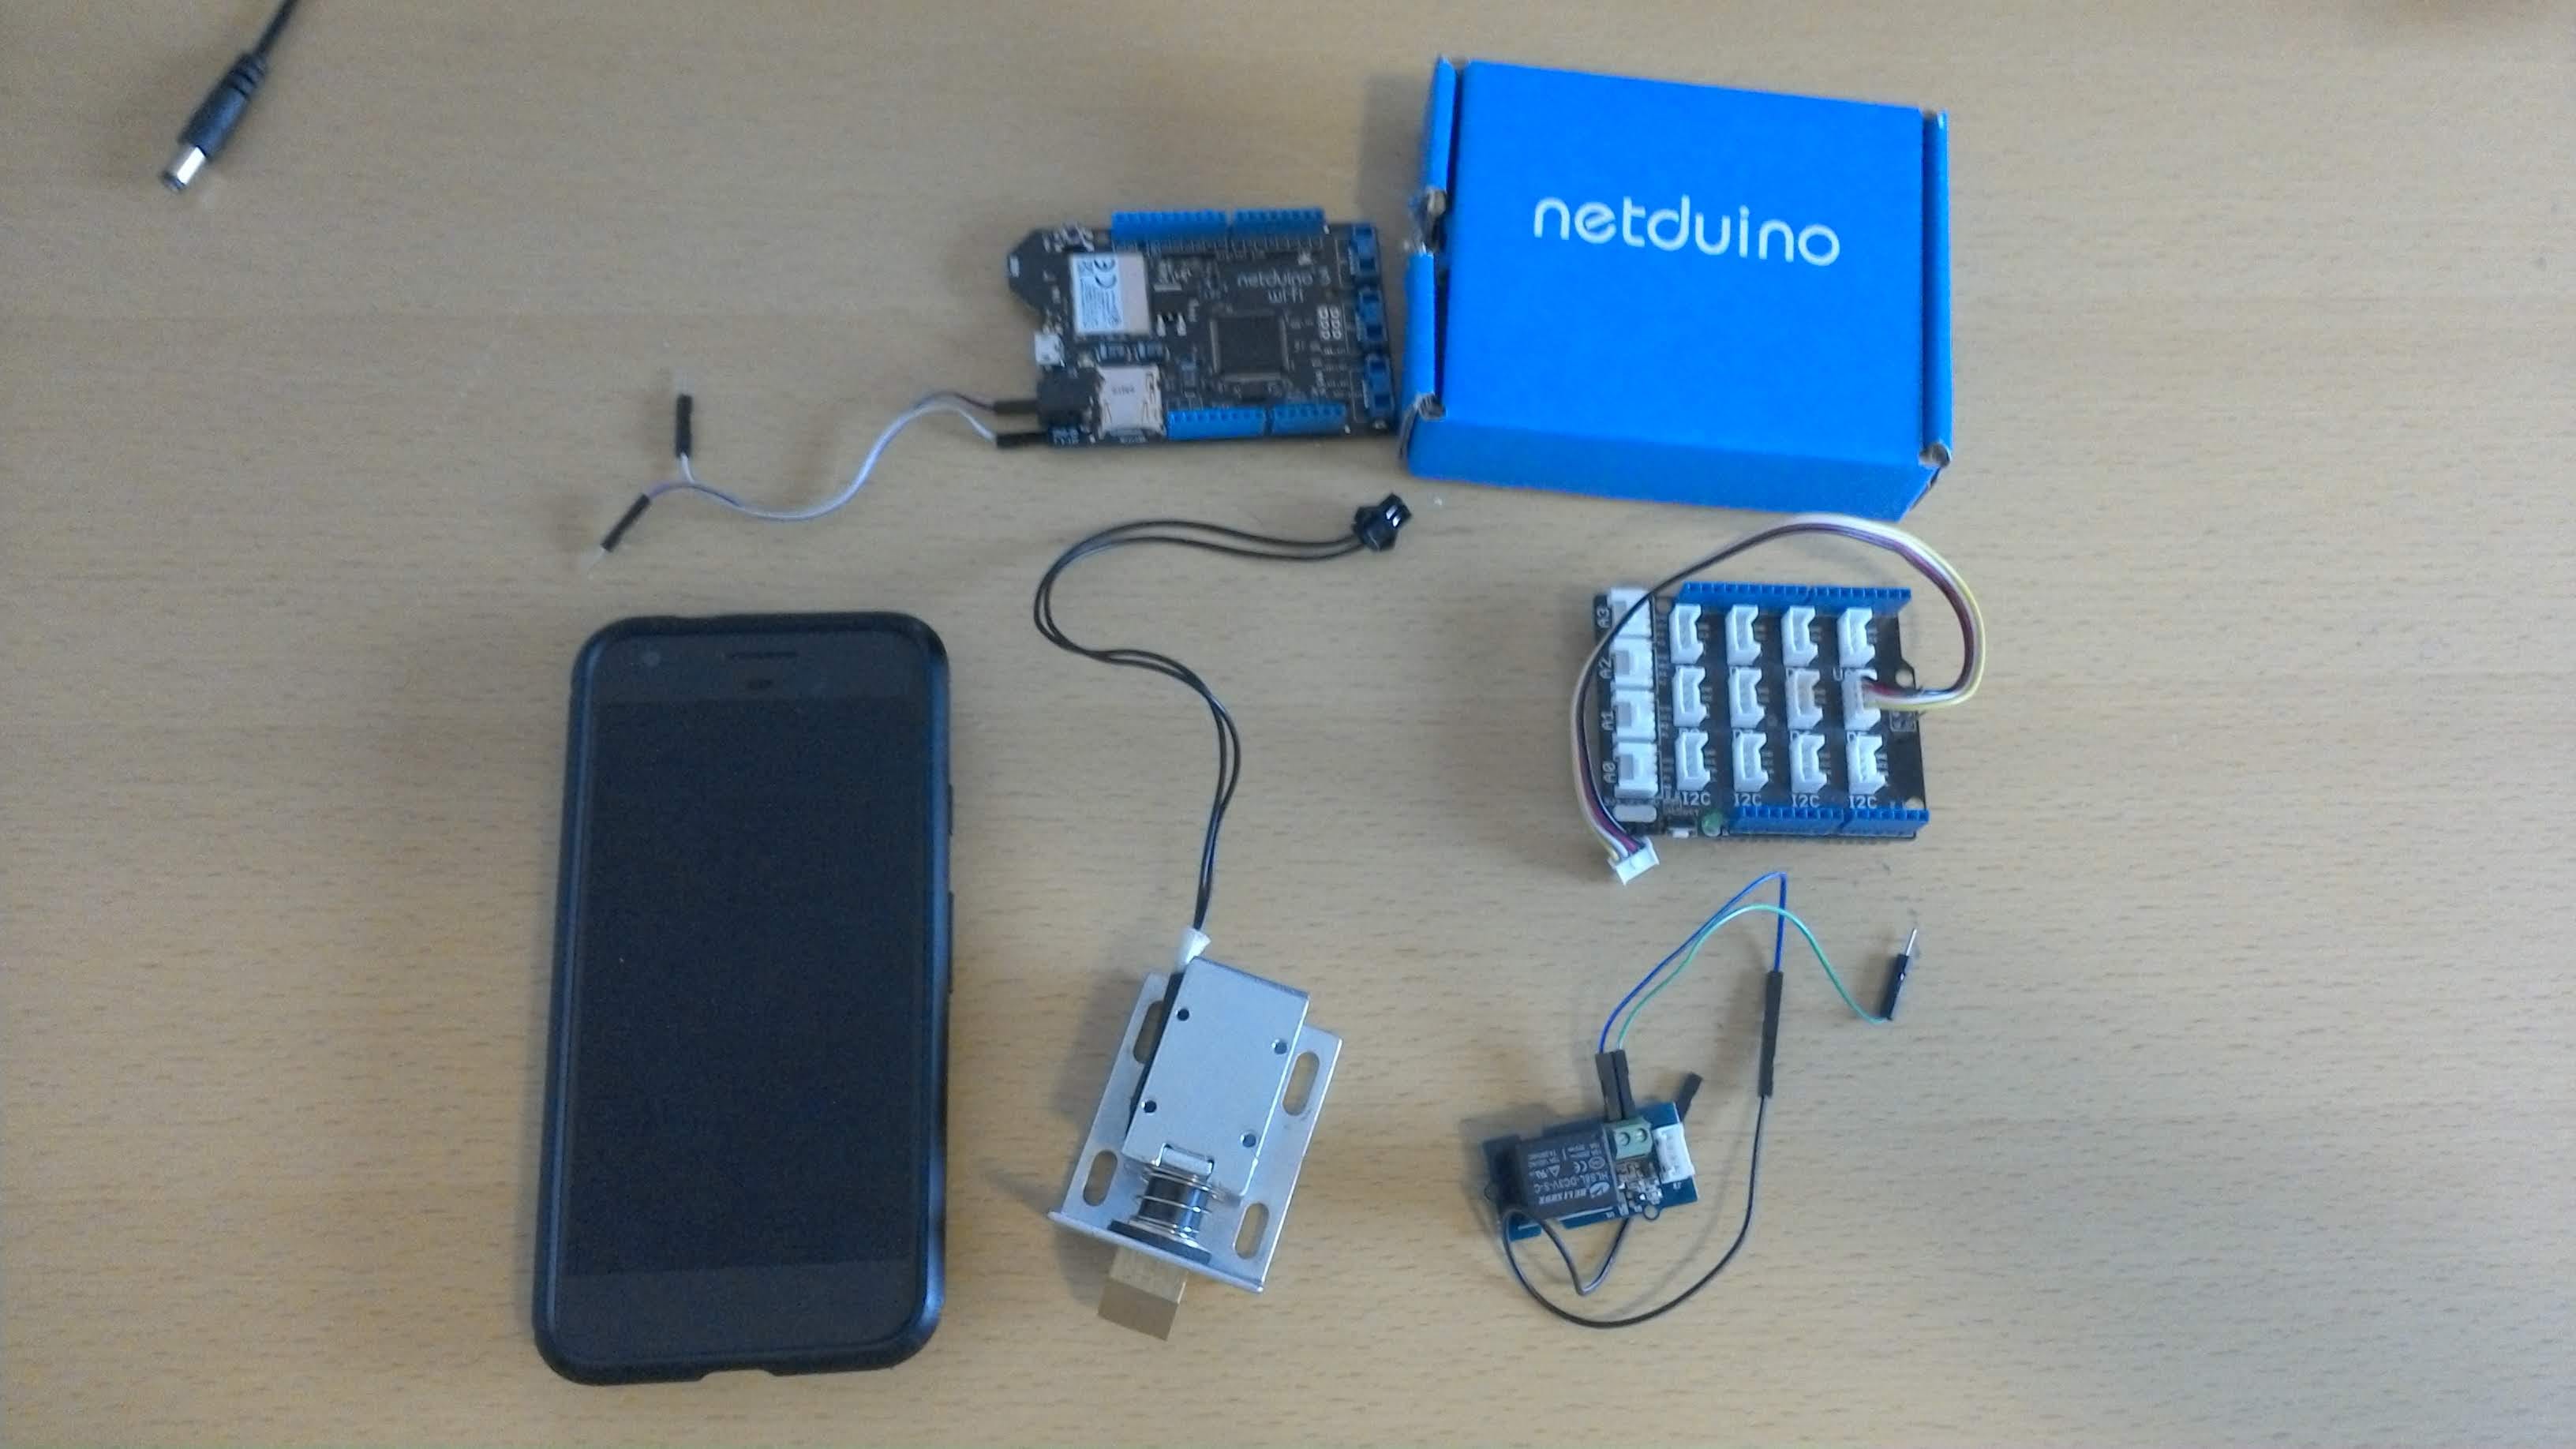
第 2 步:设置 Netduino 3 WiFi
Netduino 是基于 ac# 和 .net 的物联网板,具有很多功能,这样我们就可以基于 C# 创建整个项目。
安装 Visual Studio,在这种情况下,我使用的是 Mac。然后进入 Visual Studio Community menu -> Extension -> Gallery,并搜索“MicroFramework”来安装 Micro Framework。
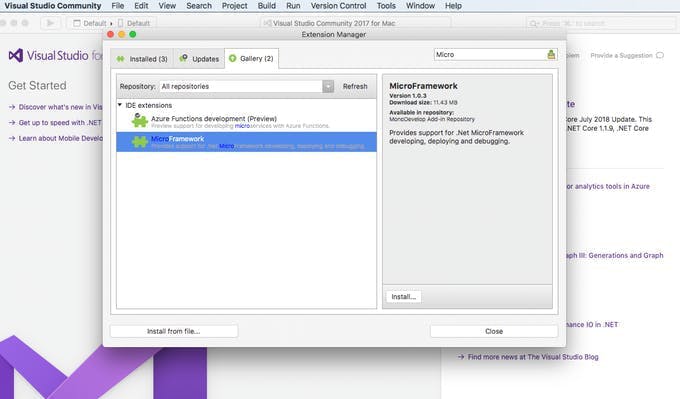
按照此页面的说明更新到最新固件
安装最新固件后,我们需要通过 Netduino Deploy 设置 WiFi 网络,以便设备连接到互联网,我们将在这里使用静态 IP,以便稍后使用手机调用套接字
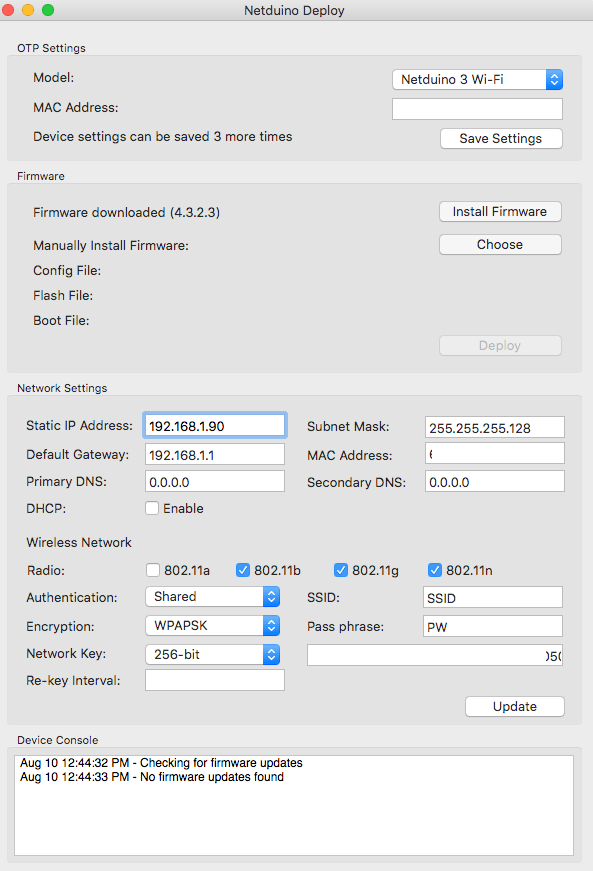
第 3 步:连接硬件
因为锁舌需要 12v,而 Netduino 的常规输出只能提供 5v,所以我们需要通过在顶部焊接 2 根电线来接入 Netduino 的电源,如下所示,这将允许我们在没有额外电源的情况下打开和关闭锁舌。
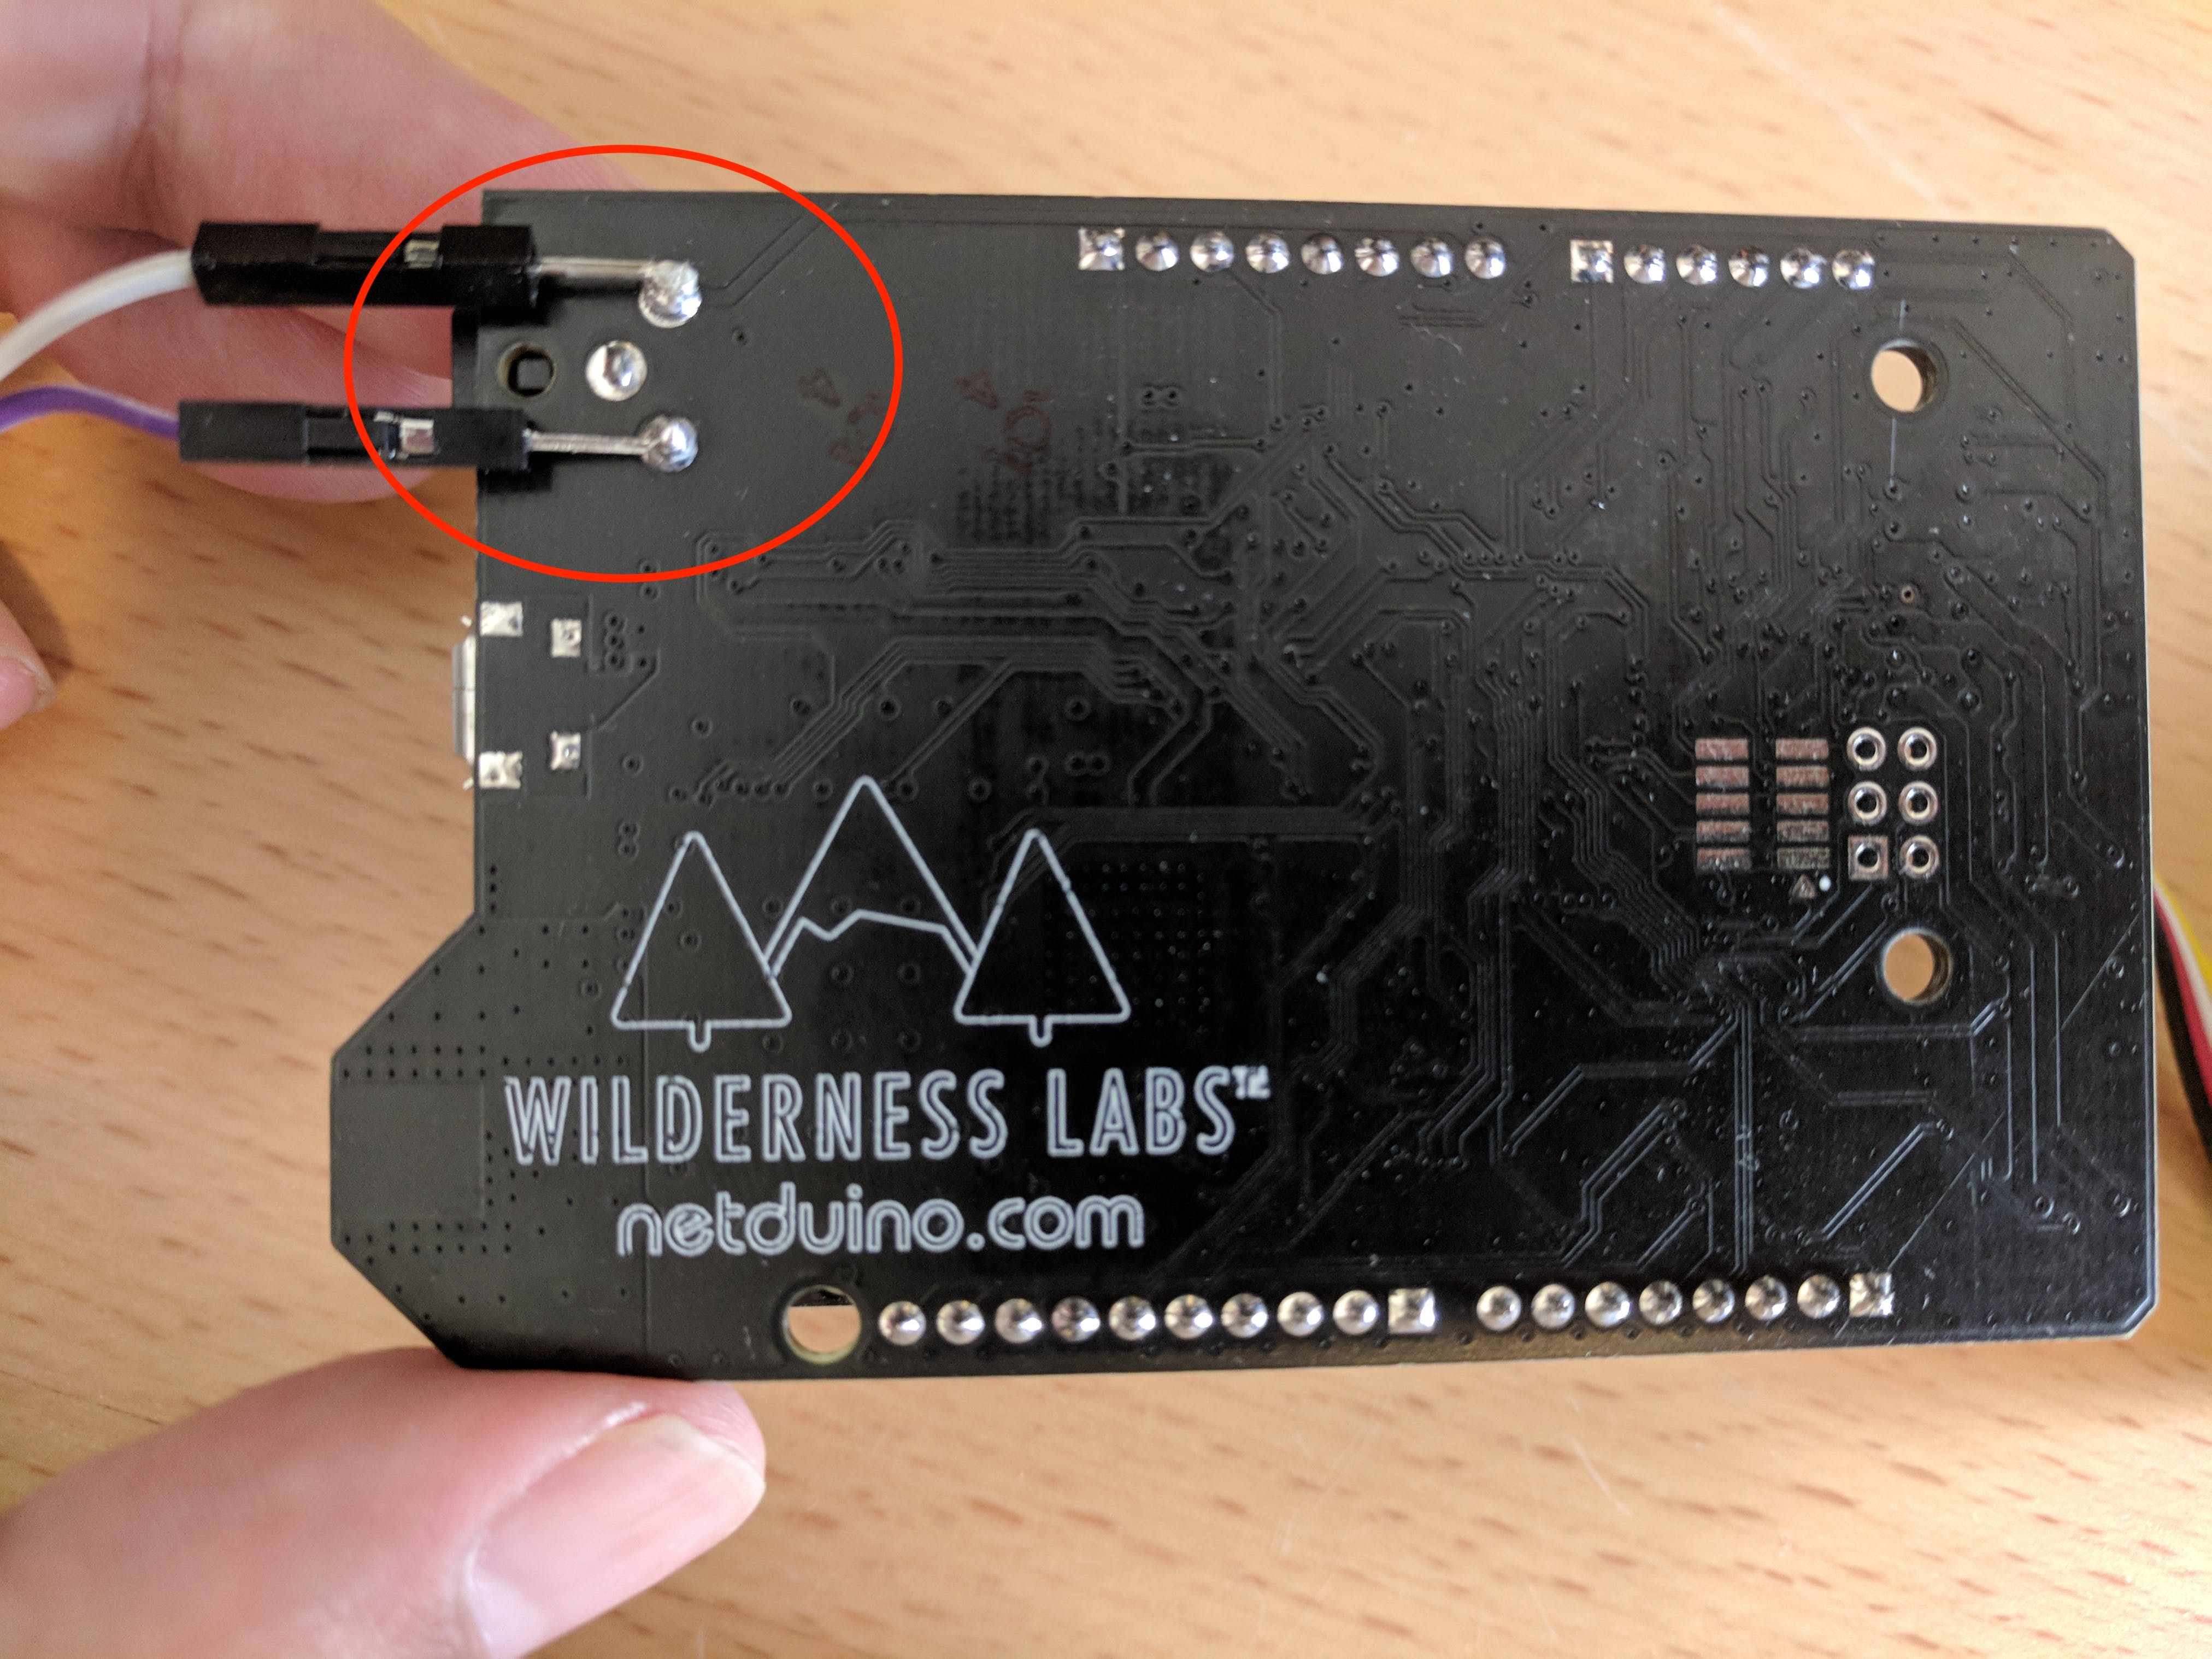
然后,我们可以利用设备的 12v 输出直接连接到继电器,一个连接到锁舌,因此继电器将从威廉希尔官方网站 板本身接收 12v 正电压,并从继电器接收负电压。当一切都说完了,它应该如下所示
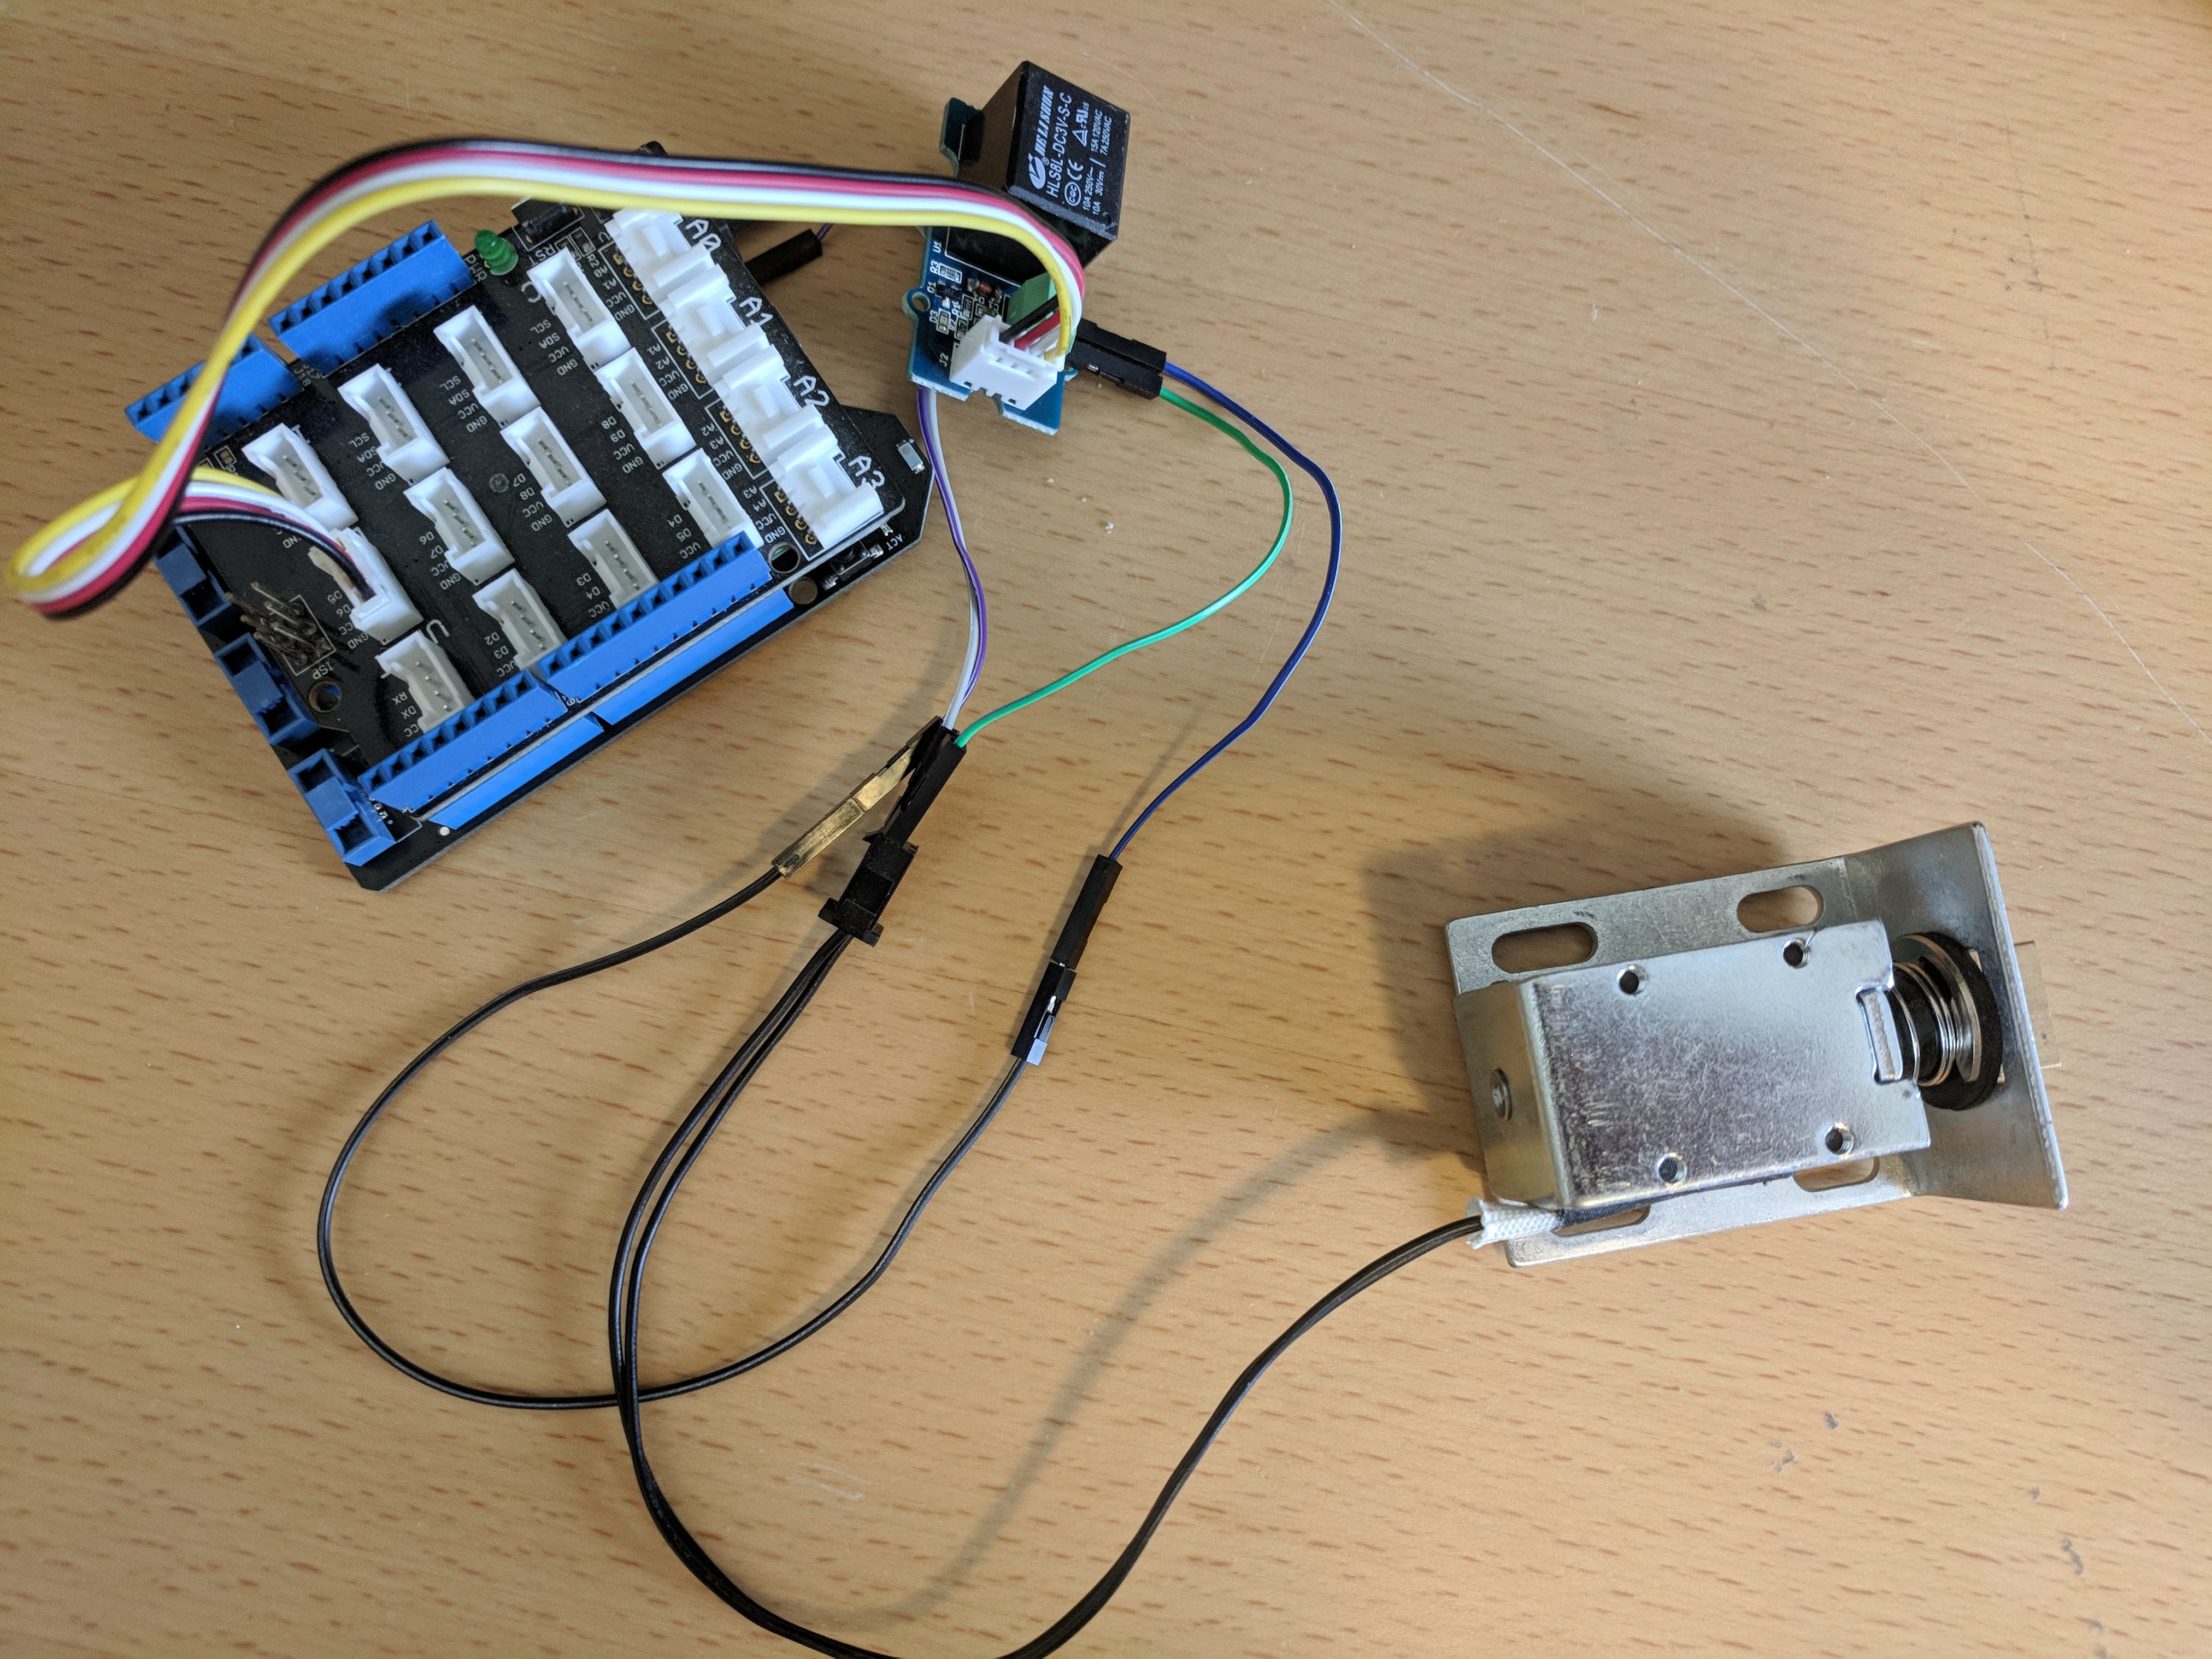
第 4 步:设置 Netduino 网络服务器
我们现在可以使用以下代码连接到周围的计算机。当它工作时,我们可以进入下一步,我们已经创建了一个 NetDuino Webserver 供其他设备通过 Wifi 网络连接。以下代码设置插座,当收到“ON”时,它会打开 LED 以及继电器,这允许我们打开锁。
using Microsoft.SPOT.Hardware;
using Microsoft.SPOT.Net.NetworkInformation;
using SecretLabs.NETMF.Hardware;
using SecretLabs.NETMF.Hardware.Netduino;
namespace Lock
{
 public class Program
 {
 // Main method is called once as opposed to a loop method called over and over again
 public static void Main()
 {
 Thread.Sleep(5000);
 App app = new App();
 app.Run();
OutputPort led = new OutputPort(Pins.ONBOARD_LED, false);
 OutputPort relay = new OutputPort(Pins.GPIO_PIN_D5, false);
int port = 80;
Socket listenerSocket = new Socket(AddressFamily.InterNetwork,
 SocketType.Stream,
 ProtocolType.Tcp);
 IPEndPoint listenerEndPoint = new IPEndPoint(IPAddress.Any, port);
Debug.Print("setting up socket");
// bind to the listening socket
 listenerSocket.Bind(listenerEndPoint);
 // and start listening for incoming connections
 listenerSocket.Listen(1);
 Debug.Print("listening");
while (true)
 {
 Debug.Print(".");
// wait for a client to connect
 Socket clientSocket = listenerSocket.Accept();
 // wait for data to arrive
 bool dataReady = clientSocket.Poll(5000000, SelectMode.SelectRead);
// if dataReady is true and there are bytes available to read,
 // then you have a good connection.
 if (dataReady && clientSocket.Available > 0)
 {
 byte[] buffer = new byte[clientSocket.Available];
 clientSocket.Receive(buffer);
 string request =
 new string(System.Text.Encoding.UTF8.GetChars(buffer));
Debug.Print(request);
if (request.IndexOf("ON") >= 0)
 {
 led.Write(true);
 relay.Write(true);
 Thread.Sleep(5000);
 led.Write(false);
 relay.Write(false);
 }
string statusText = "Lock is " + (led.Read() ? "ON" : "OFF") + ".";
 // return a message to the client letting it
 // know if the LED is now on or off.
 string response = statusText ;
 clientSocket.Send(System.Text.Encoding.UTF8.GetBytes(response));
}
 // important: close the client socket
 clientSocket.Close();
}
}
 }
public class App
 {
 NetworkInterface[] _interfaces;
public string NetDuinoIPAddress { get; set; }
 public bool IsRunning { get; set; }
public void Run()
 {
 //this.IsRunning = true;
 bool goodToGo = InitializeNetwork();
this.IsRunning = false;
 }
protected bool InitializeNetwork()
 {
 if (Microsoft.SPOT.Hardware.SystemInfo.SystemID.SKU == 3)
 {
 Debug.Print("Wireless tests run only on Device");
 return false;
 }
Debug.Print("Getting all the network interfaces.");
 _interfaces = NetworkInterface.GetAllNetworkInterfaces();
// debug output
 ListNetworkInterfaces();
// loop through each network interface
 foreach (var net in _interfaces)
 {
 // debug out
 ListNetworkInfo(net);
switch (net.NetworkInterfaceType)
 {
 case (NetworkInterfaceType.Ethernet):
 Debug.Print("Found Ethernet Interface");
 break;
 case (NetworkInterfaceType.Wireless80211):
 Debug.Print("Found 802.11 WiFi Interface");
 break;
 case (NetworkInterfaceType.Unknown):
 Debug.Print("Found Unknown Interface");
 break;
 }
// check for an IP address, try to get one if it's empty
 return CheckIPAddress(net);
 }
// if we got here, should be false.
 return false;
 }
public void MakeWebRequest(string url)
 {
 var httpWebRequest = (HttpWebRequest)WebRequest.Create(url);
 httpWebRequest.Method = "GET";
 httpWebRequest.Timeout = 1000;
 httpWebRequest.KeepAlive = false;
httpWebRequest.GetResponse();
 /*
            using (var streamReader = new StreamReader(httpResponse.GetResponseStream()))
            {
                var result = streamReader.ReadToEnd();
                Debug.Print("this is what we got from " + url + ": " + result);
            }*/
 }
protected bool CheckIPAddress(NetworkInterface net)
 {
 int timeout = 10000; // timeout, in milliseconds to wait for an IP. 10,000 = 10 seconds
// check to see if the IP address is empty (0.0.0.0). IPAddress.Any is 0.0.0.0.
 if (net.IPAddress == IPAddress.Any.ToString())
 {
 Debug.Print("No IP Address");
if (net.IsDhcpEnabled)
 {
 Debug.Print("DHCP is enabled, attempting to get an IP Address");
// ask for an IP address from DHCP [note this is a static, not sure which network interface it would act on]
 int sleepInterval = 10;
 int maxIntervalCount = timeout / sleepInterval;
 int count = 0;
 while (IPAddress.GetDefaultLocalAddress() == IPAddress.Any && count < maxIntervalCount)
 {
 Debug.Print("Sleep while obtaining an IP");
 Thread.Sleep(10);
 count++;
 };
// if we got here, we either timed out or got an address, so let's find out.
 if (net.IPAddress == IPAddress.Any.ToString())
 {
 Debug.Print("Failed to get an IP Address in the alotted time.");
 return false;
 }
Debug.Print("Got IP Address: " + net.IPAddress.ToString());
 return true;
//NOTE: this does not work, even though it's on the actual network device. [shrug]
 // try to renew the DHCP lease and get a new IP Address
 //net.RenewDhcpLease ();
 //while (net.IPAddress == "0.0.0.0") {
 //    Thread.Sleep (10);
 //}
}
 else
 {
 Debug.Print("DHCP is not enabled, and no IP address is configured, bailing out.");
 return false;
 }
 }
 else
 {
 Debug.Print("Already had IP Address: " + net.IPAddress.ToString());
 return true;
 }
}
protected void ListNetworkInterfaces()
 {
 foreach (var net in _interfaces)
 {
 switch (net.NetworkInterfaceType)
 {
 case (NetworkInterfaceType.Ethernet):
 Debug.Print("Found Ethernet Interface");
 break;
 case (NetworkInterfaceType.Wireless80211):
 Debug.Print("Found 802.11 WiFi Interface");
 break;
 case (NetworkInterfaceType.Unknown):
 Debug.Print("Found Unknown Interface");
 break;
 }
 }
 }
protected void ListNetworkInfo(NetworkInterface net)
 {
 Debug.Print("MAC Address: " + BytesToHexString(net.PhysicalAddress));
 Debug.Print("DHCP enabled: " + net.IsDhcpEnabled.ToString());
 Debug.Print("Dynamic DNS enabled: " + net.IsDynamicDnsEnabled.ToString());
 Debug.Print("IP Address: " + net.IPAddress.ToString());
 Debug.Print("Subnet Mask: " + net.SubnetMask.ToString());
 Debug.Print("Gateway: " + net.GatewayAddress.ToString());
if (net is Wireless80211)
 {
 var wifi = net as Wireless80211;
 Debug.Print("SSID:" + wifi.Ssid.ToString());
 }
this.NetDuinoIPAddress = net.IPAddress.ToString();
}
private static string BytesToHexString(byte[] bytes)
 {
 string hexString = string.Empty;
// Create a character array for hexadecimal conversion.
 const string hexChars = "0123456789ABCDEF";
// Loop through the bytes.
 for (byte b = 0; b < bytes.Length; b++)
 {
 if (b > 0)
 hexString += "-";
// Grab the top 4 bits and append the hex equivalent to the return string.
 hexString += hexChars[bytes[b] >> 4];
// Mask off the upper 4 bits to get the rest of it.
 hexString += hexChars[bytes[b] & 0x0F];
 }
return hexString;
 }
public string getIPAddress()
 {
 return this.NetDuinoIPAddress;
 }
 }
}
上传后,您会看到下面的图像,已连接互联网。在 Netduino 上部署后,我们可以在终端上使用以下命令
echo "ON" | nc 192.168.1.90 80
第 5 步:构建 Android 应用程序
我们可以构建一个简单的 Android 应用程序来与我们之前编写的 Netduino Server 进行通信。使用开源幻灯片视图。
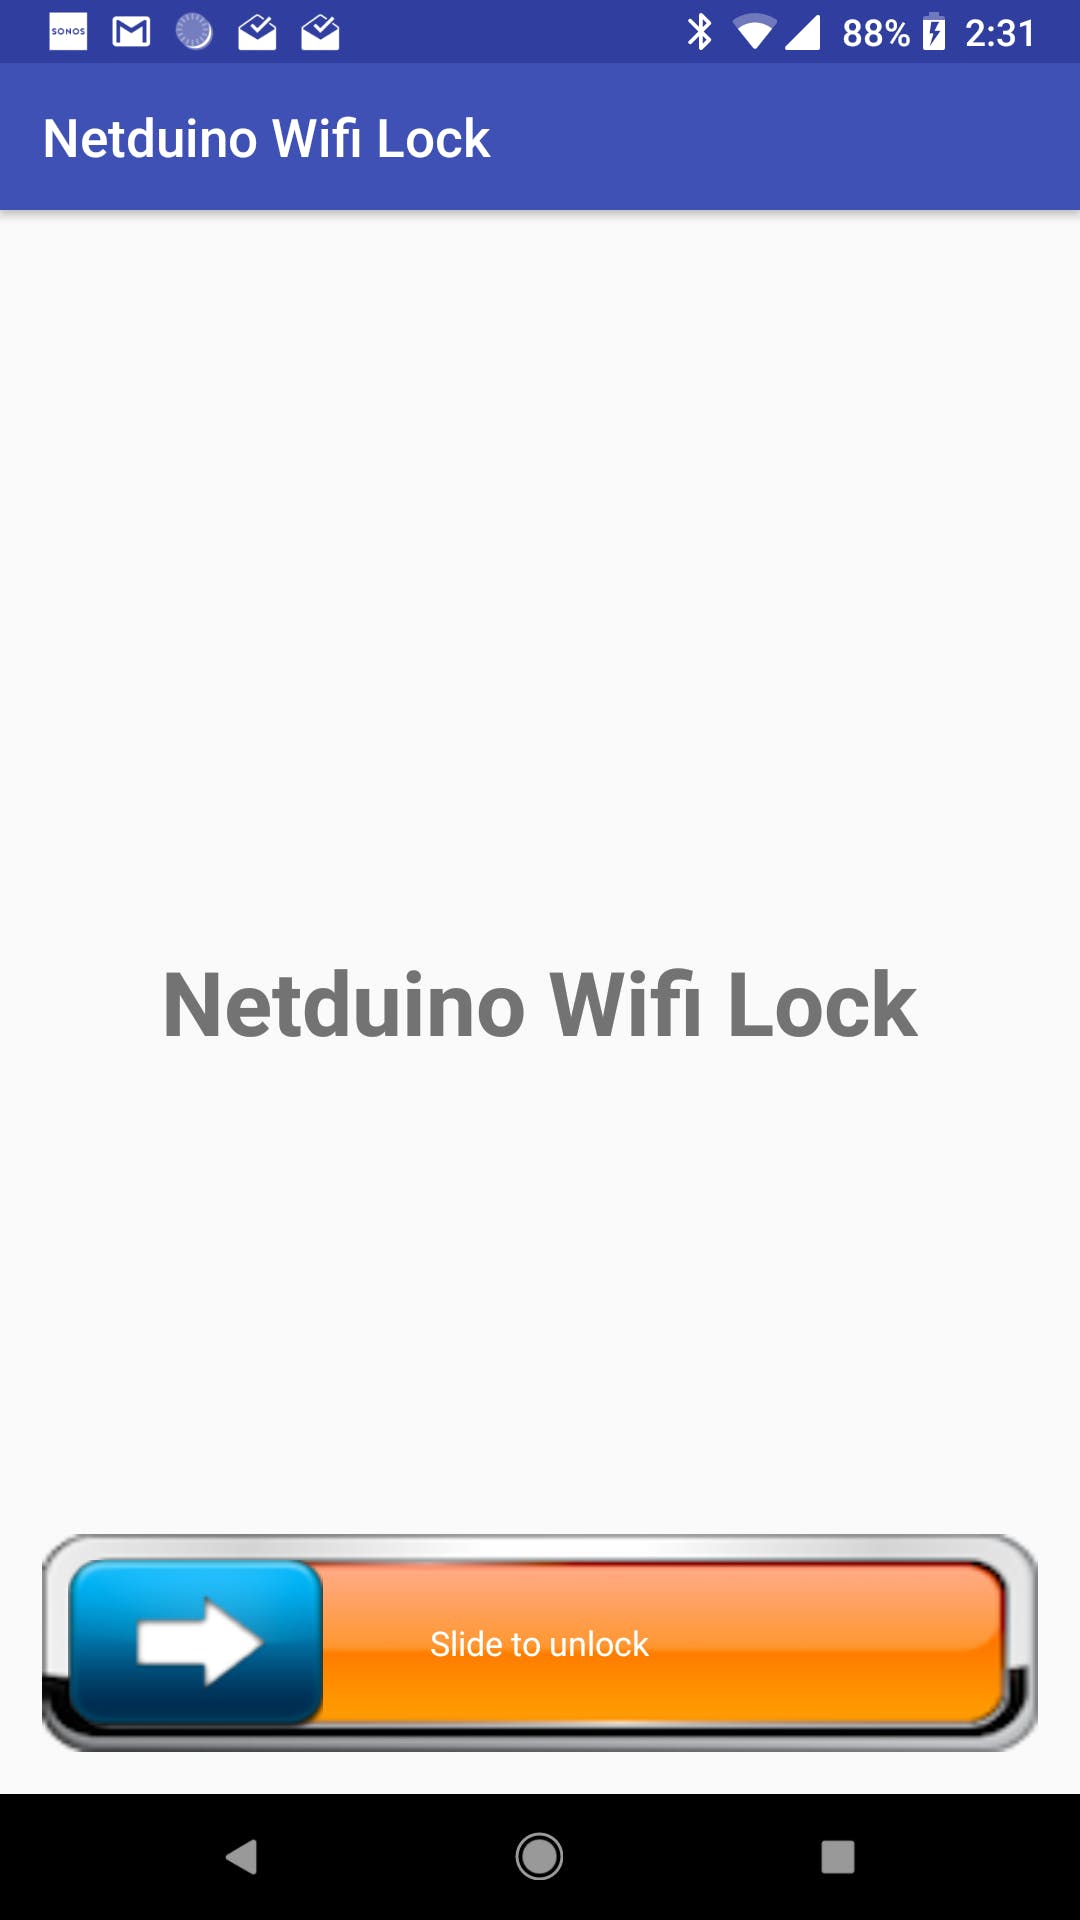
我们使用以下代码将消息直接发送到 Netduino Webserver,这将启动继电器以解锁死锁。
package com.demo.netduinolock;
import android.os.AsyncTask;
import android.os.Bundle;
import android.support.v7.app.AppCompatActivity;
import android.util.Log;
import java.io.BufferedWriter;
import java.io.DataOutputStream;
import java.io.IOException;
import java.io.OutputStreamWriter;
import java.io.PrintWriter;
import java.net.InetAddress;
import java.net.Socket;
import java.net.UnknownHostException;
import cheekiat.slideview.SlideView;
public class MainActivity extends AppCompatActivity {
    SlideView mSlideView;
    private Socket socket;
    private static final int SERVERPORT = 80;
    private static final String SERVER_IP = "192.168.1.90";
    @Override
    protected void onCreate(Bundle savedInstanceState) {
        super.onCreate(savedInstanceState);
        setContentView(R.layout.activity_main);
        mSlideView = (SlideView) findViewById(R.id.slide_view);
        mSlideView.setOnFinishListener(new SlideView.OnFinishListener() {
            @Override
            public void onFinish() {
            new ConnectTask().execute();
            mSlideView.reset();
            }
        });
    }
    public class ConnectTask extends AsyncTask, String, String> {
        @Override
        protected String doInBackground(String... message) {
            try {
                InetAddress serverAddr = InetAddress.getByName(SERVER_IP);
                socket = new Socket(serverAddr, SERVERPORT);
                if(socket.isConnected()) {
                    PrintWriter out = new PrintWriter(new BufferedWriter(
                            new OutputStreamWriter(socket.getOutputStream())),
                            true);
                    out.println("ON");
                    out.flush();
                    out.close();
                    socket.close();
                    socket = null;
                }
                else
                {
                    Log.d("doh", "not conneected");
                }
            } catch (UnknownHostException e) {
                e.printStackTrace();
            } catch (IOException e) {
                e.printStackTrace();
            } catch (Exception e) {
                e.printStackTrace();
            }
            return null;
        }
        @Override
        protected void onProgressUpdate(String... values) {
            super.onProgressUpdate(values);
            //response received from server
            Log.d("test", "done ");
            //process server response here....
        }
    }
}
完成后,如果我们连接到 WiFi,我们可以轻松滑过并解锁螺栓。
第 6 步:演示您的 WiFi 是您的关键
现在一切都已设置好,您可以使用手机解锁螺栓,而 WiFi 就是您的钥匙。:-)
声明:本文内容及配图由入驻作者撰写或者入驻合作网站授权转载。文章观点仅代表作者本人,不代表电子发烧友网立场。文章及其配图仅供工程师学习之用,如有内容侵权或者其他违规问题,请联系本站处理。 举报投诉
- 相关下载
- 相关文章


