资料下载

Arduino气象浮标
描述
的背景
在春天,我们附近的湖泊是一个诱人的重现场所,但水温并不总是像看起来那么受欢迎。在季节初期,冷空气和水温的结合有时会导致体温过低。经验法则是:如果水温和气温的总和低于 120 华氏度,则不要下水。即使是训练有素的游泳运动员,在寒冷的天气里也面临着巨大的风险。如果不满足此条件,划船或划独木舟等水上活动也可能很危险,因为倾覆和意外游泳的可能性很小。
目标
该项目的目标是建造一个气象浮标,它可以指示出水是否安全。浮标将使用 Oplà IoT 套件中包含的 Arduino MKR WiFi 1010 读取防水温度传感器,MKR IoT Carrier 上的大气传感器将检索大气条件。MKR IoT Carrier 上的 IMU 将用于确定当前的波浪状况。
安全用水
浮标代码的核心很简单,它已经为我们形成了伪代码!
if ( Water Temperature + Air Temperature < 120) {
//
}
而已!对于水温,我们有两种选择,因为水面和几英尺以下的水温通常不同。在这种情况下,我编写了脚本,因此它使用这两个温度的平均值。我使用的水温传感器是不锈钢外壳中的通用 DS18b20 传感器。这些是您搜索“防水温度传感器”时出现的最常见选项。这些将需要 Dallas Temperature 库和 One Wire 库。我遵循这些传感器的标准接线,用一个 4.7 kΩ 电阻桥接 Vcc 和数据线。我有两个传感器,但因为它们是 DS18b20,它们使用 MKR WIFi 1010 的相同数字引脚。这意味着当我们想要传感器的温度时,我们必须在代码中指定哪一个。
其他功能
除了水安全之外,如果可以的话,我们还想增加一些额外的功能,尤其是利用 MKR IoT Carrier 上已有的传感器。气温、湿度和压力非常简单,所以我们将它们添加到我们的主循环中。MKR IoT Carrier 还有一个惯性测量单元 (IMU),内部有一个陀螺仪和加速度计。我想用IMU来看看水有多粗糙。为了了解波浪状况,我确定了两个指标;波周期和波强度。
波周期是波峰之间的时间。波强度是波的强度。我们不能依靠来自 IMU 的单个数据集来测量波浪的周期和强度,因为我们无法知道 IMU 在波浪周期中测量的位置。代替瞬时测量,我们可以在短时间内快速采样 IMU 数据,然后对其进行分析。这是我正在使用的方法。
IMU 采样
要如上所述对 IMU 进行采样,我们将需要两个参数。我们希望多久收集一次数据,以及每次收集需要多长时间。在我的代码中,我在脚本开头使用变量设置了这些值。如果我决定对他们不满意,这可以很容易地在以后进行更改。
// How long to wait between IMU collections (seconds)
int collectionInterval = 900;  // 15 minutes is 900 seconds
// How long do you want to wait between datapoints (milliseconds)
int imuDelay = 100;
// How many data points to collect during each period
const int collectionTarget = 200;  // This should take ~20 seconds overall
收集数据点后,我们必须对它们进行解码。如果 MKR IoT Carrier 平行于水面安装,我发现 Z 加速度可以作为波浪强度的粗略估计。波前越尖锐,垂直加速度就越高。
在同一方向,Z 陀螺仪在每个波期间都经过零。我们只需计算数据从正数变为负数的次数,然后将收集时间(我们测量的时间)除以该数字。这为我们提供了波峰之间的近似平均时间。
void readIMU() {
 unsigned long startCollecting = millis(); // Record the start time
 int indexG = 0;
 int indexA = 0;
 int crossings = 0;
 float lastGZ = 0;
 float highA = 0;
 int updateOn = 10;
 updateDisplayIMU(0);
 // Continue collecting as long as you haven't reached the target
 while ((indexG < collectionTarget) || (indexA < collectionTarget)) {
   if (carrier.IMUmodule.gyroscopeAvailable()) {
     carrier.IMUmodule.readGyroscope(gyroX, gyroY, gyroZ);
     if ((lastGZ > 0 && gyroZ < 0) || (lastGZ > 0 && gyroZ < 0)) {
       // Has the Z gyroscope crossed zero?
       crossings++; // If so, increment the counter
     }
     lastGZ = gyroZ; // Replace the last number
     indexG++; // Increment the index counter
   }
   if (carrier.IMUmodule.accelerationAvailable()) {
     carrier.IMUmodule.readAcceleration(acelX, acelY, acelZ);
     if (acelZ > highA) { // Is the Z component the highest recorded?
       highA = acelZ; // If so, replace it
     }
     indexA++; // Increment the index conter
   }
   if ((indexA == updateOn) || (indexG == updateOn)) {
     // If 10 samples have passed
     updateDisplayIMU(updateOn);
     // update the display with the remaining samples
     updateOn = updateOn + 10; // Increment the counter
   }
   ArduinoCloud.update();
   delay(imuDelay);
 }
 unsigned long stopCollecting = millis();
 // Use the collected data to find the wave characteristics
 float dT = (stopCollecting - startCollecting)/millisCorrection;
 waveIntensity = highA;
 if (crossings > 0) { // Avoid dividing by zero
   wavePeriod = dT/crossings;
 }
 else { // Make it an obviously wrong value
   wavePeriod = -100;
 }
}
物联网连接
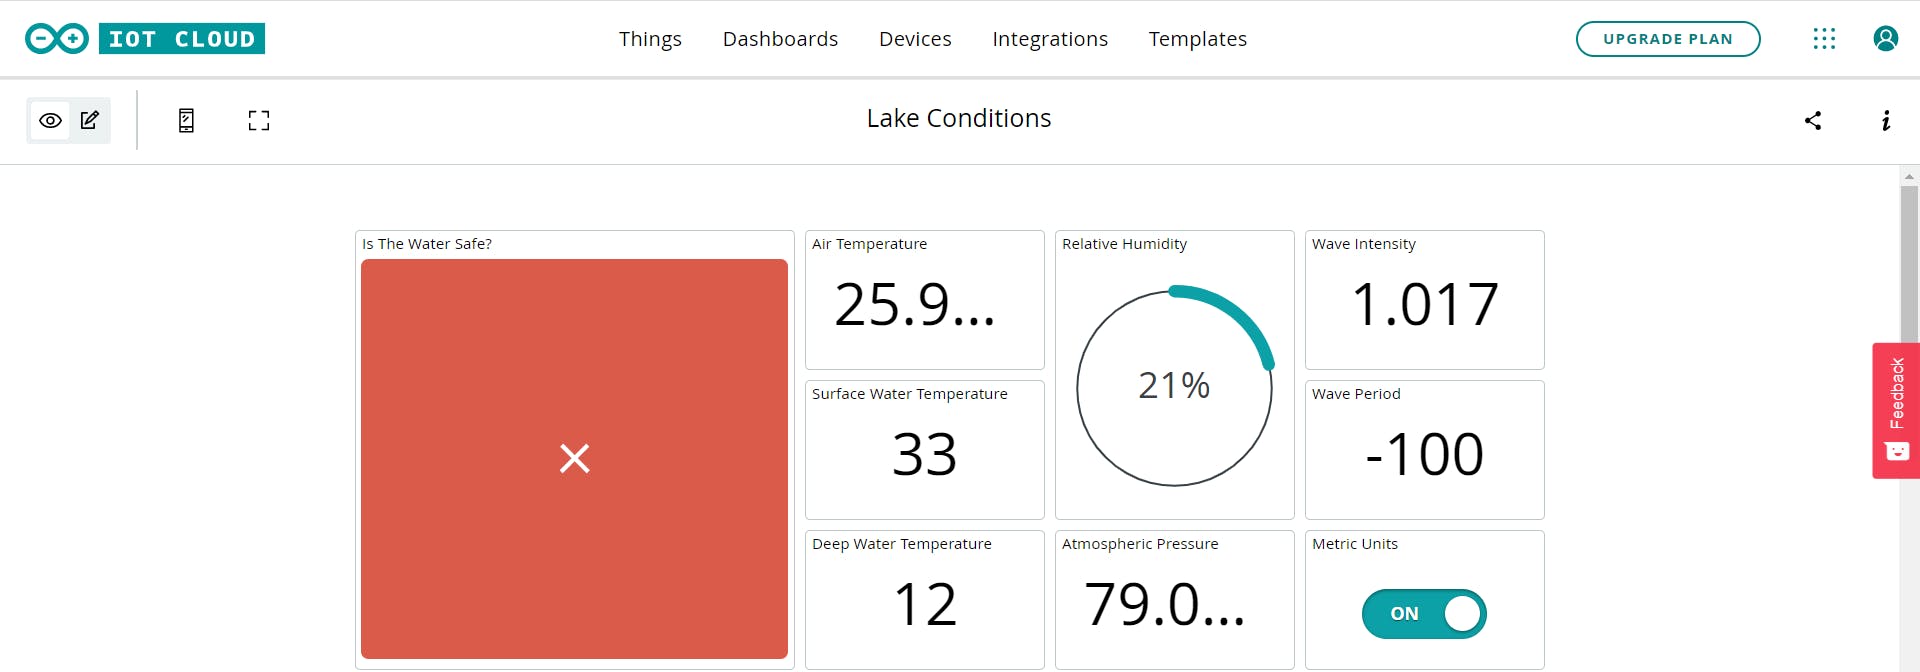
我定期编写的代码包含ArduinoCloud.update();此函数是 ArduinoIoTCloud 库的一部分,它会更新您在 IOT 云中设置项目期间定义的任何云连接变量。您可以在下面完整代码的开头看到我选择连接到云的变量。我设置了一个简单的仪表板来监控这些变量,如下所示。

我设置了一个名为 unitSelector 的云连接布尔(真/假)变量,它连接到仪表板右下角的开关。默认情况下,该变量设置为 true,当浮标通电或重置时,单位为公制。当代码读取传感器时检查选择器。
void readSensors() {
  // Humidity is the same in metric and imperial, so read it first
  airHumidity = carrier.Env.readHumidity();
  if (unitSelector) { // If reading metric units
    airTemp = carrier.Env.readTemperature();
    airPressure = carrier.Pressure.readPressure();
    deepWaterTemp = tempSensors.getTempCByIndex(deepwaterProbe);
    surfaceWaterTemp = tempSensors.getTempCByIndex(surfacewaterProbe);
  }
  else { // If reading imperial units
    airTemp = carrier.Env.readTemperature(FAHRENHEIT);
    airPressure = carrier.Pressure.readPressure(PSI);
    deepWaterTemp = tempSensors.getTempFByIndex(deepwaterProbe);
    surfaceWaterTemp = tempSensors.getTempFByIndex(surfacewaterProbe);
  }
  // Take the average water temperature
  avgWater = (deepWaterTemp + surfaceWaterTemp)/2;
}
unitSelector 还将安全水温重新定义为适当的单位(49C 或 120F)。
最后的想法
本教程到此结束。浮标可以安装在任何东西中,从带有热胶的特百惠到定制的 3D 打印外壳。我住的地方现在是冬天,所以我还没有机会制作外壳的原型。希望它很快就会变暖,可以让它彻底运行。
声明:本文内容及配图由入驻作者撰写或者入驻合作网站授权转载。文章观点仅代表作者本人,不代表电子发烧友网立场。文章及其配图仅供工程师学习之用,如有内容侵权或者其他违规问题,请联系本站处理。 举报投诉
- 相关下载
- 相关文章


